All posts by Kim

Slow Cooker Meatballs and Rice

Hi everyone! I have something a little different for you today. I know I normally bring you baked goods, but everyone needs quick and easy dinner recipes, and I have one for you today. This was one of my favorite meals growing up – a sort of sweet and sour meatball served over rice. It’s definitely not  your standard Italian or Swedish meatball recipe, but it is really delicious. And kids love them!

You start by making pretty basic beef meatballs. Then you cook them in the sauce – no browning ahead of time needed. The sauce is really simple – just four ingredients (plus water) that you probably have in your pantry.  Ketchup, mustard, flour, and sugar. Four simple ingredients, but together they are more than the sum of their parts.

My mom always cooked these in a casserole dish in the oven, but I converted it to a slow cooker recipe. She thinks her aunt, who gave her the recipe, often made them in a slow cooker as well. Use whichever method works best for you and your schedule.

Although I haven’t strayed too far from the original recipe, I feel confident you could use your favorite meatball recipe with this sauce. Just don’t cook the meatballs ahead of time. I would probably skip on highly flavored recipes like sausage-based ones, but I think this would be a great place to substitute ground turkey or chicken. Since the meatballs cook in the sauce, there is less chance they will end up dry.

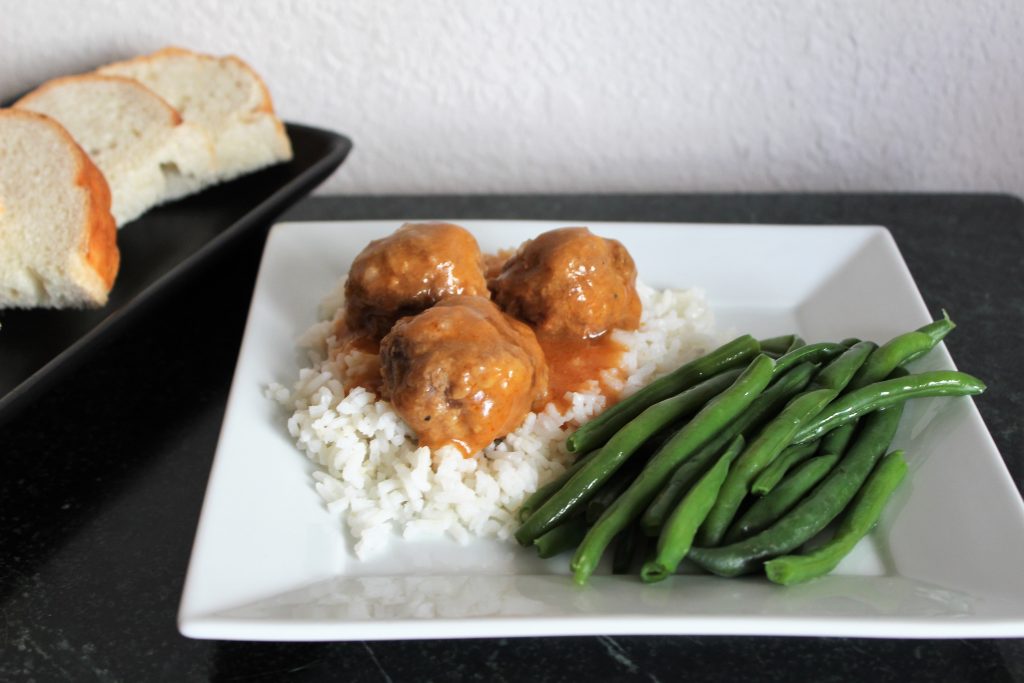
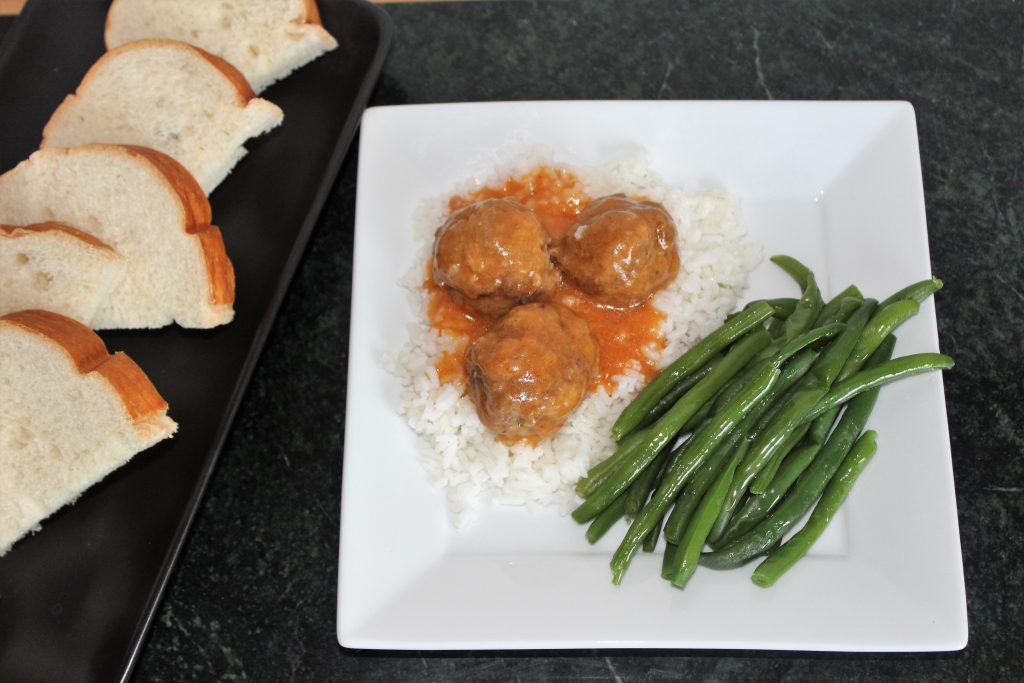
We always ate these meatballs over minute rice, but any type of rice or other starch would work well. You definitely want something to help soak up that sauce. Add in a vegetable, and you’ve got a quick, easy weeknight meal!

Print Recipe
Slow Cooker Meatballs and Rice
Course Main Dish
Servings
people
Ingredients
Meatballs
Sauce
Course Main Dish
Servings
people
Ingredients
Meatballs
Sauce
Instructions
  1. Combine all meatball ingredients until well mixed.
  2. Form into slightly-larger-than golf ball sized balls. I use a regular size ice cream scoop to keep them even. Place into slow cooker (or casserole dish).
  3. Combine all sauce ingredients and whisk until sugar is dissolved and flour in incorporated.
  4. Pour sauce over meatballs. Add water if needed to just cover meatballs.
  5. In slow cooker, cook on low for 6 to 8 hours or on high for 3 to 4 hours. In the oven, cook for about 1 hour at 350 degrees F.
  6. Serve over rice.
Recipe Notes
  • Recipe can be doubled (or tripled if you have a big enough pan.
  • Serve over the starch of your choice.
  • Feel free to experiment with other meat choices - turkey, chicken, etc.
Share this Recipe

Peanut Butter Crumb Topped Banana Bread

It’s almost time for school to start, and I have a great recipe for quick breakfasts or lunchbox treats. Peanut Butter Crumb Topped Banana Bread is a perfect mix of peanutty crumb topping and sweet banana bread.

I have been seeing so many variations on banana bread lately – crumb topped (cinnamon, graham cracker, cookie butter, and more), stuffed with cream cheese, filled with chocolate chips, or swirled with peanut butter. They all sound so good. But then I saw a recipe for peanut butter crumb-topped brownies, and I decided that the two had to meet.

Although I love walnuts or pecans in banana bread, I left them out this time. You could absolutely add them back in – or use chopped peanuts for an extra peanut bite. Chocolate chips, peanut butter chips, even butterscotch or caramel chips would be a welcome addition. You can also substitute the nut or seed butter of your choice in the crumb topping as well.

Did I mention this recipe makes two loaves? That’s right – one for right now (I ate half a loaf warm from the oven so be warned!), and one for the freezer for those hectic weekdays. I love eating a slice bread of this for breakfast, but it makes a great snack as well. Pack it in a lunchbox or serve a slice after school. This is going to become your favorite banana bread!

Print Recipe
Peanut Butter Crumb Topped Banana Bread
Servings
loaves
Ingredients
Peanut Butter Crumb Topping
Banana Bread
Servings
loaves
Ingredients
Peanut Butter Crumb Topping
Banana Bread
Instructions
Peanut Butter Crumb Topping
  1. Melt peanut butter and butter together.
  2. Stir in remaining ingredients and set aside.
Banana Bread
  1. Combine butter and slightly chopped, or broken, bananas in a microwave safe bowl or large saucepan. Heat over low heat, or 30 seconds at a time in the microwave. Stir and mash with a large spoon or potato masher until butter is melted and bananas are soft and mashed.
  2. Remove from heat. Stir in sugar and salt. Add eggs, milk, and vanilla and mix well.
  3. Stir in flour and baking powder just until combined.
  4. Gently stir in any mix-ins, if using.
  5. Divide evenly between two greased 9"x5" loaf pans.
  6. Divide peanut butter mixture in half, and crumble evenly over batter in pans.
  7. Bake at 350-degrees F for 40-45 minutes, or until toothpick inserted in the middle comes out clean
  8. Cool 10 minutes before turning out of pan onto cooling rack to cool completely.
  9. To freeze, wrap well in plastic wrap and foil, and place in a zip-top freezer. Freeze for up to a month.
Recipe Notes
  • Add chopped peanuts to up the peanut butter flavor.
  • Use pecans or walnuts for a more traditional banana bread.
  • Use any flavor chips - chocolate, peanut butter, butterscotch, caramel, etc.
  • Substitute any nut or seed butter for the peanut butter in the crumb topping.
Share this Recipe

Cookies and Coffee Cheesecake

A rich mocha cheesecake with Oreo crust and cookie dough throughout! It’s a spin on my favorite flavor of ice cream.

Do you have Turkey Hill ice cream where you live? If you do, have you tried their Double Dunker flavor? They describe it as “mocha ice cream swirled with cookie dough and crunchy chocolate cookie swirl”. I describe it as perfect. They only just recently started carrying it in stores here in Kansas City, so I was driving 2 hours to the nearest store to get it. Yes, really. It’s that good. If it’s in stores near you, go get some right now. It’s ok – I’ll wait.

For those of you who don’t have this flavor available near you, or who don’t want to run right out to the store, I turned it into a cheesecake! I started with an Oreo crust to mimic the cookie swirl. Then there are the cookie dough pieces embedded in the mocha cheesecake. Somehow they all work sooo good together.


Yes, there are a lot of steps in this. Yes, it is worth it. It’s probably not something you’ll make for a simple weeknight dessert, but it would be great for a party or other get together. It can easily serve 12, so there is plenty to go around. Plus, you can make it over several days so there is no last minute rush. 

I like to toast the flour in the cookie dough since I keep a bit to top it with that is completely uncooked. You don’t have to do this, but since there is a chance that raw flour can contain E. Coli, I usually do if I am serving it to guests. I cook the cheesecake at a low temperature, so there is no need for a water bath. And I don’t really like springform pans, so I use Alton Brown’s method and bake it in a regular cake pan. Yes, it does come out. Promise. You can use a springform if you prefer.

You say you don’t like coffee? Leave out the coffee for a straight chocolate cheesecake. Don’t want to make the cookie dough (or not a fan of raw dough), then use chopped chocolate chip cookies instead. And if you want a cookies and milk cake instead, use your favorite vanilla cheesecake batter with the Oreo crust and cookie dough pieces. However you make it, make this soon. And make sure to try the ice cream too!


Print Recipe
Cookies and Coffee Cheesecake
A rich mocha cheesecake with an Oreo crust and cookie dough pieces.
Servings
people
Ingredients
Crust
Servings
people
Ingredients
Crust
Instructions
Crust
  1. Place cookies in a food processor and pulse until it reaches fine crumbs.
  2. Add melted butter and pulse until combined.
  3. Line a 9"x2" cake pan with parchment paper on the bottom (with a round) and the sides (with a strip). Use baking spray below the parchment to keep it in place, and spray parchment with baking spray before adding crust. You may also use a 9" springform pan. Use only a parchment round on the bottom and spray with baking spray.
  4. Press crumbs onto the bottom and 1" up the sides of the pan.
  5. Bake at 300 degrees F for 10 minutes. Cool.
Filling
  1. Combine chocolate chips, cream, and instant coffee granules in a microwave safe bowl and microwave for 40 seconds, stirring halfway through. If chips are not fully melted, microwave additional 10 seconds. Set aside.
  2. Beat cream cheese and sugar with a mixer until smooth.
  3. Add cocoa powder and beat until combined.
  4. Add eggs, one at a time, beating well after each addition.
  5. Add the vanilla and reserved chocolate-coffee mixture and mix until combined.
  6. Pour mixture into cooled crust.
  7. Remove cookie dough from refrigerator or freezer and slice into 1/2-inch pieces. Press pieces into cheesecake filling, distributing evenly and making sure all cookie dough is covered by the cheesecake batter.
  8. Bake cheesecake at 250-degrees F (no water bath needed!), for 1 hour 15 minutes to 1 hour 30 minutes. Cheesecake is done when the center 4 inches is still slightly wobbly. The chocolate will ensure it sets completely once cooled.
  9. Cool cheesecake until near room temperature and then refrigerate at least 8 hours or overnight,
  10. To remove from cake pan, fill sink with about 1/2-inch of very hot tap water. Set pan into water for 1 minute. The strip of parchment around edge of pan should slide out. Slide a knife around the edge after removing paper to assure everything is released from the sides. Place a piece of parchment paper on top of the cheesecake, and turn it over onto a large plate or extra serving platter. Cheesecake should release from the bottom and fall onto the plate. If it does not, return to hot water for additional 30 seconds. Remove parchment from bottom of cheesecake and invert onto final serving platter.
Recipe Notes
  • You can omit the coffee if you prefer a regular chocolate flavor.
  • Use store-bought or homemade chocolate chip cookies instead of the cookie dough.
  • For a cookies and milk cake, use your favorite vanilla cheesecake batter with the Oreo crust and cookie dough filling.
Share this Recipe
 

Black and White Banana Cupcakes

I have the perfect Fourth of July recipe for you today! It’s a delicious banana cupcake dipped in chocolate and vanilla fudge frostings. It’s a great dessert to bring to a cookout for several reasons. First, the recipe makes 24 cupcakes, so there’s plenty to go around. Second, the frostings set up firm so they’re easy to transport and they won’t melt easily in the heat if you’ve got them sitting outside. And finally, well, they’re just plain delicious!

These cupcakes are one of my favorites. Well, let me clarify. The cupcakes are delicious. The frostings are out of this world, and probably the reason I like the cupcakes so much. I am a chocolate person through and through. I never choose vanilla if chocolate is an option. Except with this frosting. This vanilla frosting is almost like a vanilla fudge. It is so good, it will almost make you forget there is chocolate available too. Almost. So, I could never choose between a vanilla frosted and chocolate frosted one. Until now. I figured if New York could frost their cookies with both vanilla and chocolate, well, I could do it to my cupcakes. Yep, it’s a good idea.

Let’s start by talking about the cupcakes. Really, these aren’t much different than banana bread. They’re a little bit lighter in texture, which is perfect for a summer cupcake. The banana flavor is there but not overwhelming, and the bananas help to keep the cupcakes moist. Nuts are completely optional, but I do enjoy walnuts or pecans in these. I think hazelnuts or macadamias would also be great. Or, if you prefer to throw in some mini chocolate chips, I won’t stop you. They’re your cupcakes – do what sounds good to you!

Now, the frostings. Yes, plural. But I promise they aren’t difficult. Both are rich and fudgy, and they both go so well with the banana cupcake. To frost them, if you only want one flavor on the cupcake, you can just dip the tops into the warm frosting. To get the half and half look, I found it easier to use a spoon or spatula to spread partially cooled frosting on half a cupcake and then repeat on the other half with the other flavor. If you want sprinkles (and who doesn’t want sprinkles?), you need to be fast with them. This frosting sets fairly quickly, so I wouldn’t frost more than one or two cupcakes before topping with sprinkles. It’s a great task for any little helpers you have!

Each frosting recipe makes enough to fully frost 12 cupcakes, so one recipe of each flavor will cover 24, either 12 of each or half and half on 24. Of course, if you don’t need to transport these or want to change them up, you can absolutely use a standard buttercream. Chocolate, vanilla…..peanut butter, anyone? And you could replace the sprinkles with chopped nuts, mini chocolate chips, or chopped candies. 

These cupcakes are sure to become a favorite. Bake up a batch for your next picnic or bake sale. And if you have leftovers, well, they’re basically banana bread…so I say eat them for breakfast!

Print Recipe
Black and White Banana Cupcakes
A light banana cupcake with chocolate and vanilla fudge frostings.
Course Dessert
Servings
cupcakes
Ingredients
Cupcakes
Chocolate Frosting
Vanilla Frosting
Course Dessert
Servings
cupcakes
Ingredients
Cupcakes
Chocolate Frosting
Vanilla Frosting
Instructions
Cupcakes
  1. Cream butter and sugar. Add eggs and vanilla and mix well,
  2. Stir in mashed bananas.
  3. Combine dry ingredients, except nuts. in a separate bowl.
  4. Add half of dry ingredients to banana mixture, mix, and add sour milk. Mix well and add remainder of dry ingredients.
  5. Stir in nuts if using.
  6. Line 24 muffin cups with paper liners and fill about 2/3 full.
  7. Bake at 350 degrees F for 20-25 minutes until golden brown and the centers spring back when touched.
  8. Remove cupcakes to wire racks to cool.
Chocolate Frosting
  1. Combine chocolate, butter, and milk in the top of a double boiler and heat until melted.
  2. Turn off heat, but leave the double boiler together. Stir in powdered sugar. Frosting should be thick but pourable.
Vanilla Frosting
  1. Combine butter, milk, and salt in the top of a double boiler and heat until melted.
  2. Turn off heat but leave double boiler together. Stir in vanilla extract and powdered sugar. Frosting should be thick but pourable.
Assembly
  1. While frosting is still pourable, dip the tops of the cupcakes and allow to set on wire racks.
  2. To create half and half cupcakes, let frosting cool slightly and spread cupcakes half with vanilla and half with chocolate frosting.
  3. Frosting sets quickly, so add sprinkles after every one or two cupcakes are frosted.
  4. If frosting begins to cool and set in the bowl, you can reheat gently in the double boiler.
Recipe Notes

Make these your own:

  • Choose your favorite nut to add.
  • Leave out the nuts entirely.
  • Substitute mini chocolate chips instead of nuts.
  • Not in love with chocolate? Double the batch of vanilla frosting and use only that.
  • Family of chocoholics? Double the chocolate frosting and use only that.
  • Instead of sprinkles, use nuts, mini chips, or chopped candies.
  • You can use any flavor of buttercream on these as well - chocolate, vanilla, and peanut butter would be great!
Share this Recipe

Ice Cream Slab Pie

Who’s ready for ice cream? Or better yet, ice cream slab pie! This one has a rice crispy crust, peanut butter fudge sauce, and homemade no-churn ice cream with chocolate chips and peanut butter cups. It’s a twist on a favorite dessert my mom used to make in the summertime.

It sounds like a lot of components, but each of them are so easy. And there are so many options – not only to change up the flavors, but you can easily swap in store-bought parts too. You can make this as homemade or store-bought as you’d like.

Let’s start with the base. My recipe begins with a simple rice crispy base. But you could just as easily bake up a batch of brownies, or use a roll of cookie dough pressed into a pan and baked. Even a graham cracker crust would work.

The sauce starts with a homemade hot fudge that is combined with peanut butter. You could leave out the peanut butter and extra corn syrup (just use the whole batch of hot fudge instead). Or start with a bottled hot fudge sauce. You can also mix up the flavors. Use a caramel or butterscotch sauce instead. Or use a different nut butter, Nutella, or even cookie butter!

The ice cream is a very simple no churn ice cream. I love the no-churn recipe, and it’s endlessly adaptable. Choose the candy mix-ins that you prefer, or use crushed cookies (like Oreo’s!). You could also use a store-bought ice cream in whatever flavor you prefer. Just soften it slightly before you scoop it into the crust.

There are so many variations you can make to this recipe. I hope you give it a try, and let me know what flavors you choose!


Print Recipe
Ice Cream Slab Pie
Course Dessert
Servings
Ingredients
Base
Hot Fudge Sauce
Ice Cream
Course Dessert
Servings
Ingredients
Base
Hot Fudge Sauce
Ice Cream
Instructions
Base
  1. Combine first three ingredients in a large saucepan and bring to a boil over medium heat.
  2. Remove from heat and stir in cereal until completely coated.
  3. Press evenly into a greased 13"x9" baking pan. Line with parchment or waxed paper if preferred for easier serving.
Sauce
  1. Melt chocolate in a small saucepan over low heat.
  2. Once melted, add evaporated milk, sugar, cocoa powder, 1/4 cup corn syrup, salt, and vanilla. Cook over medium-low heat until thickened, about 5 to 8 minutes. The mixture should not quite come to a simmer.
  3. Remove 2/3 cup hot fudge sauce and combine with peanut butter and remaining corn syrup. Save remaining hot fudge sauce for another use (store air tight in refrigerator).
  4. Spread half of peanut butter fudge sauce onto the base and place in freezer.
Ice Cream
  1. Whip cream until soft peaks form.
  2. Gently fold in sweetened condensed milk and vanilla until combined.
  3. Chop 12 of the peanut butter cups and fold into ice cream mixture with all but 2 tablespoons of the chocolate chips.
  4. Spread ice cream mixture onto prepared base and sprinkle with remaining chips and the other 6 peanut butter cups, chopped.
  5. Freeze for at least 6 hours or overnight.
  6. Serve with warmed remaining peanut butter fudge sauce drizzled over each serving.
  7. Store leftovers in the freezer, and extra sauce in the refrigerator.
Recipe Notes
  • Use any crust you'd like - brownies, baked cookie dough, graham cracker crust.  Mix it up with different flavors!
  • Use 2/3 cup bottled hot fudge sauce if desired. Or double the amount and leave out the peanut butter.
  • Use any flavor sauce you'd like - try butterscotch or caramel!
  • Substitute any nut butter, or even Nutella. Cookie butter would be delicious too.
  • Use any mix-ins you prefer - try different candies, or crushed cookies. Your imagination is the limit! Use 1 to 2 cups total.
  • You can also use softened, store bought ice cream in any flavor to fill the crust (6 cups/ 48 oz tub).
Share this Recipe

Ginger-Lime Thumbprint Cookies

The first time I made a cookie similar to this was while I was on a project and living in a hotel room. I was baking for the crew almost every weekend, but since I was in a hotel and cooking in a toaster oven with only a few tools, I tried to use shortcuts where I could. I was looking for ways to easily dress up a cookie mix when I stumbled upon a recipe for ginger-lime sugar cookies and decided that could work. I just mixed up the mix and added lime zest and fresh ginger. I stirred in some white chocolate chips and baked them up. Everyone went crazy for them!

I fell in love with the ginger-lime combination at that point, and I have made similar cookies many times since. I wanted to dress them up a little for you, though, so I turned them into thumbprint cookies!  These are soft, chewy cookies that actually stay soft and chewy for up to a week. For the filling, I use vanilla almond bark because I prefer it over actual white chocolate. You can use whichever you prefer or have on hand. These have a tropical vibe to them, so I think a sprinkle of toasted coconut or toasted macadamia nuts would be perfect. You could either sprinkle some on top of the ganache before it sets, or go all out and roll the cookie dough in them before baking!


Print Recipe
Ginger-Lime Thumbprint Cookies
Servings
dozen
Ingredients
Servings
dozen
Ingredients
Instructions
  1. Melt butter.
  2. While still warm, add cubed cream cheese, sugar, and oil. Whisk until combined and cream cheese is mostly melted.
  3. Add lime, ginger, and egg and mix well.
  4. Stir in flour, baking soda, baking powder, and salt until a smooth dough is formed.
  5. Refrigerate dough for at least 30 minutes or up to several hours.
  6. Scoop dough, using a 1 1/2 tablespoon scoop, onto a parchment or silicone lined cookie sheet.
  7. Bake at 350 degrees F for 8 to 10 minutes, or until lightly golden brown around the edges.
  8. As soon as the cookies come out of the oven, press an indentation in the middle with a small (1/2 teaspoon) measuring spoon.
  9. Cool 5 minutes, then move to a cooling rack to cool completely.
  10. Once cookies are baked, make the ganache by combining almond bark with heavy cream in a microwave safe bowl.
  11. Microwave 30 seconds at a time, stirring after each. Continue until chocolate is completely melted and mixture is smooth.
  12. Spoon, or pipe with a piping or plastic bag, the ganache into the indents in the cookies. Let set until firm, about 1 hour.
  13. Sprinkle with additional lime zest if desired.
Recipe Notes
  • Sprinkle with toasted coconut or toasted, chopped macadamia nuts before the ganache sets.
  • Roll the cookie dough in coconut or chopped macadamia nuts before baking.
Share this Recipe

Pecan Sticky Buns

Do you have breakfast plans this weekend? Or are you looking for something sweet to add to your Easter brunch next weekend? If so, you’re in luck, because I have the recipe for the best-ever sticky buns.

These are one of my favorite breakfast treats. My mom made them on occasion when I was a kid, and I was always excited when they made an appearance on the breakfast menu.  I’ve tried a number of other sticky buns since then, and I have yet to find any that are as good as these. They are full of caramel and pecans, with a hint of cinnamon. And they are perfectly gooey and sticky.

Sticky buns may seem intimidating, but they are really pretty simple to make. If you can make a cinnamon roll, you can definitely make these. It starts with a rich yeast dough which is filled with chopped pecans, butter, brown sugar, and a little cinnamon. The topping is just brown sugar, butter, corn syrup, a little more cinnamon, and a ton of pecans.

As always, you can leave the pecans out of both the topping and the filling, or substitute another nut of your choice. Most of the sticky bun recipes I see do not include cinnamon, especially in the topping. I really like it in there, but you can definitely leave it out as well. And you could put whatever you like in the filling – add a handful of raisins or other dried fruit if you’re so inclined, or even some mini chocolate chips if you want to really take it over the top.


These are so good, and you probably have everything you need already in your pantry. Make these this weekend or for Easter brunch (or both!). I promise you will love them!

Print Recipe
Pecan Sticky Buns
Servings
Ingredients
Rolls
Topping
Filling
Servings
Ingredients
Rolls
Topping
Filling
Instructions
Dough
  1. Dissolve the yeast in the warm water.
  2. Scald the milk (bring it just to a simmer) and add the butter. Let cool to warm room temperature while the butter softens and partially melts.
  3. Transfer milk mixture and yeast to stand mixer. Add sugar and eggs and mix well with the paddle attachment. (You can also do this by hand with a large spoon).
  4. Add salt and 4 cups flour and mix well with the dough hook attachment (or a spoon).
  5. Continue to knead dough, adding up to 1/2 cup additional flour, until dough is only slightly sticky, about 5 minutes with the mixer.
  6. Place in a greased bowl, cover, and let rise until doubled, about 1 hour.
Topping
  1. Combine all ingredients except pecans in a medium saucepan and bring to a boil over medium heat.
  2. Boil for 1 minute.
  3. Pour into a greased 9"x13" baking pan and sprinkle with pecan halves. Set aside.
Filling and Assembly
  1. Combine brown sugar, cinnamon, and pecans in a small bowl.
  2. Roll dough, once doubled, into a 12"x 22" rectangle.
  3. Brush with melted butter and sprinkle with filling.
  4. Roll up, jelly-roll style, starting on the short end. (You should end up with a roll 12" long.)
  5. Cut into 1" slices and place, cut side up, onto topping in prepared pan.
  6. Cover and let rise again until doubled. See note to prepare the night before and bake in the morning.
  7. Bake at 350-degrees F for 15-20 minutes or until golden brown.
  8. Remove from oven and cool for 10 minutes (no longer!) for the topping to harden slightly.
  9. Invert onto serving platter, scraping any pecans and topping left in the pan onto the top of the rolls.
  10. Enjoy warm! Rolls will keep up to 3 days covered at room temperature, but do yourself a favor and microwave them for a few seconds to rewarm before eating. 🙂
Recipe Notes

Note: To make these the night before, follow instructions until the second rise (in the pan). When rolls are not quite doubled in size, cover with plastic wrap and refrigerate. The next morning, remove from refrigerator and preheat oven. Once oven is preheated, bake rolls for 25-30 minutes, or until golden brown.

  • Substitute pecans for your favorite nut, or leave out completely.
  • Leave out cinnamon in the topping and/or filling if you prefer. If leaving the cinnamon out of the topping, consider adding a pinch to 1/4 teaspoon of salt for that salted caramel flavor.
  • Add fillings of your choice - raisins, dried fruit, mini chocolate chips, etc.
Share this Recipe

Lemon Puff Balls

Today I’m bringing you a recipe that is a twist on a childhood favorite of mine – chocolate puff balls. I’ll share that recipe with you soon, but since I just posted a chocolate recipe , I decided to mix things up a bit.

Are you still dealing with winter where you are? Spring seems to have sprung here, much to my dismay. I definitely miss the cold, snowy winters of Cleveland. The spring weather here is finally convincing me to bake things a little less heavy and rich. I have tossed around the idea of lemon puff balls for some time, and this weekend I finally tackled them.

So what is a puffball? It’s nothing mysterious, really. Just a steamed cake, usually served with a warm sauce instead of frosting. The original recipe is a chocolate cake with a vanilla butter sauce. This time, I’ve made a lemon cake with a lemon sauce. I added a drizzle of raspberry sauce as well, but that’s completely optional.

You really could do this with any variety of citrus. And feel free to use a sauce of your choice, or just a dusting a powdered sugar and a dollop of whipped cream. Chocolate sauce would be great on an orange cake. Or you could just use extra milk in place of the lemon juice (and remove the baking soda) for a vanilla cake and top with citrus sauce or hot fudge.

This is a great recipe for beginner bakers. It is a simple, one-bowl cake recipe that doesn’t require an electric mixer.  However, you do need some ramekins or Pyrex bowls and a steamer. I use four 10-oz Pyrex bowls, but you can use up to six bowls or ramekins, as small as a 5-oz size. Just make sure they are heat-safe. I have large pasta pot with a steamer insert that I use, but you can use any steamer you have, or make your own with a large soup or stock pot.

The cake is fairly light, in both flavor and texture. Which is why I highly recommend adding the sauce to it. The sauce soaks up into the cake to make it extra moist and flavorful. If you’ve never had a puff ball cake before, you definitely need to give these a try. 


Print Recipe
Lemon Puff Balls
Servings
Ingredients
Puff Balls
Lemon Sauce
Servings
Ingredients
Puff Balls
Lemon Sauce
Instructions
Puff Balls
  1. Combine all ingredients in a medium bowl and wisk until combined.
  2. Pour into 4 to 6 greased ramekins or Pyrex bowls (5 to 10 oz each).
  3. Steam cakes in a steamer for 20-30 minutes or until a toothpick inserted in the middle comes out clean.
Lemon Sauce
  1. Combine sugar, cornstarch, and water in a small saucepan and cook over medium heat until thickened and clear.
  2. Add remaining ingredients and stir until butter is melted.
  3. Serve warm over puff balls.
Recipe Notes

A drizzle of raspberry sauce adds a nice pop to the lemon cake.

Use any citrus you'd like for both the cake and the sauce. Or omit the citrus sauce and top with warm hot fudge sauce on an orange puff ball.

You can also top with whipped cream or ice cream.

Share this Recipe

Mud Pie for Grandpa

I am a long-time collector of recipes. Cookbooks, magazines, recipe cards – I love them all. For years I copied or clipped recipes from all of the above, and I keep them in a set of binders. More recipes than I’ll ever get around to making. As I was looking through those binders looking for inspiration, I came across an old recipe for Mud Pie. It came out of a children’s cookbook, Alpha Bakery by Gold Medal Flour.

Sometime in roughly the mid-90’s, I made this recipe for a family dinner. I don’t remember the exact occasion, but my grandparents, and maybe others, had come to dinner. Anyway, I made the mud pie and we all thought it was delicious. Several months or maybe even a year later, my grandfather asked about the dessert. He wanted me to make it again. He described it as a brownie or cake with whipped cream on it. Well, neither my mom nor I, or anyone else, could remember such a recipe. (I know – that really makes you want to try a recipe we couldn’t remember a relatively short time later.) He continued to talk about it on occasion, and how much he liked it. But we just could not figure out what that recipe was.

My grandpa passed away in 2006, and I still hadn’t figured out what dessert he was remembering. Fast forward several years, when my parents were moving into their current house and I was helping them to pack up. I was looking through all of my mom’s cookbooks while packing them when I came across the Alpha Bakery cookbook. I flipped through it to see if there were any recipes worth saving, and as soon as I saw the Mud Pie recipe I knew that was recipe Grandpa kept asking about. I copied it then and put it into my binder, to be forgotten again until this past weekend. Since his 95th birthday would have been later this week, I knew it was time to make it again.

The base is a rich brownie with chopped nuts. I used slivered almonds because I had some on hand. But you can of course use the nuts of your choice, or leave them out. Replace them with chocolate chips (any flavor) if you’d like. You top the brownie with hot fudge sauce. I used a homemade sauce, but you can definitely use a jarred sauce – fudge sauce, not chocolate syrup. I also think this would be delicious with a caramel sauce instead. Then top it all with whipped cream. I used a stabilized whipped cream, since I knew we wouldn’t eat it all at once. You could use regular whipped cream if you have enough people to serve that there won’t be leftovers. Or Cool Whip works too. But if you are making your own whipped cream, consider playing around with the flavors. Personally, I think a little almond extract in it would be perfect. But strawberry or cherry extract and a little red or pink food coloring would be delicious. Or peppermint extract and green food color for a grasshopper type of pie. The possibilities are endless.

Happy Birthday Grandpa!

Print Recipe
Mud Pie
A dense, fudgy brownie topped with hot fudge sauce and whipped cream. Lightly adapted from Gold Medal Flour's Alpha Bakery
Course Dessert
Servings
Ingredients
Brownie Base
Whipped Cream
Course Dessert
Servings
Ingredients
Brownie Base
Whipped Cream
Instructions
Brownie Base
  1. Heat oven to 325 degrees F and grease an 8-inch cake pan or pie plate.
  2. Mix butter, sugar, eggs, vanilla, and salt in a medium bowl.
  3. Stir in flour, cocoa powder, and nuts.
  4. Pour into prepared pan and bake for 25-35 minutes or until a toothpick inserted halfway between the center and the edge comes out clean. Time will depend partly on the size of your pan.
  5. As soon as the brownie comes out of the oven, poke it all over with a skewer or fork. Spread the fudge sauce over the brownie and let cool completely.
Whipped Cream
  1. For stabilized whipped cream, combine gelatin and water in a small saucepan and let sit until thick.
  2. Melt gelatin over low heat, stirring constantly. Once melted, remove from heat and cool slightly.
  3. While gelatin cools, whip cream and powdered sugar until soft peaks form. Add vanilla. (At this point, for regular whipped cream, whip a little longer until stiff peaks and use immediately.)
  4. Beating slowly, gradually add the cooled gelatin mixture to the whipped cream. It will start to look a little curdled, but beat at low to medium speed just until combine and peaks are stiff.
  5. Spread or pipe onto cooled brownie base.
  6. Serve with shaved chocolate or additional hot fudge sauce.
  7. Store in refrigerator.
Recipe Notes
  • Use any nuts you like, or substitute with any flavor of chocolate chips.
  • Jarred or homemade hot fudge sauce works great. Experiment with flavors. Try caramel sauce, or chocolate-mint fudge sauce instead.
  • Use Cool Whip in place of whipped cream.
  • Or flavor your whipped cream with any extract you like. Enhance with food color if desired. Think mint, strawberry, etc.
Share this Recipe

Pumpkin Spice Ghost Munch Caramel Corn

Hi guys! Are you over the pumpkin spice craze yet, or do you have room for more? I hope you’re still into it, but if not, it’s super easy to leave it out of this recipe. In fact, this is super customizable. You can really make it for any holiday or special occasion. But more on that in a minute.

Do you all know what Moose Munch is? It’s a caramel corn by Harry and David that is typically coated in chocolate. It is delicious. This is my take on it, all dressed up for Halloween. And it’s super easy, even with homemade caramel corn. Yes, I said homemade. I promise it’s not hard to make, and you probably have all of the ingredients you need in your pantry right now. Yes, you need a candy thermometer, but they aren’t expensive and it is sooooo worth it.

I love this caramel corn. My mom has been making it for as long as I can remember. She always adds salted peanuts, which I think add the perfect salty component. You can, of course, use whatever nuts you like. But make sure they are salted and roasted. If you don’t use salted nuts, give the caramel corn a heavy sprinkle of sea salt before baking. You’ll thank me later. You can certainly stop once the caramel corn is made, and you would have an absolutely delicous snack. But if you want something special for a holiday or party, or just because, go ahead and add some chocolate. I used chocolate almond bark and pumpkin spice chips, but you can use any chocolate that sounds good to you. Chocolate chips, white chocolate, almond bark, peanut butter chips. Like I said, anything you want.

Candy melts also work well, so it’s super simple to customize the colors. Go for red and green at Christmas. Or red, white, and blue for the Fourth of July. How about some pretty pastels for Easter? Or use your teams colors for a fun tailgating snack. And the sprinkles are optional, but there are so many fun varieties out there, you are sure to find some that will work for whatever event you’re making this for. Put out a big bowl for everyone to much on and it will be gone in no time. Or divide it into individual bags with matching ribbons or tags for a fun party favor. However you decide to customize this, you should definitely give it a try!


Print Recipe
Pumpkin Spice Ghost Munch Caramel Corn
Homemade caramel corn coated in chocolate.
Servings
Ingredients
Servings
Ingredients
Instructions
  1. Pop popcorn. You can do this in an air popper, a stir popper, in a pan on the stove, or even in the microwave. You can use a small amount of butter or oil, but you don't wanted seasoned or salted popcorn. You will need 10 cups of popped popcorn.
  2. Combine butter, brown sugar, and corn syrup in a medium to large saucepan and cook over medium to medium-high heat.
  3. Cook and stir until butter is melted and mixture begins to boil. Insert candy thermometer and continue to cook for about 5 minutes, without stirring, until mixture reaches 248 degrees, or firm ball stage.
  4. Remove from heat and carefully stir in the baking soda. The mixture will foam up, which is why you want a larger saucepan than you think you need.
  5. While caramel is cooking, combine popcorn and nuts (if using) in a large greased baking pan. I'm talking about a sheet pan, preferably with 2-inch sides. If you don't have a pan this big, the bottom part of a large broiler pan may work. Or divide evenly between two 13x9-inch cake pans.
  6. Pour caramel mixture (after baking soda has been added) over the popcorn and nuts. Stir well to coat all pieces. If you do not want to use nuts, sprinkle the coated popcorn with 1/4 to 1/2 teaspoon sea salt.
  7. Move to a 250-degree F oven and cook for 45-60 minutes, stirring every 15 minutes. The caramel corn is done when no "loose" caramel is pooling in the bottom of the pan. Everything should be coated onto the popcorn and it shouldn't be too sticky. It will firm up the rest of the way once cooled.
  8. Once caramel corn is cool, melt the chocolate in a large bowl. Toss with 6 cups of the caramel corn until completely coated. Spread onto parchment- or waxed paper-lined baking sheet and let harden. I placed mine in the fridge for a few minutes to help it set.
  9. If using more than one type of chocolate, like I did, melt each type separately. I used 1/2 cup each of pumpkin spice chips and chopped chocolate almond bark. I mixed each type with 3 cups of the caramel corn.
  10. If you want to add sprinkles, add them to the chocolate-coated popcorn before it sets,
  11. Combine coated caramel corn with uncoated and mix well to distribute. Store in an airtight container for up to a week.
Recipe Notes
  • You can use any type of chocolate or chips that you want. Dark, milk, white, peanut butter. Colored candy melts also work great and make it easy to customize for any holiday or event.
  • Try red and green for Christmas; red, white, and blue for Fourth of July; team colors for tailgating; school colors for graduation.
Share this Recipe