Archives

Lemon Meringue Ice Cream Cake

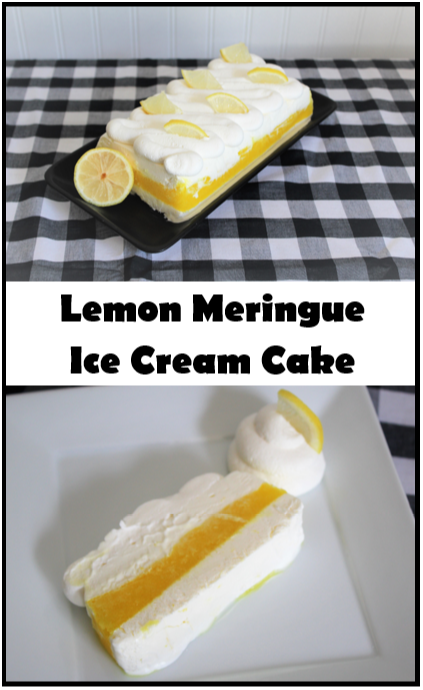
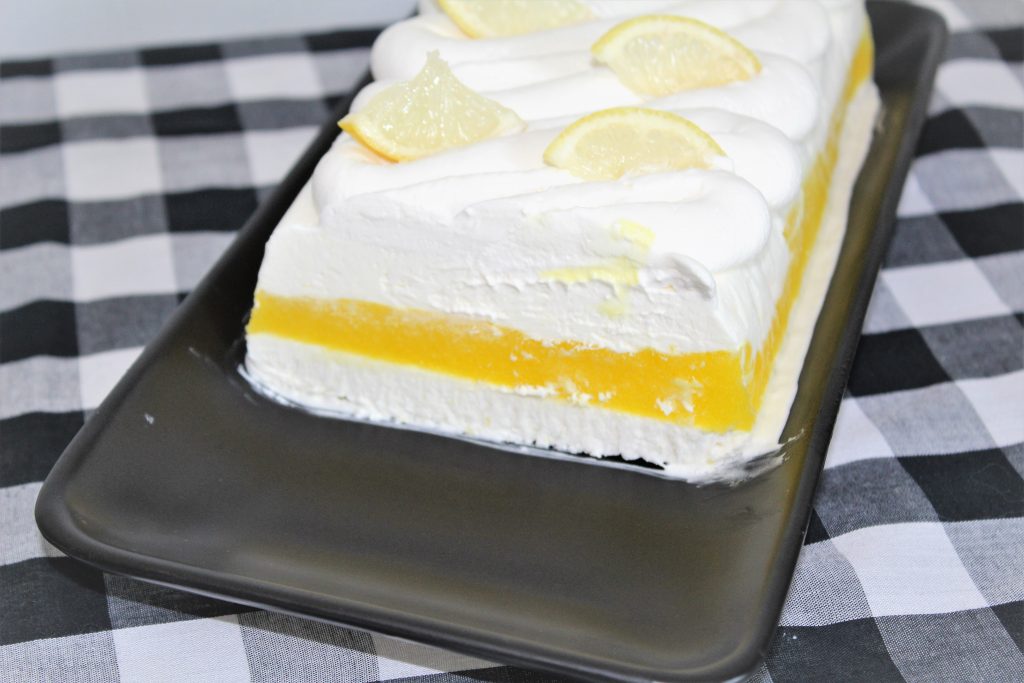
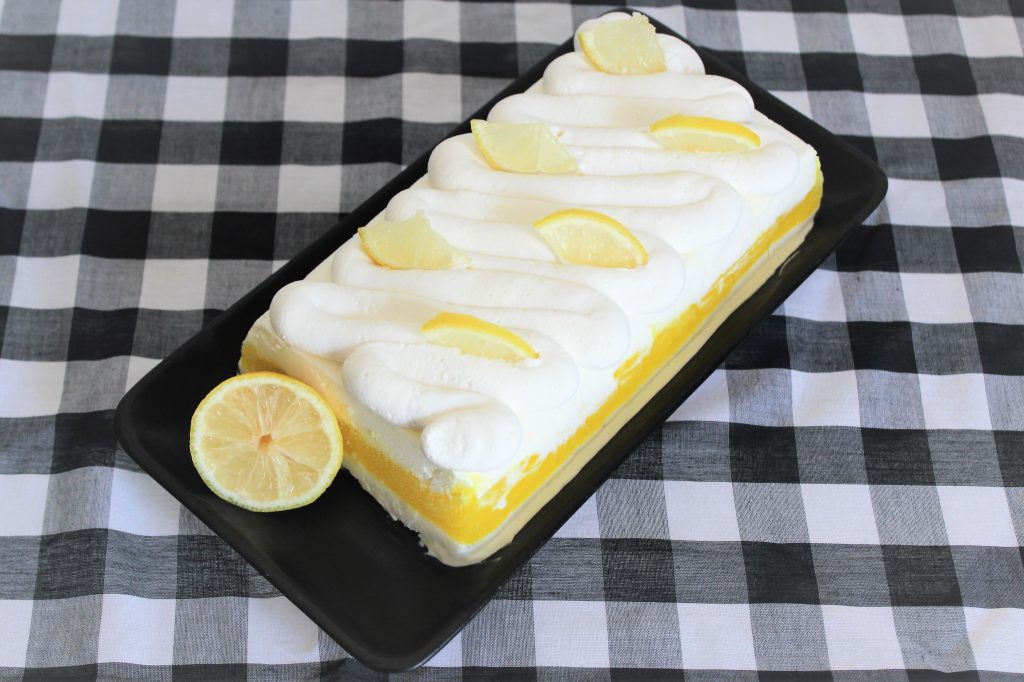
With all of the hot weather we’re currently having, I’ve been craving ice cream and bright citrus flavors. And this Lemon Meringue Ice Cream Cake perfectly fits the bill! It’s a tart lemon sorbet surrounded by layers of creamy lemon ice cream, all topped with whipped cream. And the best part is that it’s all no-churn so anyone can make it!

I know layered desserts can look intimidating, but I assure you, this recipe couldn’t be any easier. Yes, it takes a little time since you have to chill each layer, but most of that time is hand’s off.

The middle layer is a no-churn lemon sorbet. It’s so simple and uses only a handful of basic ingredients. Please, please, please use fresh lemons. Not only so you can add the peel, which adds a ton of flavor without the tartness, but because bottled lemon juice is just not the same. I made my sorbet very tart, since I love strong citrus flavor, but you can increase the sugar to 3/4 cup if you prefer your lemon desserts to be a little sweeter. Just heat the water, sugar, salt, and peel until the sugar is dissolved. Add the lemon juice, cool, and strain. Add in a tablespoon of vodka if you’d like, which is just a little extra insurance to keep it from freezing quite so firm. If you don’t have it or don’t want to use it, it will still be great. I also added a few drops of food coloring just because I wanted a bright yellow color. Then freeze until mostly solid. Blitz it up in a food processor or blender, and freeze again until solid. Easy!

The lemon ice cream is even easier, if that’s possible. It’s a basic no-churn ice cream (heavy cream and sweetened condensed milk) with the addition of lemon juice and zest. Stir together the lemon juice, lemon zest, and sweetened condensed milk. Whip the cream, and fold in the sweetened condensed milk mixture and you have an ice cream base ready to freeze. This recipe makes a half batch of ice cream, which means you have half a can of sweetened condensed milk left. You can double the recipe to use a full can and freeze half of the ice cream in its own container if you prefer.

I topped mine with homemade sweetened whipped cream (heavy cream and powdered sugar), but you could also use Cool Whip. Or for a true lemon meringue pie feel, go ahead and top it with meringue (and torch it if you like!). Yes, you can freeze leftovers with meringue or whipped cream on top.

And don’t confine yourself to lemon. You can substitute any citrus in equal parts for the lemon. I personally love lime and can’t wait to try a lime version. Grapefruit or orange would be super refreshing. Or try mixing flavors! How about lime sorbet with lemon ice cream? Or orange sorbet with vanilla ice cream (just leave out the citrus and add vanilla extract to the ice cream base). I’m sure blood oranges would make a stunning dessert when they are in season as well.

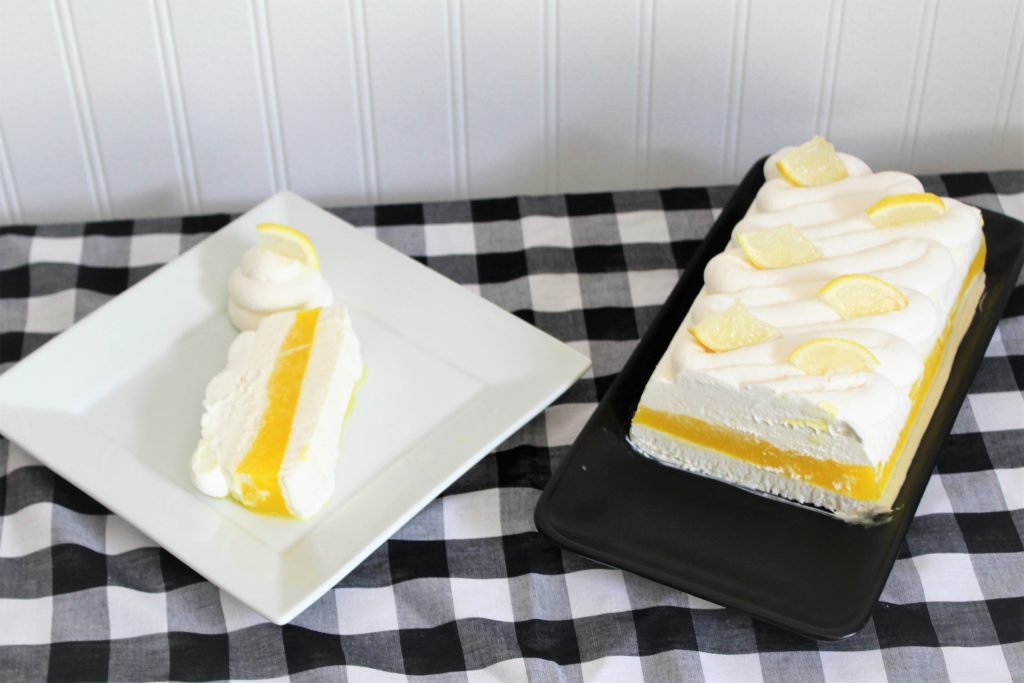
Don’t let the layers intimidate you. It may look fancy, but truly anyone can make it. It uses basic pantry ingredients and no fancy equipment. Give this one a try, you are sure to impress guests with this one!

Print Recipe
Lemon Meringue Ice Cream Cake
Servings
slices
Ingredients
Sorbet
Ice Cream
Servings
slices
Ingredients
Sorbet
Ice Cream
Instructions
  1. Combine water, sugar, and salt in a small saucepan. Use a vegetable peeler to remove large strips of peel from the lemons, leaving the white pith on the lemon. Add peel to the saucepan and heat over medium heat until just beginning to bubble and sugar is completely dissolved.
  2. Remove from heat, add lemon juice, and vodka and food coloring if using, and set aside to cool for 10 minutes.
  3. Pour through a strainer into a freezer-safe container and freeze until nearly solid, 3 to 4 hours.
  4. While sorbet is freezing, make the ice cream base. Stir together sweetened condensed milk, lemon zest, and lemon juice.
  5. Whip the cream until stiff peaks form. Fold in the sweetened condensed milk mixture.
  6. Line a 9"x 5" loaf pan with waxed paper, leaving a portion overhanging. I left the short ends un-lined.
  7. Pour half of the ice cream base into the loaf pan and smooth out. Cover and place loaf pan in the freezer and freeze until firm, about 3 to 4 hours. Store the remaining ice cream base in the refrigerator, tightly covered.
  8. Once sorbet is nearly frozen, break into chunks and place in blender or food processor. Blitz until slushy. If ice cream layer is firm, pour slushy sorbet mix directly on top, cover, and freeze until firm, 1 to 2 hours. If ice cream base is not yet set, place sorbet mix back into a separate container and return to freezer until ready to use.
  9. Once sorbet layer is firm, pour on remaining ice cream mixture, cover, and freeze until firm, 3 to 4 hours or overnight.
  10. To remove from pan, run a knife along the edges that aren't lined with waxed paper. Pull ice cream out of pan with overhanging paper. If it won't come loose, dip pan in 1 to 2 inches of hot water for just a few seconds. Invert ice cream onto a serving platter.
  11. Top with sweetened whipped cream, Cool Whip, or even meringue. Torch meringue if desired. Store leftovers in the freezer, covered, even with whipped cream or meringue.
Recipe Notes
  • Use any citrus fruit you'd like.
  • Mix flavors - use one flavor for the sorbet and another for the ice cream.
Share this Recipe

Maple Mousse

It’s finally fall! I’m so excited – cool evenings and cooler days, crops are being harvested (no more walking through 10-foot-tall corn!), and all the mouthwatering flavors that come with this time of year.

I grew up in northeast Ohio where there is a festival every spring dedicated to maple, since that’s when it’s produced. It has always been a favorite flavor around our house any time of year. But most people, myself included, consider it to be a fall flavor. Maybe that’s because it goes so well with other fall and winter flavors like the warm spices, tart cranberries, and roasted nuts that are so prevalent during this season.

Whatever the time of year, this recipe is delicious. It is a very light mousse with a strong maple flavor. It’s perfect for the holiday season when there is so much heavy food around, but it would also be wonderful as a light dessert in the spring or summer. You can serve the mousse in bowls as I did, or use it fill cannoli shells or cream puffs. I added some fun fall sprinkles, but chopped or candied walnuts would also work well.

This mousse does involve a little cooling time, but it is generally very simple. You start by making a maple custard, which is good all on it’s own. It has to chill completely before you add in the whipped cream. The mousse ends up being very light and slightly loose in texture. If you prefer a firmer mousse, use a stabilized whipped cream that is made with gelatin. Maple syrup is a must – no substituting pancake syrup!

This recipe serves four, but doubles very well, which makes it great for entertaining. Although it is best served within a few hours, the custard can be made a day ahead. Just whip the cream and fold in right before serving and top as desired. I hope you give it a try soon!


Print Recipe


Maple Mousse

Servings


Ingredients

Servings


Ingredients


Instructions
  1. Heat syrup and 3/4 cup milk in a saucepan over medium heat until simmering.

  2. Combine cornstarch, salt, and remaining milk. Add to simmering syrup mixture, stirring constantly.

  3. Cook over medium-high heat, stirring constantly, until mixture is thickened and begins to bubble.

  4. Reduce heat to medium; cook and stir 2 minutes.

  5. Beat egg in a small bowl. Add in a small amount of the hot mixture and stir well.

  6. Add egg mixture to pan and cook, stirring constantly, until mixture simmers. It will be thick.

  7. Continue to cook and stir for 2 additional minutes.

  8. Pour into a heat-proof bowl. Cover with plastic wrap or waxed paper, making sure wrap touches the surface of the custard to prevent a skin, and refrigerate until cool, 4 hours or overnight.

  9. When custard is cool, whip cream until stiff peaks form.

  10. Gently fold into cooled custard, then transfer to serving bowls. Top as desired and serve.


Recipe Notes
  • Candied or roasted walnuts would be a great addition to the top of this mousse.
  • Use mousse as a filling for cannoli or cream puffs.
  • For a firmer mousse, use a stabilized whipped cream (with gelatin).
  • Best eaten within a few hours.


Share this Recipe

Cookies and Coffee Cheesecake

A rich mocha cheesecake with Oreo crust and cookie dough throughout! It’s a spin on my favorite flavor of ice cream.

Do you have Turkey Hill ice cream where you live? If you do, have you tried their Double Dunker flavor? They describe it as “mocha ice cream swirled with cookie dough and crunchy chocolate cookie swirl”. I describe it as perfect. They only just recently started carrying it in stores here in Kansas City, so I was driving 2 hours to the nearest store to get it. Yes, really. It’s that good. If it’s in stores near you, go get some right now. It’s ok – I’ll wait.

For those of you who don’t have this flavor available near you, or who don’t want to run right out to the store, I turned it into a cheesecake! I started with an Oreo crust to mimic the cookie swirl. Then there are the cookie dough pieces embedded in the mocha cheesecake. Somehow they all work sooo good together.


Yes, there are a lot of steps in this. Yes, it is worth it. It’s probably not something you’ll make for a simple weeknight dessert, but it would be great for a party or other get together. It can easily serve 12, so there is plenty to go around. Plus, you can make it over several days so there is no last minute rush. 

I like to toast the flour in the cookie dough since I keep a bit to top it with that is completely uncooked. You don’t have to do this, but since there is a chance that raw flour can contain E. Coli, I usually do if I am serving it to guests. I cook the cheesecake at a low temperature, so there is no need for a water bath. And I don’t really like springform pans, so I use Alton Brown’s method and bake it in a regular cake pan. Yes, it does come out. Promise. You can use a springform if you prefer.

You say you don’t like coffee? Leave out the coffee for a straight chocolate cheesecake. Don’t want to make the cookie dough (or not a fan of raw dough), then use chopped chocolate chip cookies instead. And if you want a cookies and milk cake instead, use your favorite vanilla cheesecake batter with the Oreo crust and cookie dough pieces. However you make it, make this soon. And make sure to try the ice cream too!


Print Recipe
Cookies and Coffee Cheesecake
A rich mocha cheesecake with an Oreo crust and cookie dough pieces.
Servings
people
Ingredients
Crust
Servings
people
Ingredients
Crust
Instructions
Crust
  1. Place cookies in a food processor and pulse until it reaches fine crumbs.
  2. Add melted butter and pulse until combined.
  3. Line a 9"x2" cake pan with parchment paper on the bottom (with a round) and the sides (with a strip). Use baking spray below the parchment to keep it in place, and spray parchment with baking spray before adding crust. You may also use a 9" springform pan. Use only a parchment round on the bottom and spray with baking spray.
  4. Press crumbs onto the bottom and 1" up the sides of the pan.
  5. Bake at 300 degrees F for 10 minutes. Cool.
Filling
  1. Combine chocolate chips, cream, and instant coffee granules in a microwave safe bowl and microwave for 40 seconds, stirring halfway through. If chips are not fully melted, microwave additional 10 seconds. Set aside.
  2. Beat cream cheese and sugar with a mixer until smooth.
  3. Add cocoa powder and beat until combined.
  4. Add eggs, one at a time, beating well after each addition.
  5. Add the vanilla and reserved chocolate-coffee mixture and mix until combined.
  6. Pour mixture into cooled crust.
  7. Remove cookie dough from refrigerator or freezer and slice into 1/2-inch pieces. Press pieces into cheesecake filling, distributing evenly and making sure all cookie dough is covered by the cheesecake batter.
  8. Bake cheesecake at 250-degrees F (no water bath needed!), for 1 hour 15 minutes to 1 hour 30 minutes. Cheesecake is done when the center 4 inches is still slightly wobbly. The chocolate will ensure it sets completely once cooled.
  9. Cool cheesecake until near room temperature and then refrigerate at least 8 hours or overnight,
  10. To remove from cake pan, fill sink with about 1/2-inch of very hot tap water. Set pan into water for 1 minute. The strip of parchment around edge of pan should slide out. Slide a knife around the edge after removing paper to assure everything is released from the sides. Place a piece of parchment paper on top of the cheesecake, and turn it over onto a large plate or extra serving platter. Cheesecake should release from the bottom and fall onto the plate. If it does not, return to hot water for additional 30 seconds. Remove parchment from bottom of cheesecake and invert onto final serving platter.
Recipe Notes
  • You can omit the coffee if you prefer a regular chocolate flavor.
  • Use store-bought or homemade chocolate chip cookies instead of the cookie dough.
  • For a cookies and milk cake, use your favorite vanilla cheesecake batter with the Oreo crust and cookie dough filling.
Share this Recipe
 

Ice Cream Slab Pie

Who’s ready for ice cream? Or better yet, ice cream slab pie! This one has a rice crispy crust, peanut butter fudge sauce, and homemade no-churn ice cream with chocolate chips and peanut butter cups. It’s a twist on a favorite dessert my mom used to make in the summertime.

It sounds like a lot of components, but each of them are so easy. And there are so many options – not only to change up the flavors, but you can easily swap in store-bought parts too. You can make this as homemade or store-bought as you’d like.

Let’s start with the base. My recipe begins with a simple rice crispy base. But you could just as easily bake up a batch of brownies, or use a roll of cookie dough pressed into a pan and baked. Even a graham cracker crust would work.

The sauce starts with a homemade hot fudge that is combined with peanut butter. You could leave out the peanut butter and extra corn syrup (just use the whole batch of hot fudge instead). Or start with a bottled hot fudge sauce. You can also mix up the flavors. Use a caramel or butterscotch sauce instead. Or use a different nut butter, Nutella, or even cookie butter!

The ice cream is a very simple no churn ice cream. I love the no-churn recipe, and it’s endlessly adaptable. Choose the candy mix-ins that you prefer, or use crushed cookies (like Oreo’s!). You could also use a store-bought ice cream in whatever flavor you prefer. Just soften it slightly before you scoop it into the crust.

There are so many variations you can make to this recipe. I hope you give it a try, and let me know what flavors you choose!


Print Recipe
Ice Cream Slab Pie
Course Dessert
Servings
Ingredients
Base
Hot Fudge Sauce
Ice Cream
Course Dessert
Servings
Ingredients
Base
Hot Fudge Sauce
Ice Cream
Instructions
Base
  1. Combine first three ingredients in a large saucepan and bring to a boil over medium heat.
  2. Remove from heat and stir in cereal until completely coated.
  3. Press evenly into a greased 13"x9" baking pan. Line with parchment or waxed paper if preferred for easier serving.
Sauce
  1. Melt chocolate in a small saucepan over low heat.
  2. Once melted, add evaporated milk, sugar, cocoa powder, 1/4 cup corn syrup, salt, and vanilla. Cook over medium-low heat until thickened, about 5 to 8 minutes. The mixture should not quite come to a simmer.
  3. Remove 2/3 cup hot fudge sauce and combine with peanut butter and remaining corn syrup. Save remaining hot fudge sauce for another use (store air tight in refrigerator).
  4. Spread half of peanut butter fudge sauce onto the base and place in freezer.
Ice Cream
  1. Whip cream until soft peaks form.
  2. Gently fold in sweetened condensed milk and vanilla until combined.
  3. Chop 12 of the peanut butter cups and fold into ice cream mixture with all but 2 tablespoons of the chocolate chips.
  4. Spread ice cream mixture onto prepared base and sprinkle with remaining chips and the other 6 peanut butter cups, chopped.
  5. Freeze for at least 6 hours or overnight.
  6. Serve with warmed remaining peanut butter fudge sauce drizzled over each serving.
  7. Store leftovers in the freezer, and extra sauce in the refrigerator.
Recipe Notes
  • Use any crust you'd like - brownies, baked cookie dough, graham cracker crust.  Mix it up with different flavors!
  • Use 2/3 cup bottled hot fudge sauce if desired. Or double the amount and leave out the peanut butter.
  • Use any flavor sauce you'd like - try butterscotch or caramel!
  • Substitute any nut butter, or even Nutella. Cookie butter would be delicious too.
  • Use any mix-ins you prefer - try different candies, or crushed cookies. Your imagination is the limit! Use 1 to 2 cups total.
  • You can also use softened, store bought ice cream in any flavor to fill the crust (6 cups/ 48 oz tub).
Share this Recipe

Mud Pie for Grandpa

I am a long-time collector of recipes. Cookbooks, magazines, recipe cards – I love them all. For years I copied or clipped recipes from all of the above, and I keep them in a set of binders. More recipes than I’ll ever get around to making. As I was looking through those binders looking for inspiration, I came across an old recipe for Mud Pie. It came out of a children’s cookbook, Alpha Bakery by Gold Medal Flour.

Sometime in roughly the mid-90’s, I made this recipe for a family dinner. I don’t remember the exact occasion, but my grandparents, and maybe others, had come to dinner. Anyway, I made the mud pie and we all thought it was delicious. Several months or maybe even a year later, my grandfather asked about the dessert. He wanted me to make it again. He described it as a brownie or cake with whipped cream on it. Well, neither my mom nor I, or anyone else, could remember such a recipe. (I know – that really makes you want to try a recipe we couldn’t remember a relatively short time later.) He continued to talk about it on occasion, and how much he liked it. But we just could not figure out what that recipe was.

My grandpa passed away in 2006, and I still hadn’t figured out what dessert he was remembering. Fast forward several years, when my parents were moving into their current house and I was helping them to pack up. I was looking through all of my mom’s cookbooks while packing them when I came across the Alpha Bakery cookbook. I flipped through it to see if there were any recipes worth saving, and as soon as I saw the Mud Pie recipe I knew that was recipe Grandpa kept asking about. I copied it then and put it into my binder, to be forgotten again until this past weekend. Since his 95th birthday would have been later this week, I knew it was time to make it again.

The base is a rich brownie with chopped nuts. I used slivered almonds because I had some on hand. But you can of course use the nuts of your choice, or leave them out. Replace them with chocolate chips (any flavor) if you’d like. You top the brownie with hot fudge sauce. I used a homemade sauce, but you can definitely use a jarred sauce – fudge sauce, not chocolate syrup. I also think this would be delicious with a caramel sauce instead. Then top it all with whipped cream. I used a stabilized whipped cream, since I knew we wouldn’t eat it all at once. You could use regular whipped cream if you have enough people to serve that there won’t be leftovers. Or Cool Whip works too. But if you are making your own whipped cream, consider playing around with the flavors. Personally, I think a little almond extract in it would be perfect. But strawberry or cherry extract and a little red or pink food coloring would be delicious. Or peppermint extract and green food color for a grasshopper type of pie. The possibilities are endless.

Happy Birthday Grandpa!

Print Recipe
Mud Pie
A dense, fudgy brownie topped with hot fudge sauce and whipped cream. Lightly adapted from Gold Medal Flour's Alpha Bakery
Course Dessert
Servings
Ingredients
Brownie Base
Whipped Cream
Course Dessert
Servings
Ingredients
Brownie Base
Whipped Cream
Instructions
Brownie Base
  1. Heat oven to 325 degrees F and grease an 8-inch cake pan or pie plate.
  2. Mix butter, sugar, eggs, vanilla, and salt in a medium bowl.
  3. Stir in flour, cocoa powder, and nuts.
  4. Pour into prepared pan and bake for 25-35 minutes or until a toothpick inserted halfway between the center and the edge comes out clean. Time will depend partly on the size of your pan.
  5. As soon as the brownie comes out of the oven, poke it all over with a skewer or fork. Spread the fudge sauce over the brownie and let cool completely.
Whipped Cream
  1. For stabilized whipped cream, combine gelatin and water in a small saucepan and let sit until thick.
  2. Melt gelatin over low heat, stirring constantly. Once melted, remove from heat and cool slightly.
  3. While gelatin cools, whip cream and powdered sugar until soft peaks form. Add vanilla. (At this point, for regular whipped cream, whip a little longer until stiff peaks and use immediately.)
  4. Beating slowly, gradually add the cooled gelatin mixture to the whipped cream. It will start to look a little curdled, but beat at low to medium speed just until combine and peaks are stiff.
  5. Spread or pipe onto cooled brownie base.
  6. Serve with shaved chocolate or additional hot fudge sauce.
  7. Store in refrigerator.
Recipe Notes
  • Use any nuts you like, or substitute with any flavor of chocolate chips.
  • Jarred or homemade hot fudge sauce works great. Experiment with flavors. Try caramel sauce, or chocolate-mint fudge sauce instead.
  • Use Cool Whip in place of whipped cream.
  • Or flavor your whipped cream with any extract you like. Enhance with food color if desired. Think mint, strawberry, etc.
Share this Recipe