Tag Archives: Cookies

Cookies and Coffee Cheesecake

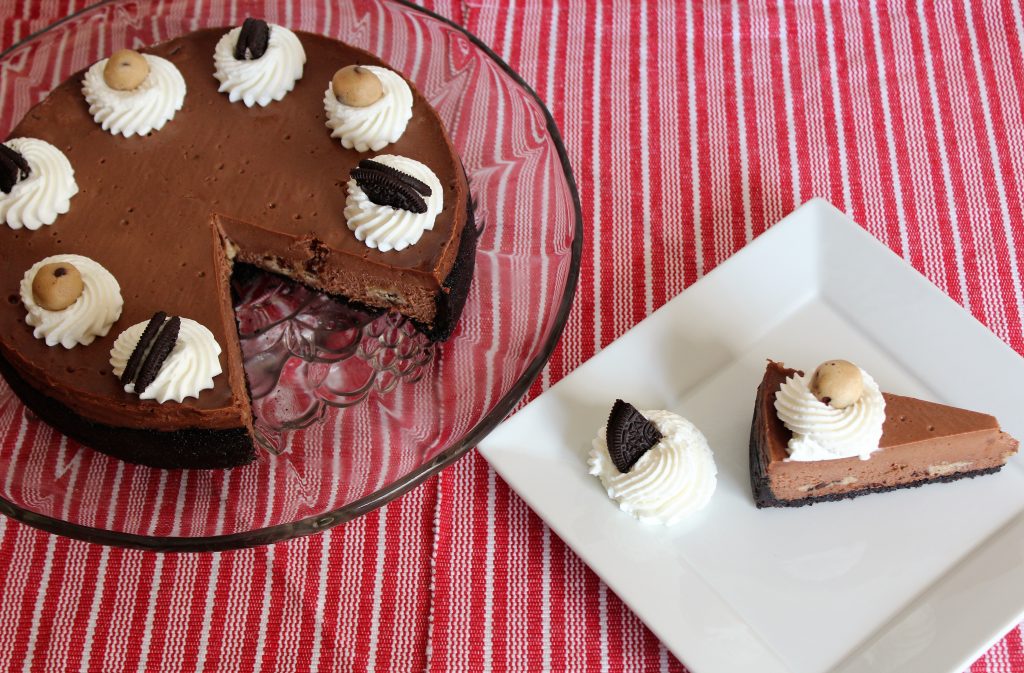
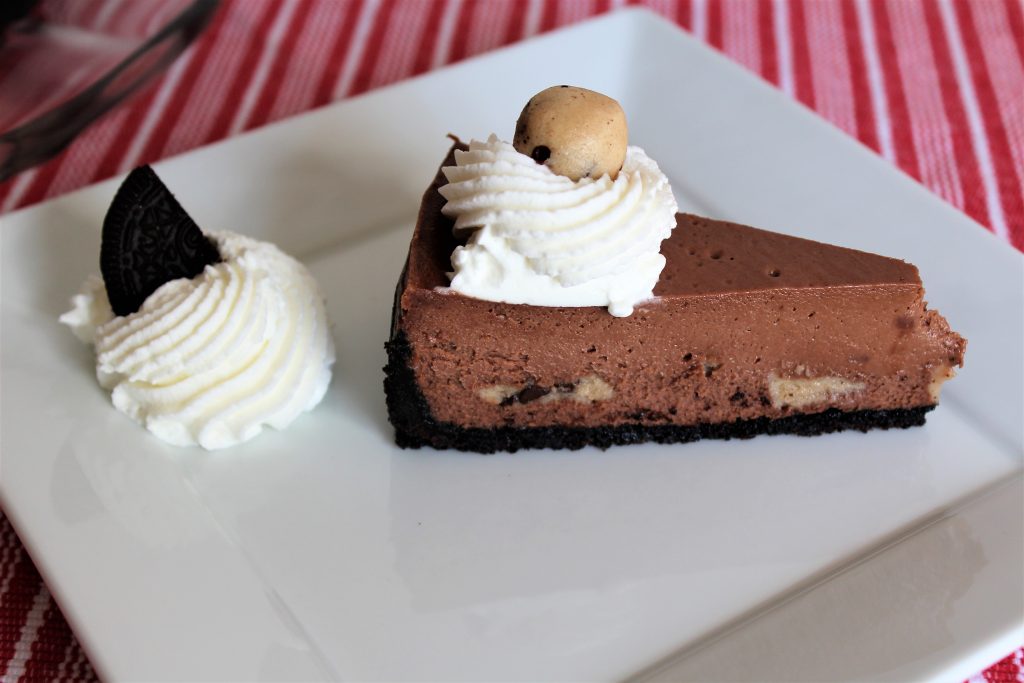
A rich mocha cheesecake with Oreo crust and cookie dough throughout! It’s a spin on my favorite flavor of ice cream.

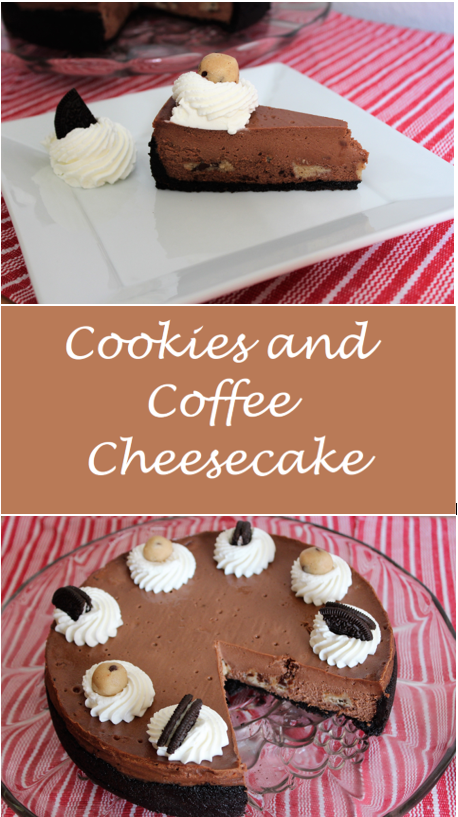
Do you have Turkey Hill ice cream where you live? If you do, have you tried their Double Dunker flavor? They describe it as “mocha ice cream swirled with cookie dough and crunchy chocolate cookie swirl”. I describe it as perfect. They only just recently started carrying it in stores here in Kansas City, so I was driving 2 hours to the nearest store to get it. Yes, really. It’s that good. If it’s in stores near you, go get some right now. It’s ok – I’ll wait.

For those of you who don’t have this flavor available near you, or who don’t want to run right out to the store, I turned it into a cheesecake! I started with an Oreo crust to mimic the cookie swirl. Then there are the cookie dough pieces embedded in the mocha cheesecake. Somehow they all work sooo good together.


Yes, there are a lot of steps in this. Yes, it is worth it. It’s probably not something you’ll make for a simple weeknight dessert, but it would be great for a party or other get together. It can easily serve 12, so there is plenty to go around. Plus, you can make it over several days so there is no last minute rush. 

I like to toast the flour in the cookie dough since I keep a bit to top it with that is completely uncooked. You don’t have to do this, but since there is a chance that raw flour can contain E. Coli, I usually do if I am serving it to guests. I cook the cheesecake at a low temperature, so there is no need for a water bath. And I don’t really like springform pans, so I use Alton Brown’s method and bake it in a regular cake pan. Yes, it does come out. Promise. You can use a springform if you prefer.

You say you don’t like coffee? Leave out the coffee for a straight chocolate cheesecake. Don’t want to make the cookie dough (or not a fan of raw dough), then use chopped chocolate chip cookies instead. And if you want a cookies and milk cake instead, use your favorite vanilla cheesecake batter with the Oreo crust and cookie dough pieces. However you make it, make this soon. And make sure to try the ice cream too!


Print Recipe
Cookies and Coffee Cheesecake
A rich mocha cheesecake with an Oreo crust and cookie dough pieces.
Servings
people
Ingredients
Crust
Servings
people
Ingredients
Crust
Instructions
Crust
  1. Place cookies in a food processor and pulse until it reaches fine crumbs.
  2. Add melted butter and pulse until combined.
  3. Line a 9"x2" cake pan with parchment paper on the bottom (with a round) and the sides (with a strip). Use baking spray below the parchment to keep it in place, and spray parchment with baking spray before adding crust. You may also use a 9" springform pan. Use only a parchment round on the bottom and spray with baking spray.
  4. Press crumbs onto the bottom and 1" up the sides of the pan.
  5. Bake at 300 degrees F for 10 minutes. Cool.
Filling
  1. Combine chocolate chips, cream, and instant coffee granules in a microwave safe bowl and microwave for 40 seconds, stirring halfway through. If chips are not fully melted, microwave additional 10 seconds. Set aside.
  2. Beat cream cheese and sugar with a mixer until smooth.
  3. Add cocoa powder and beat until combined.
  4. Add eggs, one at a time, beating well after each addition.
  5. Add the vanilla and reserved chocolate-coffee mixture and mix until combined.
  6. Pour mixture into cooled crust.
  7. Remove cookie dough from refrigerator or freezer and slice into 1/2-inch pieces. Press pieces into cheesecake filling, distributing evenly and making sure all cookie dough is covered by the cheesecake batter.
  8. Bake cheesecake at 250-degrees F (no water bath needed!), for 1 hour 15 minutes to 1 hour 30 minutes. Cheesecake is done when the center 4 inches is still slightly wobbly. The chocolate will ensure it sets completely once cooled.
  9. Cool cheesecake until near room temperature and then refrigerate at least 8 hours or overnight,
  10. To remove from cake pan, fill sink with about 1/2-inch of very hot tap water. Set pan into water for 1 minute. The strip of parchment around edge of pan should slide out. Slide a knife around the edge after removing paper to assure everything is released from the sides. Place a piece of parchment paper on top of the cheesecake, and turn it over onto a large plate or extra serving platter. Cheesecake should release from the bottom and fall onto the plate. If it does not, return to hot water for additional 30 seconds. Remove parchment from bottom of cheesecake and invert onto final serving platter.
Recipe Notes
  • You can omit the coffee if you prefer a regular chocolate flavor.
  • Use store-bought or homemade chocolate chip cookies instead of the cookie dough.
  • For a cookies and milk cake, use your favorite vanilla cheesecake batter with the Oreo crust and cookie dough filling.
Share this Recipe
 

Apple Cider Cookies for the Go Bo! Bake Sale

If you follow me on Facebook, you may have seen recently that I signed up to donate decorated cookies for the Go Bo! Bake Sale. For the whole story, go check out that link. In short, a 12 year-old boy (Bo) was diagnosed with a rare form of leukemia. While fighting cancer, he started the Go Bo! Foundation to fund cancer research and childhood treatment. The year he passed, a bake sale was planned as a fundraiser for the foundation. A local cookier took to social media to spread the word about the bake sale and ask any other cookiers to donate decorated cookies. That was in 2012, and they raised $5,000 at that bake sale. As word has spread, more and more cookiers have donated. Last year they were able to raise over $30,000!

When I heard about the fundraiser, I knew I wanted to decorate some cookies to donate. I pored over cookie after cookie on Pinterest, and finally settled on a design. It was a hybrid of a few others I had seen out there, and I have to say I really love the way they came out. I made royal icing transfer and then attached them to the flooded cookies. Here are the images I used as templates.

After I knew what design I wanted to create, I had to decide what flavor to make. I love my basic butter cookie recipe, but I wanted something a little more special. So I thought about the apple cider shortbread I had made at Christmas last year. I knew I could combine that idea with my favorite butter cookie, so that’s what I did. Most of the flavor comes from instant hot cider mix, but I felt like it needed another punch of apple flavor, so I reduced some apple cider down to a syrup and mixed that in as well. It was exactly what I was looking for! I think these will be making a reappearance at Christmas this year!

There aren’t a lot of easy substitutions for this recipe. But you could brown the butter and then cool and solidify it before creaming with the sugar. Or, use maple syrup instead of the cider syrup for a hint of maple. And, I suspect you could use instant (sweetened) ice tea mix instead of the cider mix (leaving out the reduced cider syrup) for a summery version of this cookie. In fact, I may try that next summer!

Print Recipe
Apple Cider Cookies
Servings
Ingredients
Servings
Ingredients
Instructions
  1. Place apple cider into a saucepan. Bring to boil over medium heat and cook until it is reduced to 2 tablespoons. Set aside to cool.
  2. Cream butter with sugar and hot cider mix.
  3. Beat in egg, vanilla, and cooled reduced cider.
  4. MIx in salt and flour until well blended.
  5. Depending on how warm your butter was, you may need to chill the dough for up to an hour to make rolling easier.
  6. Roll out dough on a lightly floured surface to nearly 1/4 inch thickness, and cut out with desired cookie cutter.
  7. Place on ungreased cookie sheet and bake at 350 degrees F for 15 to 20 minutes. Cookies should be lightly browned around the edges.
  8. Cool on cookie sheets for 5 minutes before moving to a rack to cool completely.
  9. Decorate as desired. You can also decorate with sprinkles before baking.
Recipe Notes
  • Use parchment or silicon mats on the cookie sheets if desired.
  • Roll thinner if a crisper cookie is desired.
  • Use maple syrup in place of the reduced cider for a slight variation.
  • Omit the reduced cider and replace the hot cider mix with sweetened ice tea mix for a summery cookie.
Share this Recipe

No Bake Corn Flake Cookies

Oh my goodness you guys, it has been a loooong summer already. Things have been super crazy around here, which is why I haven’t been posting much. But I think things are calming down, so I am hoping to get back to a semi-regular schedule here on the blog.

Also, it has been super hot here the last few weeks, and it looks like it is going to continue for a while. Are you dealing with this extreme heat as well? If you are, and even if you aren’t, you’ll love the next few recipes I’ve got planned for you, since they are all no bake! This first one couldn’t be easier. It is only four ingredients, and you probably have most of them in your pantry now. You only need chocolate chips, butterscotch chips, peanut butter, and corn flakes.

But as always around here, there are lots of ways you can customize it. The original recipe, which my family has made for years, uses marshmallows in place of the corn flakes and presses in into a 9″x13″ pan. My college roommate once made something similar with corn flakes. Since I am not a fan of marshmallows (that original dessert is just about the only way I eat them), I loved that twist on the bars. You can use either marshmallows or unsweetened cereal, or a combination of both. If you don’t like corn flakes, I would try something like Chex cereal, or even Rice Krispies. You want something that isn’t too dense. You could also stir in some nuts or even dried fruit if that’s your thing.

These cookies are simple and quick to put together, and they won’t heat up your kitchen. They aren’t fancy, but they are delicious. I hope you try them, because I know you will love them!

Print Recipe
No Bake Corn Flake Cookies
Servings
cookies
Servings
cookies
Instructions
  1. Melt chocolate chips, butterscotch chips, and peanut butter in a large bowl in the microwave, or a large pot on the stove top on medium-low.
  2. Stir in corn flakes, gently, until completely coated.
  3. Scoop with a large ice cream scoop onto parchment lined baking sheets and refrigerate until firm, about 15 minutes.
  4. Store at room temperate, for softer and slightly sticky cookies, or in the refrigerator for firmer (and less messy) cookies.
Recipe Notes
  • For bars, press into a greased 9"x13" pan. Refrigerate until firm before cutting.
  • Use 2 (10 oz) packages of mini marshmallows in place of the corn flakes.
  • Use a combination of marshmallows and corn flakes.
  • Use any other cereal of your choice - preferably an airy cereal like Chex or Rice Krispies.
  • Substitute 1 cup of cereal (or marshmallows) with 1 to 2 cups of nuts or dried fruit.
Share this Recipe

Coffee Chocolate Chip Oatmeal Cookies

I know what you’re thinking. You’re thinking you don’t need another chocolate chip cookie recipe. But you’re wrong. Because not only is this cookie delicious and different than most of your chocolate chip cookie recipes, this one doesn’t have to be a chocolate chip cookie.

This recipe is based off of a recipe we made all the time as kids. We always had homemade cookies in our school lunch. Always. (My mom is the best. 🙂 ). The oatmeal chocolate chips cookies were a regular and a favorite. I was thinking about them the other day, and I thought they might be improved with a bit of coffee. (I was right). I made a few other changes (took out one egg white, used all brown sugar, melted the butter) to make them even chewier. Also a good idea.

But as I said, these don’t have to be chocolate chip cookies. In fact, the original recipe called for either chocolate chips OR shredded coconut. You could absolutely make that substitution here. Or add chopped nuts. Or dried fruit (you know, like raisins, if you’re in to that kind of thing). Or any combination of the above. The coffee is not an overwhelming flavor, but it really does add an interesting element to the cookie. Yes, you can leave it out. Or, if you want a real coffee punch, use up to twice the amount I’ve called for.

One thing you shouldn’t do is skip the chilling the dough step. Especially when using the melted butter, you really need to chill the dough to get a thicker, chewy cookie. Unless you want a thinner, crispier cookie. In which case, you should bake these as soon as they are mixed. (But seriously, why would you want that??) Whatever way you make these, you should definitely make them soon. I was informed that these are “husband approved”, and that I didn’t need to bring these in to the office to share. (Sorry guys!) 🙂

Print Recipe
Coffee Chocolate Chip Oatmeal Cookies
Course Dessert
Servings
cookies
Ingredients
Course Dessert
Servings
cookies
Ingredients
Instructions
  1. Combine melted butter and brown sugar and mix well.
  2. Add egg, egg yolk, coffee (dissolved in water), and vanilla and mix until combined.
  3. Add dry ingredients, mixing just until combined.
  4. Stir in chocolate chips or other mix-ins.
  5. Refrigerate dough at least 30 minutes.
  6. Scoop chilled dough by heaping tablespoons onto cookie sheets.
  7. Bake at 350 degrees F for 12 to 15 minutes or until golden brown and just set. Do not overbake.
  8. Cool completely on wire rack. Store in airtight container up to a week.
Recipe Notes
  • Use any flavor chips you like.
  • Substitute chopped nuts, shredded coconut, and/or dried fruit.
  • Use any combination that sounds good to you!
Share this Recipe
 

Mardi Gras Cookies, and Let’s Talk about Archaeology

Hi everyone! I’ve been kind of under the weather this week, so I decided to make a pretty simple cookie. They take almost no time to put together, they are delicious, and you can totally customize the colors to suit any occasion.

Since it’s a short and sweet recipe, I thought now would be the perfect time to talk a little about archaeology, and to show you some pictures from past projects I’ve been on. If you’re just here for the recipe, go ahead and scroll down to the bottom of the post – I won’t be offended. 🙂

For those of you who are interested in my “other” job, let’s run through a quick FAQ.

First, What is archaeology? Well, the biggest misconception is that archaeologists dig up dinosaurs. In fact, paleontologists deal with dinosaurs, while archaeologists deal with the human past. Specifically, the material remains left by humans. This includes everything from arrowheads and other stone tools to foundation remnants and broken plates and glasses.

Second, Why do archaeologists do what they do? There are a lot of ways to interpret this question, but here I am getting at the reason my job exists. Because of the Historic Preservation Act of 1966, and specifically Section 106, all federally funded or permitted projects have to undergo a historic and archaeological review to determine the impact that the project will have on any historic sites. That means if federal funds or permits are involved, archaeologists and/or historians have to survey the area to be impacted to determine if there are significant historic or archaeological sites that may be impacted. If there are, the project is either re-routed, or the site is excavated to retrieve any data possible.

So, finally, What do I actually do? The vast majority of the fieldwork that I do involves archaeological survey. In other words, I am out walking across the project area. In plowed fields, we simply look for artifacts that have been brought to the surface by the plowing. In pastures and other where the ground surface isn’t visible, we dig small holes at regular intervals, and pass the dirt through a mesh screen to look for artifacts. When we find artifacts or structure remnants like foundations, we record the site and report it’s location and any information we can gather to the state. If the state determines the site may be significant, we may have to return to do further testing on the site, and perhaps even full excavation, but this is rare. Many sites are not considered significant, that is, they won’t provide us new or important information. And those that are, or may be, or often avoided by the project by a re-route.

Ok. I’m sure I’ve bored you completely by now. 🙂  But now, its time for cookies. These really couldn’t be more simple. It’s a quick and easy dough to put together. Then you divide the dough in half, roll each half into a rectangle, and add sprinkles. Roll it up, chill it, slice it, and bake it. And like I said earlier, if you’re not celebrating Mardi Gras, or want to use the recipe for a different celebration, you can just change up the sprinkles. Think red, white, and blue for July 4th…or red and green for Christmas…or brown, yellow, and orange for the fall…or school colors for graduation. I could go on and on with all the ideas I have for this, but I’m sure you’ve got ideas too, so I’ll just give you the recipe so you can get baking!


Print Recipe
Mardi Gras Cookies
Course Dessert
Servings
cookies
Course Dessert
Servings
cookies
Instructions
  1. Cream butter and sugar with an electric mixer until light and fluffy.
  2. Add egg and vanilla, and mix well.
  3. Add salt and flour, and mix until combined.
  4. Divide dough in half. Place one half onto a lightly floured piece of waxed paper. Dust lightly with flour and cover with another piece of waxed paper. (Or chill until firm enough to roll without sticking to the rolling pin.)
  5. Roll into a 12-inch by 8-inch rectangle, about 1/8-inch thick.
  6. Using one color of sprinkles at a time, coat the dough with a long "stripe" of sprinkles, covering about a third of the rectangle. Repeat with the remaining colors, lined up next to each other.
  7. Roll the dough up tightly, starting from the long end.
  8. Wrap the dough cylinder in the waxed paper and refrigerate 1 hour, or freeze 15-20 minutes.
  9. Repeat with remaining half of dough.
  10. Remove waxed paper, and slice dough into 1/4-inch slices. Place on Silpat or parchment-lined baking sheet.
  11. Bake at 350 degress F for 15-20 minutes or until lightly browned.
  12. Remove from baking sheet to cool completely. Store in airtight container up to one week.
Recipe Notes

Change the sprinkle colors to suit the celebration. For example, red, white, and blue for July 4th. Red and green for Christmas. School colors for a graduation, etc.

Share this Recipe

Merry Christmas!

Sugar Cookies, Cran-Rasp Pinwheels, Gluten-Free Chocolate Spritz, Nut Balls, Cheesecake Stuffed Gingerbread, Browned Butter Apple Cider Shortbread

It’s just a few days before Christmas, and I am finally back in town for a little while. I will have to get some pictures of this last project together to share with you all soon.

In the meantime, I wanted to quickly share with you the cookies I made for Christmas this year. It is a shorter list than most years, since I didn’t have much time for baking. But, if you are still looking for a few ideas for this weekend, here you go!

Starting in the upper left corner, and moving clockwise:

Cheesecake Stuffed Gingerbread

Basic Sugar Cookies, decorated as snowflakes

Gluten-Free Chocolate Spritz

Nut Balls/ Russian Tea Cakes

Cran-Raspberry Pinwheels

Browned Butter Apple Cider Shortbread with Salted Caramel Drizzle

I hope you find something here that sounds good and give them a try. The Nut Balls are a long-time family favorite. I have used plain raspberry, plain cranberry, and this year a cran-raspberry filling for the pinwheels and they are always a hit. They look fancy, but are really pretty simple to make.

And the newcomer this year is the shortbread – browned butter, apple cider, and topped with a salted caramel drizzle. They were the absolute favorite of most of the people I shared them with. I had pinned a recipe for browned butter shortbread, and then I saw a recipe for apple cider shortbread. I decided they needed to be combined. And then I saw Wilton’s salted caramel candy melts (Hershey’s just came out with a salted caramel baking chip as well), and figured it was a natural match. It was a very good idea.


Merry Christmas! I hope you all have a safe and happy holiday season!