Tag Archives: Christmas

No-Peel, No-Boil Mashed Potatoes

Are you getting ready to cook a large holiday meal for friends or family? Is stove-top space always at a premium, but you absolutely have to keep mashed potatoes on the menu? I’ve got the solution! And not only does it save you time and stove-top space, you also end up with super creamy, super fluffy mashed potatoes!

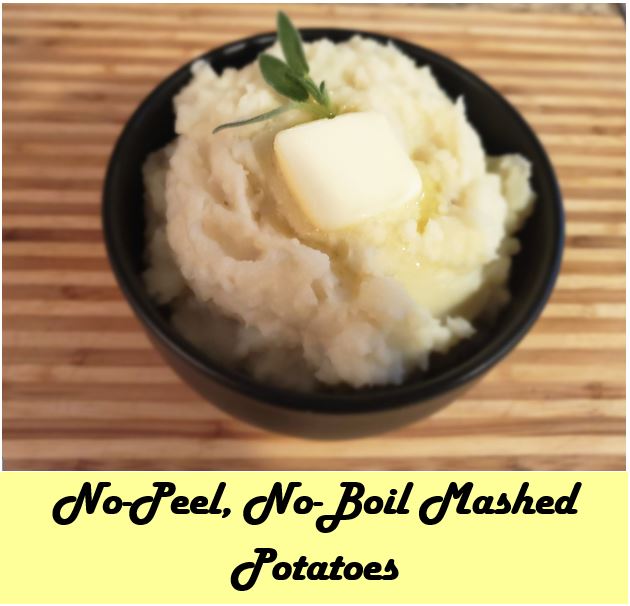
So what’s the secret? Well, there are two. First, you bake the potatoes. Yep, bake them. More on that in a minute. But the real secret is to use a potato ricer. If you don’t have one of these yet, and you like creamy, fluffy, “whipped” potatoes, you absolutely need one. They aren’t expensive and can be found in almost any grocery or department store. It’s the only way I make mashed potatoes.

So back to the potatoes. Make sure you wash them, and poke some holes in each one with either a fork or sharp knife. Since you won’t be eating the skins, you don’t need to oil or season them like you might for a baked potatoes. When I’m just making a small amount for two of us on a regular weeknight, I microwave them for around 3-4 minutes a piece, depending on size. If you are doing a smaller amount, this method works just fine.

If you’re making a large batch for a big family meal, just put them in the oven with your turkey, ham, or roast. Place them directly on a rack in the oven, preferably at 350 degrees (which is what most of those meats roast at), and bake them for an hour to an hour and half. Timing will depend on the size and number of potatoes. Whichever cooking method you use, you just want them to cook until they are easily pierced by a fork.

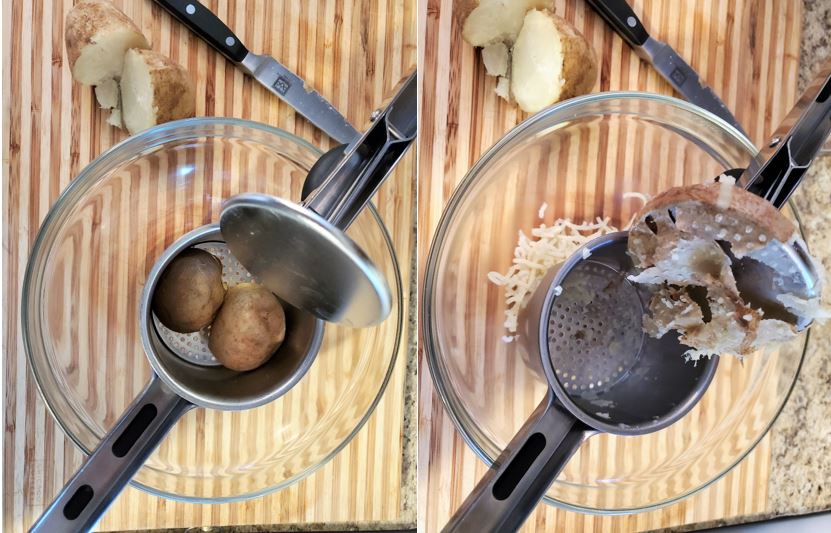
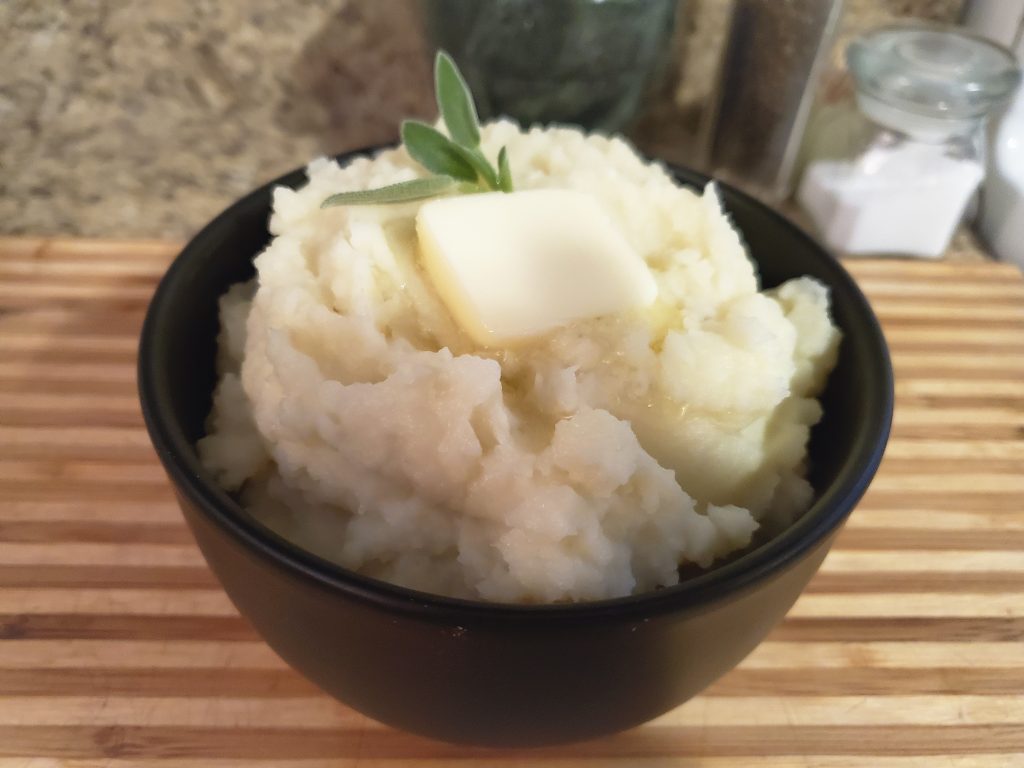
Once they are cooked, all you have to do is slice them in half, and press them through the ricer into a mixing bowl. Place them cut side down in the ricer and press. Depending on the size of the potato, you may get one or two halves in at a time. The potato flesh will pass right through, while the skin is left in the ricer. Pull out the empty skin, and press another potato. Repeat until you’ve got a big bowl of riced potatoes. Now add butter, milk and seasonings, and stir until creamy and fluffy. I prefer to heat the milk and butter together, and add it in batches until I reach the consistency I’m looking for. If you have extra, don’t discard it right away, as potatoes often thicken up as they sit and you may want to splash in a little more before serving.

This is really more of a method than a recipe. Although I’ve provided a very basic recipe below, you can add whatever ingredients you typically put in your mashed potatoes. Cream cheese, buttermilk, garlic – they all work perfectly with this method. Follow your favorite recipe, or try a new one!

Print Recipe
No-Peel, No-Boil Mashed Potatoes
Super creamy and fluffy mashed potatoes without the time and hassle of peeling, chopping, and boiling.
Servings
Ingredients
Servings
Ingredients
Instructions
  1. Wash the potatoes and poke several times with a fork or sharp knife.
  2. For smaller amounts, cook in the microwave for 3 to 4 minutes per potato.
  3. For large batches, place on oven rack and bake at 350 degrees for about one to one and a half hours. Can be baked with turkey, ham, or roast also in oven.
  4. Once potatoes are fork-tender, remove from oven or microwave. Slice each potato in half.
  5. Place halves cut-side down in a single layer in a potato ricer and press into a large mixing bowl. Remove skin that is left in ricer and repeat with remaining potatoes.
  6. Once potatoes are all riced, add warmed milk and butter gradually, with seasonings. Stir gently to combine, adding enough liquid to reach desired consistency. If potatoes need to sit before serving, they may cool and thicken. Add additional warm milk and butter just before serving if needed.
Recipe Notes
  • Quantities are approximate and adjustable. Halve, double, or triple to make the quantity you need. And adjust milk and butter quantity to get the texture you prefer.
  • Use this method with the ingredients you prefer in your potatoes. Cream cheese, buttermilk, garlic - any of those variations, and more, will work!
Share this Recipe

Merry Christmas!

Sugar Cookies, Cran-Rasp Pinwheels, Gluten-Free Chocolate Spritz, Nut Balls, Cheesecake Stuffed Gingerbread, Browned Butter Apple Cider Shortbread

It’s just a few days before Christmas, and I am finally back in town for a little while. I will have to get some pictures of this last project together to share with you all soon.

In the meantime, I wanted to quickly share with you the cookies I made for Christmas this year. It is a shorter list than most years, since I didn’t have much time for baking. But, if you are still looking for a few ideas for this weekend, here you go!

Starting in the upper left corner, and moving clockwise:

Cheesecake Stuffed Gingerbread

Basic Sugar Cookies, decorated as snowflakes

Gluten-Free Chocolate Spritz

Nut Balls/ Russian Tea Cakes

Cran-Raspberry Pinwheels

Browned Butter Apple Cider Shortbread with Salted Caramel Drizzle

I hope you find something here that sounds good and give them a try. The Nut Balls are a long-time family favorite. I have used plain raspberry, plain cranberry, and this year a cran-raspberry filling for the pinwheels and they are always a hit. They look fancy, but are really pretty simple to make.

And the newcomer this year is the shortbread – browned butter, apple cider, and topped with a salted caramel drizzle. They were the absolute favorite of most of the people I shared them with. I had pinned a recipe for browned butter shortbread, and then I saw a recipe for apple cider shortbread. I decided they needed to be combined. And then I saw Wilton’s salted caramel candy melts (Hershey’s just came out with a salted caramel baking chip as well), and figured it was a natural match. It was a very good idea.


Merry Christmas! I hope you all have a safe and happy holiday season!

Cran-Raspberry Pretzel Salad

Hi Everyone!

I’ve been super busy and on the road the last few weeks, so I didn’t get a chance to post a new recipe. To make up for it, I’ve got both a recipe and a gallery of decorated food for you today! I added a new page at the top of the site with pictures of a lot of the cakes and cookies I have decorated. I plan to keep updating it both with old items I already have pictures of, and with new items as I create them. 

And, as I said, I have a new recipe for you. This is a take on the old Strawberry Pretzel Jello Salad that I’m sure many of you have had. It’s a buttery pretzel crust with a sweet cream cheese filling topped with strawberry studded Jello.
Cream Cheese Filling

Since I’m not a big fan of strawberries, my mom started making this with raspberries and raspberry Jello. I decided to change it up again and make it more Thanksgiving- and Christmas-oriented. I made a basic cranberry sauce, but I amped it up with a little bit of raspberry as well. And I decided to make them individual-sized in cupcake liners.

Cran-Raspberry Pretzel Jello

You can make this in small mason jars, or in an 8″ square pan. Or double it so it’s the size of the original recipe and make it in a 9×13-inch pan. I didn’t add any flavors, like cinnamon or orange zest, to the cranberry sauce, but they would be great additions. And if you prefer to go a little more traditional, or want to make it a different time of year, you can use any combination of frozen fruit and jello. How does cherry sound? Or what about blueberry in the spring? You could add a little lemon zest into the cream cheese layer for any of the berry flavors. Or maybe a sprinkle of mini chocolate chips instead with the cherry (or raspberry or strawberry…) version. (So that’s going on my to-make list. 🙂 )

Cran-Raspberry Pretzel Jello

It’s not overly sweet, so it can be served as a side dish or a dessert. It wouldn’t be out of place on a brunch menu either. Anyway, I hope you guys try this out, whatever version you choose!

Cran-Raspberry Pretzel Jello


Individual Cran-Raspberry Pretzel Salads
Yields 12
For the Crust
  1. 2 cups (3 ounces) mini pretzel twists or thin sticks
  2. 2 teaspoons granulated sugar
  3. 6 tablespoons butter, melted
For the Cream Cheese Layer
  1. 4 ounces cream cheese, softened
  2. 1/4 cup granulated sugar
  3. 4 ounces (half of an 8 ounce tub) frozen whipped topping, thawed
For the Cran-Raspberry Layer
  1. 6 ounces (about 1 1/2 cups) fresh or frozen cranberries
  2. 2 ounces (about 1/2 cup) fresh or frozen raspberries
  3. 1/4 cup water
  4. 1/2 cup sugar
  5. 1 tablespoon raspberry jam
Add ingredients to shopping list
If you don’t have Buy Me a Pie! app installed you’ll see the list with ingredients right after downloading it
For the Crust
  1. Preheat the oven to 400 degrees F. Line a 12-cup cupcake pan with cupcake liners and spray with baking spray. Or, spray an 8-inch square baking pan or 12 small mason jars with baking spray.
  2. Combine the pretzels and sugar in a food processor and pulse until the pretzels are coarse crumbs. Add the melted butter and pulse a few times until combined.
  3. Divide crumbs between the 12 liners, 12 jars, or dump into square pan. Pack crust down firmly. Bake for 5-10 minutes, depending on container, or until lightly browned. Let cool completely.
For the Cream Cheese Filling
  1. Combine the cream cheese and sugar with a hand or stand mixer until light and fluffy. Fold in the whipped topping. Spoon or pipe onto cooled crust. Refrigerate while you make the final layer.
For the Cran-Raspberry Layer
  1. Combine the cranberries, raspberries, water, and sugar in a saucepan. Cook over medium heat, stirring occasionally, until the mixture begins to simmer. Reduce heat slightly and continue cooking until all of the cranberries have popped and the mixture has thickened, 10-15 minutes. Remove from heat and stir in the raspberry jam. Cool to room temperature.
  2. Once cooled, spoon or pipe onto cream cheese layer. Return to refrigerator and chill for at least 2 hours.
  3. Keep leftovers refrigerated.
Print
The Archaeologist Bakes http://www.thearchaeologistbakes.com/