Archives

Zucchini Bread – Made with Spaghetti Squash!

Hi Everyone! I know I’ve been pretty absent here this summer, but I promise I am getting back to baking and will be bringing you lots of new recipes soon! I am so ready for fall – fall weather, fall flavors, fall color. It’s my favorite time of year. 🙂

But for those of you still clinging on to summer, and the bounty of your vegetable garden, I have one more summer recipe for you. Actually, with the cinnamon, it tastes like the start of fall, but it’s a great way to use up your squash.

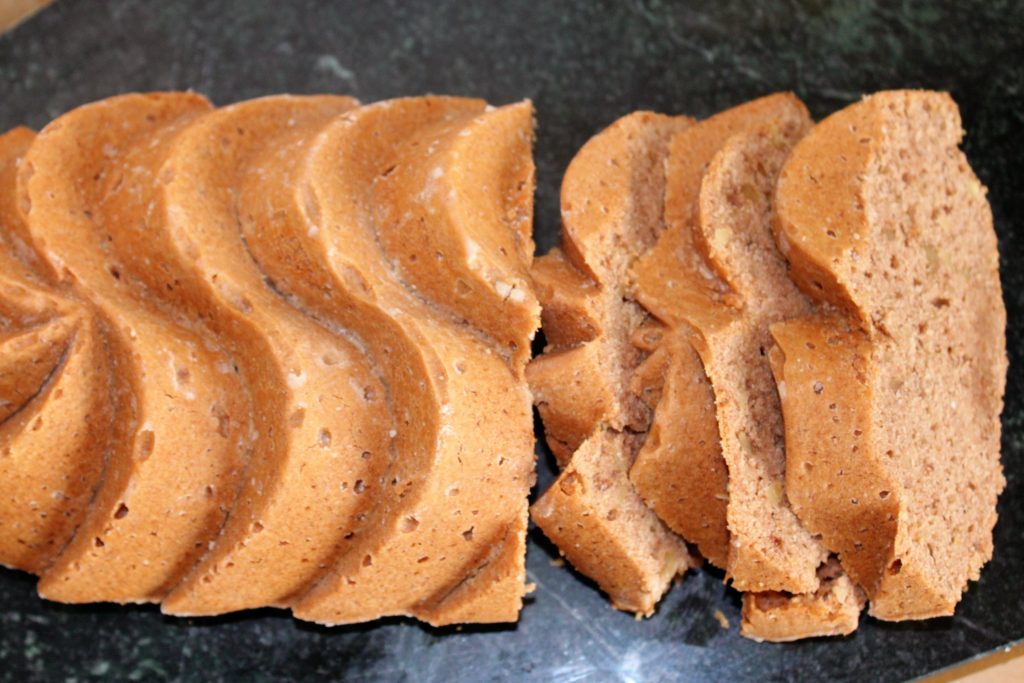
This was originally my mom’s zucchini bread recipe, and people LOVE this bread. It’s got a nice strong cinnamon flavor and is super moist because of the zucchini. I was gifted a spaghetti  squash from a co-worker, and of course I was immediately challenged to bake something with it. I wondered if I could use it in place of zucchini in baked goods. So I did a little research, crossed my fingers, and went for it. 

This is the second recipe I’ve tried using that substitution, and I can’t tell the difference between the original and the spaghetti squash version. Yes – it works! The only difference is that you have to cook, and shred, the spaghetti squash first, whereas the zucchini is shredded and added to the batter raw. Also, you need to measure the squash by weight, since it is much more dense than shredded zucchini. 

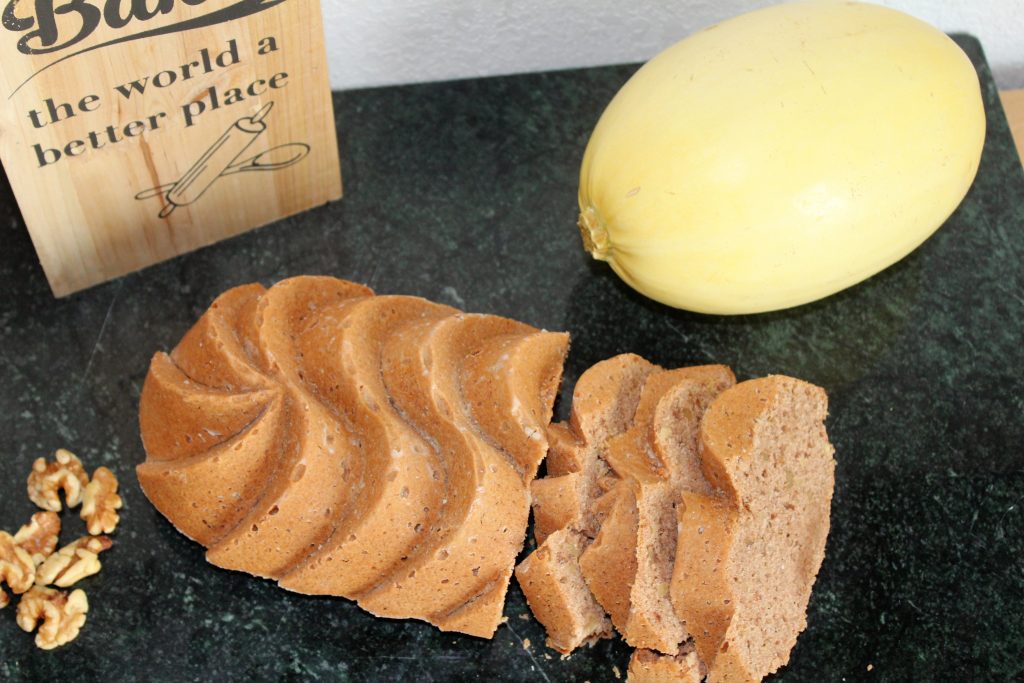
Yes, you can absolutely use zucchini as originally intended. And while I used walnuts in mine, as always, the nuts are optional or changeable. Pecans are always delicious in sweet breads. Hazelnuts or macadamia nuts would be really interesting too.  This recipe uses only cinnamon, but you could change that up too. Add in a little bit of nutmeg or cloves for more of a fall flavor. And you can absolutely bake this in standard 8″x4″ loaf pans. I couldn’t resist trying out this beautiful new swirl pan I just got. And I have to say that I am loving it.

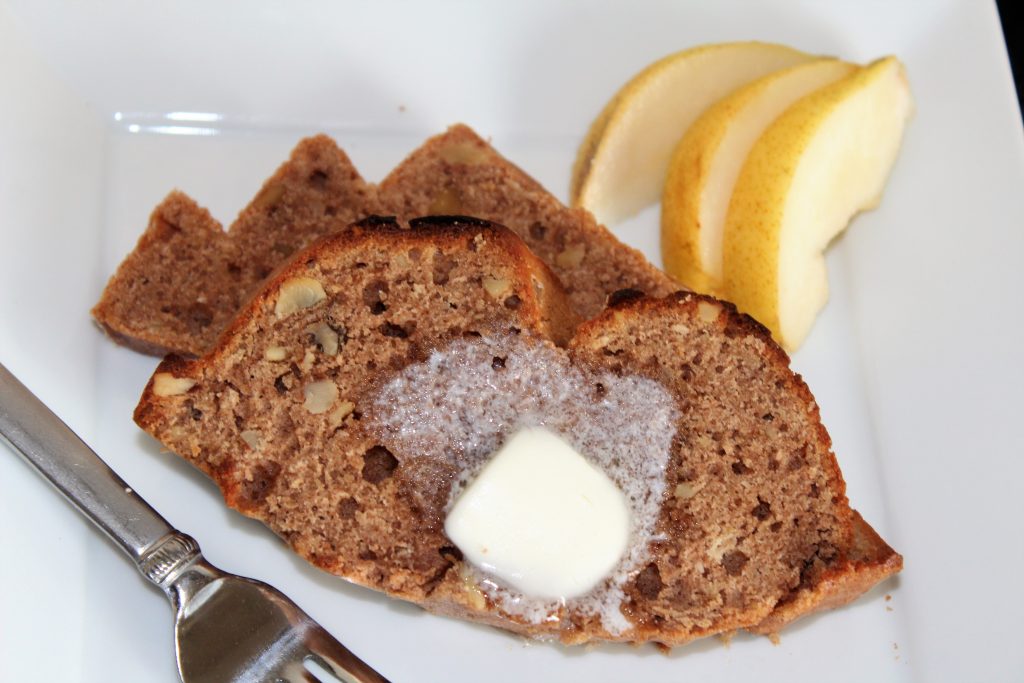
Serve this warm or at room temperature. Or toast it and spread on a little butter. Or cream cheese. Or, if you want to go all out, drizzle on some cream cheese icing for a decadent treat. I think I need to go make another batch of this and do just that….


Print Recipe
Zucchini Bread - with Spaghetti Squash!
Course Breakfast, Dessert
Servings
Loaves
Ingredients
Course Breakfast, Dessert
Servings
Loaves
Ingredients
Instructions
  1. Whisk eggs and sugar together until thick and very light yellow in color.
  2. Whisk in oil and vanilla until combined.
  3. Stir in shredded zucchini or squash.
  4. Combine dry ingredients and stir into batter along with nuts, if using, just until combined.
  5. Pour into two 8"x4" greased loaf pans.
  6. Bake at 325 degrees F for 60-70 minutes. (See notes).
  7. Cool 10 minutes before turning out onto a cooling rack to finish cooling. Serve warm or room temperature.
  8. Store in an airtight container for 2-3 days at room temperature or a week refrigerated.
Recipe Notes
  • Zucchini should be grated raw, with or without the peel.
  • Spaghetti squash should be cooked (steamed or baked) and shredded before adding to batter.
  • If you are using larger loaf pans (like the pan I used, or a 9"x5" pan) the bread will cook faster. Start checking after 35 minutes.
Share this Recipe

Coffee Chocolate Chip Oatmeal Cookies

I know what you’re thinking. You’re thinking you don’t need another chocolate chip cookie recipe. But you’re wrong. Because not only is this cookie delicious and different than most of your chocolate chip cookie recipes, this one doesn’t have to be a chocolate chip cookie.

This recipe is based off of a recipe we made all the time as kids. We always had homemade cookies in our school lunch. Always. (My mom is the best. 🙂 ). The oatmeal chocolate chips cookies were a regular and a favorite. I was thinking about them the other day, and I thought they might be improved with a bit of coffee. (I was right). I made a few other changes (took out one egg white, used all brown sugar, melted the butter) to make them even chewier. Also a good idea.

But as I said, these don’t have to be chocolate chip cookies. In fact, the original recipe called for either chocolate chips OR shredded coconut. You could absolutely make that substitution here. Or add chopped nuts. Or dried fruit (you know, like raisins, if you’re in to that kind of thing). Or any combination of the above. The coffee is not an overwhelming flavor, but it really does add an interesting element to the cookie. Yes, you can leave it out. Or, if you want a real coffee punch, use up to twice the amount I’ve called for.

One thing you shouldn’t do is skip the chilling the dough step. Especially when using the melted butter, you really need to chill the dough to get a thicker, chewy cookie. Unless you want a thinner, crispier cookie. In which case, you should bake these as soon as they are mixed. (But seriously, why would you want that??) Whatever way you make these, you should definitely make them soon. I was informed that these are “husband approved”, and that I didn’t need to bring these in to the office to share. (Sorry guys!) 🙂

Print Recipe
Coffee Chocolate Chip Oatmeal Cookies
Course Dessert
Servings
cookies
Ingredients
Course Dessert
Servings
cookies
Ingredients
Instructions
  1. Combine melted butter and brown sugar and mix well.
  2. Add egg, egg yolk, coffee (dissolved in water), and vanilla and mix until combined.
  3. Add dry ingredients, mixing just until combined.
  4. Stir in chocolate chips or other mix-ins.
  5. Refrigerate dough at least 30 minutes.
  6. Scoop chilled dough by heaping tablespoons onto cookie sheets.
  7. Bake at 350 degrees F for 12 to 15 minutes or until golden brown and just set. Do not overbake.
  8. Cool completely on wire rack. Store in airtight container up to a week.
Recipe Notes
  • Use any flavor chips you like.
  • Substitute chopped nuts, shredded coconut, and/or dried fruit.
  • Use any combination that sounds good to you!
Share this Recipe
 

Unicorn Pizzelles Three Ways: Cookies, Sandwiches, and Stroopwafels

Hi everyone! Is it too late to jump on the unicorn bandwagon? 

What a busy spring it has been. I was out of town for work most of the last month, and when I finally got back I had this small matter of my wedding to attend to. 🙂 It turned out to be a beautiful day, at least for the few hours we needed it to be. It stormed the night before and then again that afternoon, but in the late morning it dried up and the sun actually peeked out a little bit. It was a small ceremony, with only the two of us and the pastor (and photographer), but it was perfect, and everything we wanted it to be. I made my own wedding cake – I know, everyone says not to do it – but it turned out great. I made one of the geode cakes that has become so popular lately. Do you want to see a picture?

So, as you can see, I have been busy, and I have been baking. I just haven’t had time to do much for this blog. But I got a pizzelle maker from my parents for the wedding, and I knew I had to do something fun with it. Since I hadn’t made any unicorn treats yet, and they seem to be so popular, I decided it was time. And because I just can’t leave something well enough alone, I made a couple of variations.

Of course the “plain” cookie is delicious, but I also used a circle cutter to cut smaller circles and filled those with white chocolate buttercream. Then I rolled them in sprinkles. Because unicorn cookies need sprinkles. And for the larger cookies, I filled some with a caramel stroopwafel filling. Stroopwafels are a pizzelle-like cookie from the Netherlands filled with a cinnamon caramel. I had never had one, but they sounded delicious – and they are. Apparently you can place it over a steamy mug of coffee or tea, and that will warm the cookie and filling slightly, making it even better.

Pizzelles are so easy to make. Yes, you need a pizzelle iron, but they are totally worth it. They are a really simple batter, and they cook up so fast you can make a ton of cookies pretty quickly. And, they work perfectly with a 1:1 gluten-free flour blend if you are GF.  You can flavor them with any extract you want. And you can fill them with almost anything. They make great ice cream sandwiches. Or curl them into an ice cream cone while they are still warm. Or spread on some peanut butter, or Nutella, or cookie butter….

If you aren’t into unicorns, go with darker colors and make galaxy-inspired cookies. Or, with graduation season upon us, color these with your school colors. They would be great for a graduation party! However you make them, you should make them soon!


Print Recipe
Unicorn Pizzelles Three Ways
Basic pizzelles, with two optional fillings.
Servings
Ingredients
Pizzelles
White Chocolate Buttercream
Stroopwafel Filling
Servings
Ingredients
Pizzelles
White Chocolate Buttercream
Stroopwafel Filling
Instructions
Pizzelles
  1. Beat eggs and sugar with the whisk attachment of an electric mixer until light yellow in color, 3 to 5 minutes.
  2. Add vanilla and cooled, melted butter and mix until combined.
  3. Sift together flour and baking powder, and gently stir into egg mixture.
  4. If desired, divide into three equal portions and color each portion a different color.
  5. Place each color into a small disposable piping bag, cut off the ends, and place all three into a larger piping bag.
  6. Or, using a long spatula, place the three colors side-by-side in the large piping bag.
  7. Preheat and grease a pizzelle iron according to manufacturers directions.
  8. Pipe about 1 to 1 1/2 tablespoons of batter onto each circle and bake 25-35 seconds.
  9. Remove from iron with a spatula and place flat onto a wire rack to cool.
  10. For smaller cookies, use about 1/2 tablespoon batter and cook for 15-20 seconds.
  11. As soon as cookies come off of the iron (you have about 15 seconds tops), use a 2 to 3 inch round metal cookie cutter to cut a circle out of the middle of the cookie. Cool on wire rack as above.
White Chocolate Buttercream
  1. Combine chocolate chips and cream in a microwavable bowl.
  2. Microwave for 1 to 1 1/2 minutes, stirring every 30 seconds, until chips are melted. (You are making a white chocolate ganache.)
  3. Cool ganache to room temperature, either on the counter or in the refrigerator.
  4. Place buttercream into a bowl, and beat in cooled ganache.
  5. Sandwich two small pizzelles together with the white chocolate buttercream, and roll edges in sprinkles if desired.
Stroopwafel Filling
  1. Combine all ingredients in a saucepan and cook over medium heat until mixture reaches the soft ball stage, 234 to 240 degrees Fahrenheit.
  2. Remove from heat and cool slightly, no more than 5 minutes.
  3. Working quickly, and CAREFULLY (it's hot sugar!), spread about 1/2 tablespoon of the mixture on one full-size pizzelle and top with another cookie.
  4. If the mixture gets too thick before you finish filling cookies, place the pan back on the burner on low until the mixture starts to thin back out.
Recipe Notes
  • Use any extract you like. Anise is a traditional flavor for pizzelles.
  • Use any colors you like, or leave it uncolored and drop by spoonfuls instead of piping the batter.
  • Fill the cookies (or not) with any filling you like. Ice cream, buttercream, Nutella, etc.
Share this Recipe

Mardi Gras Cookies, and Let’s Talk about Archaeology

Hi everyone! I’ve been kind of under the weather this week, so I decided to make a pretty simple cookie. They take almost no time to put together, they are delicious, and you can totally customize the colors to suit any occasion.

Since it’s a short and sweet recipe, I thought now would be the perfect time to talk a little about archaeology, and to show you some pictures from past projects I’ve been on. If you’re just here for the recipe, go ahead and scroll down to the bottom of the post – I won’t be offended. 🙂

For those of you who are interested in my “other” job, let’s run through a quick FAQ.

First, What is archaeology? Well, the biggest misconception is that archaeologists dig up dinosaurs. In fact, paleontologists deal with dinosaurs, while archaeologists deal with the human past. Specifically, the material remains left by humans. This includes everything from arrowheads and other stone tools to foundation remnants and broken plates and glasses.

Second, Why do archaeologists do what they do? There are a lot of ways to interpret this question, but here I am getting at the reason my job exists. Because of the Historic Preservation Act of 1966, and specifically Section 106, all federally funded or permitted projects have to undergo a historic and archaeological review to determine the impact that the project will have on any historic sites. That means if federal funds or permits are involved, archaeologists and/or historians have to survey the area to be impacted to determine if there are significant historic or archaeological sites that may be impacted. If there are, the project is either re-routed, or the site is excavated to retrieve any data possible.

So, finally, What do I actually do? The vast majority of the fieldwork that I do involves archaeological survey. In other words, I am out walking across the project area. In plowed fields, we simply look for artifacts that have been brought to the surface by the plowing. In pastures and other where the ground surface isn’t visible, we dig small holes at regular intervals, and pass the dirt through a mesh screen to look for artifacts. When we find artifacts or structure remnants like foundations, we record the site and report it’s location and any information we can gather to the state. If the state determines the site may be significant, we may have to return to do further testing on the site, and perhaps even full excavation, but this is rare. Many sites are not considered significant, that is, they won’t provide us new or important information. And those that are, or may be, or often avoided by the project by a re-route.

Ok. I’m sure I’ve bored you completely by now. 🙂  But now, its time for cookies. These really couldn’t be more simple. It’s a quick and easy dough to put together. Then you divide the dough in half, roll each half into a rectangle, and add sprinkles. Roll it up, chill it, slice it, and bake it. And like I said earlier, if you’re not celebrating Mardi Gras, or want to use the recipe for a different celebration, you can just change up the sprinkles. Think red, white, and blue for July 4th…or red and green for Christmas…or brown, yellow, and orange for the fall…or school colors for graduation. I could go on and on with all the ideas I have for this, but I’m sure you’ve got ideas too, so I’ll just give you the recipe so you can get baking!


Print Recipe
Mardi Gras Cookies
Course Dessert
Servings
cookies
Course Dessert
Servings
cookies
Instructions
  1. Cream butter and sugar with an electric mixer until light and fluffy.
  2. Add egg and vanilla, and mix well.
  3. Add salt and flour, and mix until combined.
  4. Divide dough in half. Place one half onto a lightly floured piece of waxed paper. Dust lightly with flour and cover with another piece of waxed paper. (Or chill until firm enough to roll without sticking to the rolling pin.)
  5. Roll into a 12-inch by 8-inch rectangle, about 1/8-inch thick.
  6. Using one color of sprinkles at a time, coat the dough with a long "stripe" of sprinkles, covering about a third of the rectangle. Repeat with the remaining colors, lined up next to each other.
  7. Roll the dough up tightly, starting from the long end.
  8. Wrap the dough cylinder in the waxed paper and refrigerate 1 hour, or freeze 15-20 minutes.
  9. Repeat with remaining half of dough.
  10. Remove waxed paper, and slice dough into 1/4-inch slices. Place on Silpat or parchment-lined baking sheet.
  11. Bake at 350 degress F for 15-20 minutes or until lightly browned.
  12. Remove from baking sheet to cool completely. Store in airtight container up to one week.
Recipe Notes

Change the sprinkle colors to suit the celebration. For example, red, white, and blue for July 4th. Red and green for Christmas. School colors for a graduation, etc.

Share this Recipe