Mardi Gras Cookies, and Let’s Talk about Archaeology

Hi everyone! I’ve been kind of under the weather this week, so I decided to make a pretty simple cookie. They take almost no time to put together, they are delicious, and you can totally customize the colors to suit any occasion.

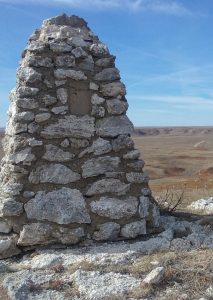
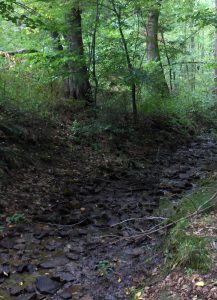
Since it’s a short and sweet recipe, I thought now would be the perfect time to talk a little about archaeology, and to show you some pictures from past projects I’ve been on. If you’re just here for the recipe, go ahead and scroll down to the bottom of the post – I won’t be offended. 🙂

For those of you who are interested in my “other” job, let’s run through a quick FAQ.

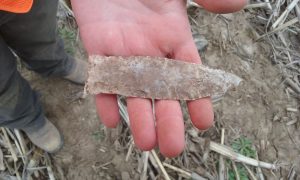
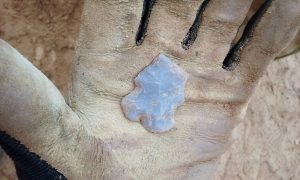
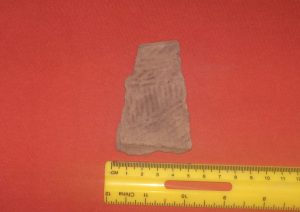
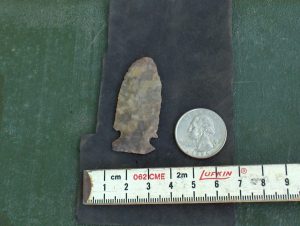
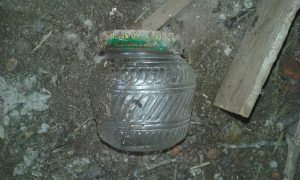
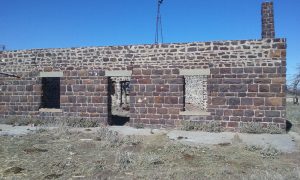
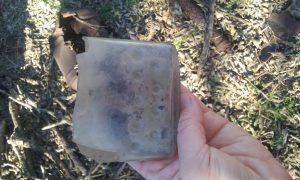
First, What is archaeology? Well, the biggest misconception is that archaeologists dig up dinosaurs. In fact, paleontologists deal with dinosaurs, while archaeologists deal with the human past. Specifically, the material remains left by humans. This includes everything from arrowheads and other stone tools to foundation remnants and broken plates and glasses.

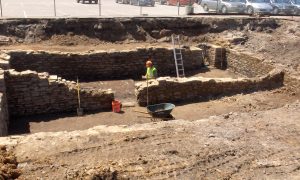
Second, Why do archaeologists do what they do? There are a lot of ways to interpret this question, but here I am getting at the reason my job exists. Because of the Historic Preservation Act of 1966, and specifically Section 106, all federally funded or permitted projects have to undergo a historic and archaeological review to determine the impact that the project will have on any historic sites. That means if federal funds or permits are involved, archaeologists and/or historians have to survey the area to be impacted to determine if there are significant historic or archaeological sites that may be impacted. If there are, the project is either re-routed, or the site is excavated to retrieve any data possible.

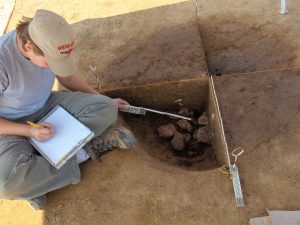
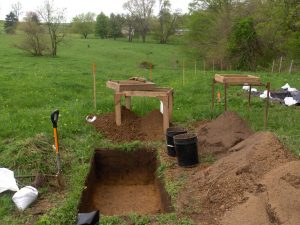
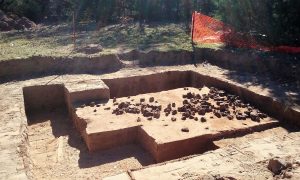
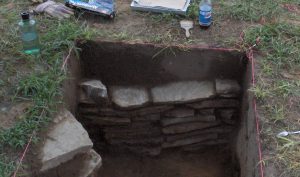
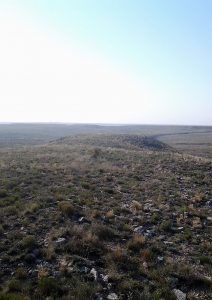
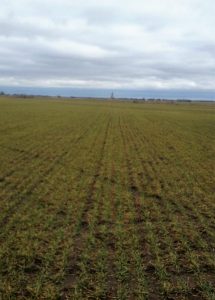
So, finally, What do I actually do? The vast majority of the fieldwork that I do involves archaeological survey. In other words, I am out walking across the project area. In plowed fields, we simply look for artifacts that have been brought to the surface by the plowing. In pastures and other where the ground surface isn’t visible, we dig small holes at regular intervals, and pass the dirt through a mesh screen to look for artifacts. When we find artifacts or structure remnants like foundations, we record the site and report it’s location and any information we can gather to the state. If the state determines the site may be significant, we may have to return to do further testing on the site, and perhaps even full excavation, but this is rare. Many sites are not considered significant, that is, they won’t provide us new or important information. And those that are, or may be, or often avoided by the project by a re-route.

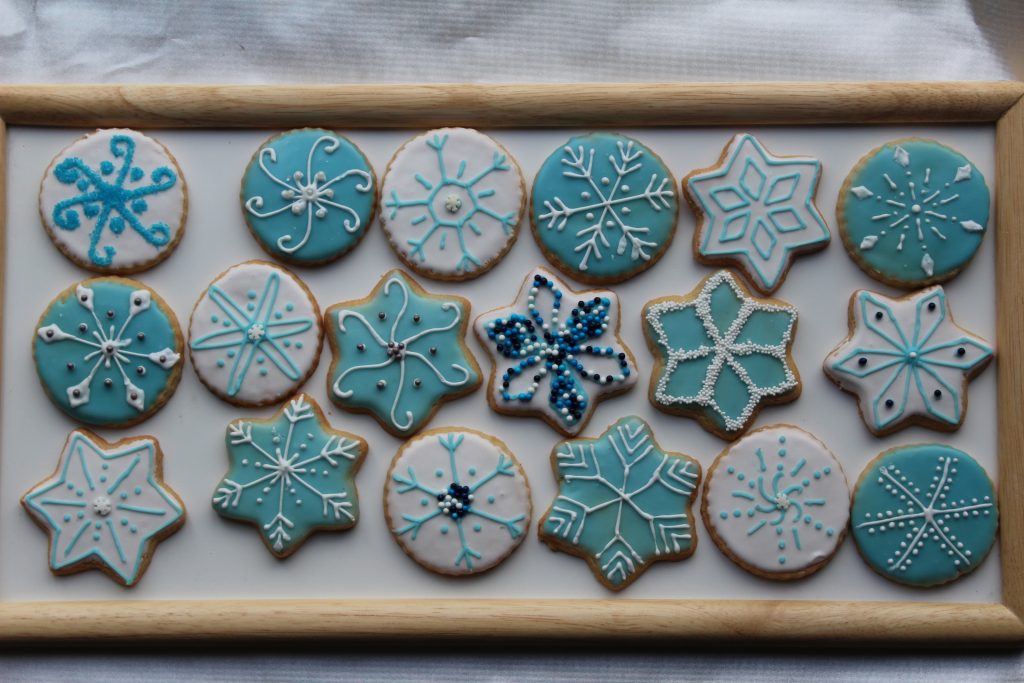
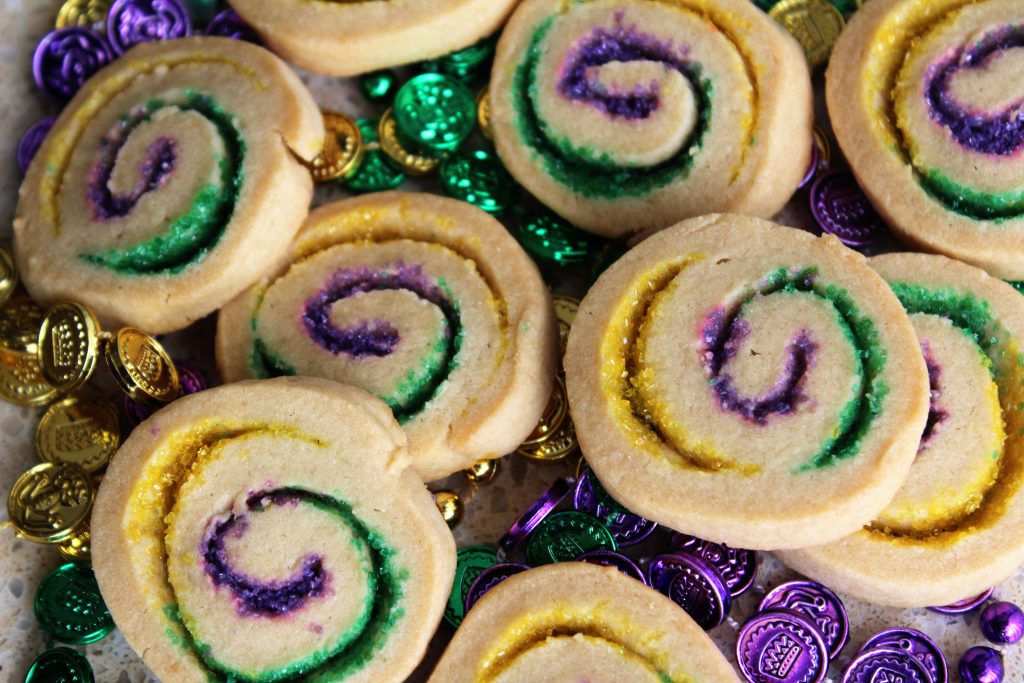
Ok. I’m sure I’ve bored you completely by now. 🙂  But now, its time for cookies. These really couldn’t be more simple. It’s a quick and easy dough to put together. Then you divide the dough in half, roll each half into a rectangle, and add sprinkles. Roll it up, chill it, slice it, and bake it. And like I said earlier, if you’re not celebrating Mardi Gras, or want to use the recipe for a different celebration, you can just change up the sprinkles. Think red, white, and blue for July 4th…or red and green for Christmas…or brown, yellow, and orange for the fall…or school colors for graduation. I could go on and on with all the ideas I have for this, but I’m sure you’ve got ideas too, so I’ll just give you the recipe so you can get baking!


Print Recipe
Mardi Gras Cookies
Course Dessert
Servings
cookies
Course Dessert
Servings
cookies
Instructions
  1. Cream butter and sugar with an electric mixer until light and fluffy.
  2. Add egg and vanilla, and mix well.
  3. Add salt and flour, and mix until combined.
  4. Divide dough in half. Place one half onto a lightly floured piece of waxed paper. Dust lightly with flour and cover with another piece of waxed paper. (Or chill until firm enough to roll without sticking to the rolling pin.)
  5. Roll into a 12-inch by 8-inch rectangle, about 1/8-inch thick.
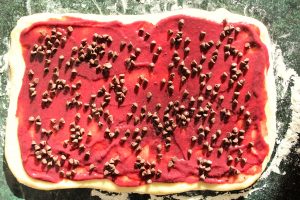
  6. Using one color of sprinkles at a time, coat the dough with a long "stripe" of sprinkles, covering about a third of the rectangle. Repeat with the remaining colors, lined up next to each other.
  7. Roll the dough up tightly, starting from the long end.
  8. Wrap the dough cylinder in the waxed paper and refrigerate 1 hour, or freeze 15-20 minutes.
  9. Repeat with remaining half of dough.
  10. Remove waxed paper, and slice dough into 1/4-inch slices. Place on Silpat or parchment-lined baking sheet.
  11. Bake at 350 degress F for 15-20 minutes or until lightly browned.
  12. Remove from baking sheet to cool completely. Store in airtight container up to one week.
Recipe Notes

Change the sprinkle colors to suit the celebration. For example, red, white, and blue for July 4th. Red and green for Christmas. School colors for a graduation, etc.

Share this Recipe

Cherry Chocolate Chip Sweet Rolls

Hi everyone! I have something really exciting to share with you today! Oh – and I made you Cherry Chocolate Chip Sweet Rolls. 🙂

So I’ve been back down in Oklahoma, but this time I’ve been in Ponca City, which just happens to be the next town over from Pawhuska. Now, if you read many food blogs, or watch Food Network, you may recognize that name. That’s because it’s where Pioneer Woman lives, and where her Mercantile is located. Well, I was fortunate enough to get to go visit the Mercantile and eat dinner there! The store is really amazing, and the food was fantastic. I bought a cookbook and a few bowls, and then spent too much money at the bakery. 🙂 And dinner was worth the wait (the line was out the door when we first got there!). I had the grilled cheese, and others I went with tried the ribeye reuben, the chicken fried steak, and the fried chicken sandwich. They are all highly recommended by us!

That was exciting enough, but what made the day even better was that the lodge, the guesthouse on their ranch where Ree films her Food Network show, was open for tours that day, and I managed to get there just before they closed! It was really cool to visit both her “studio” and the Mercantile. The Pioneer Woman is one of the most successful and well-known food blogs, so for a new blogger it was a real treat. I definitely recommend stopping at the Mercantile if you ever find yourself anywhere near Pawhuska!

Anyway, let’s get back to these sweet rolls. They are somewhat inspired by Pioneer Woman, since I tried her cinnamon rolls at the bakery (too die for!!), and in the cookbook I bought she has a recipe for Raspberry Cream Cheese Sweet Rolls.  I was really craving some kind of sweet roll, and with Valentine’s day coming up, chocolate and cherry seemed to be an appropriate combination. 🙂

These start with a cherry curd, which is really simple to make. You just need frozen cherries, sugar, butter, egg yolks, and corn starch. The recipe makes about 2 cups, and you only need 1/2 cup for this recipe, so there is plenty left over. Spread it on toast, biscuits, pancakes, ice cream, pork chops….well, pretty much anything! You can also substitute any frozen berries in this recipe, and it would be just as delicious.

The filling is just the curd and chocolate chips, but there is so much room for adjustments! Prefer lemon curd? Go for it. Or want them even faster? Use a store-bought jam. Leave out the chocolate chips, or change up the flavor (white chocolate with the lemon curd would be perfect). Add nuts with the chips or in place of them. The possibilities are endless!

This recipe is scaled to make 6 rolls, but can easily be doubled to make a dozen in a 9×13-inch pan.

Oh, and did I mention these come together in about an hour, if you already have the curd made? That’s right – you are only an hour away from warm, chocolatey, sweet-tart cherry sweet rolls!


Print Recipe
Cherry Chocolate Chip Sweet Rolls
Course Breakfast
Prep Time 40 minutes
Cook Time 20 minutes
Servings
rolls
Ingredients
Course Breakfast
Prep Time 40 minutes
Cook Time 20 minutes
Servings
rolls
Ingredients
Instructions
  1. Combine 1 cup flour and the yeast in a large bowl, or the bowl of a stand mixer.
  2. Combine milk, water, sugar, oil, and salt in a microwave safe bowl. Microwave for 30 seconds at a time, stirring after each, until mixture is slightly warm, about 1 minute.
  3. Add the milk mixture to the flour and yeast along with the egg yolk. Beat with an electric mixer, or by hand, for 30 seconds or until combined. Scrape bowl, and beat at medium speed for 3 minutes.
  4. Either by hand or with a dough hook, add in the second cup of flour and mix until a soft dough forms. Knead, by hand or with the dough hook, for 3 to 5 minutes, adding up to an additional 1/4 cup of flour, until dough is smooth and elastic. It will be a very soft dough, and should be very slightly sticky. Cover and let rest for 10 minutes.
  5. Turn dough out onto a lightly floured surface and roll into a 7x12-inch rectangle. Spread cherry curd over dough, then sprinkle with chocolate chips. Beginning from the short (7-inch) side, roll up jelly-roll style. (If doubling, roll a 14x12-inch rectangle and roll from the long side.)
  6. Slice into 6 rolls and place, cut side up, into a greased 8-inch square pan. Cover and let rise until nearly doubled, about 20 minutes.
  7. Bake in a 375-degree F oven for 15 to 20 minutes or until golden brown. Cool slightly before topping with the powdered sugar glaze and serving. Store, covered, at room temperature for 2 to 3 days.
Recipe Notes

Cherry curd recipe here.

Powdered sugar glaze recipe here.

Recipe can be doubled to make 12 rolls in a 9x13-inch pan.

Substitute any curd or jam.

Substitute any flavor chocolate chips.

Add 1/4 cup chopped nuts instead of or in addition to the chocolate chips.

Flavor the powdered sugar glaze with extracts.


Share this Recipe

Puppy Chow (Muddy Buddy) Pie

Yep. You read that right. I made a Puppy Chow, or Muddy Buddy if you prefer, pie!

So, are we done with the January diets yet? Because this is decidedly NOT diet food. But it is so delicious I promise you won’t care.

You all know what Puppy Chow is, right? It’s a chocolate and peanut butter mixture that you pour all over Chex cereal, which you then douse with powdered sugar. It is highly addictive, and definitely one of my favorite sweet treats. The best pieces are the ones that are coated a little thicker with the chocolate and peanut butter.

So I figured, why not just fill a pie shell with that filling? And if you made that pie crust with crushed up cereal, so much the better. And then you certainly can’t stop there – better put a heavy coat of powdered sugar on top.

This is a pretty simple pie, but it is very rich. A small slice goes a long way. And you can certainly change it up (but I don’t know why you would want to 🙂 ). Use white chocolate chips instead, or even milk chocolate or butterscotch. Try using a different nut butter or even using Nutella in it’s place. And if the powdered sugar seems like just too much, go ahead and top it with crushed nuts (peanuts, hazelnuts, whatever makes you happy), or pretty sprinkles for a special occasion. I hope you give this a try – you will love it!

Puppy Chow Pie
A chocolate and peanut butter filling in a cereal crust - just like Puppy Chow (Muddy Buddies)!
For the crust
  1. 4 cups Chex cereal (rice or corn)
  2. 3 tablespoons sugar
  3. 4 tablespoons butter, melted
For the filling
  1. 1 cup semisweet chocolate chips
  2. 1/2 cup heavy or whipping cream
  3. 1/2 cup creamy peanut butter
  4. 1/2 teaspoon vanilla extract
  5. powdered sugar, for topping
Add ingredients to shopping list
If you don’t have Buy Me a Pie! app installed you’ll see the list with ingredients right after downloading it
Instructions
  1. Finely crush the cereal. You should end up with about 2 cups of crumbs. Mix well with the sugar and melted butter. Spray a 9" pie pan with baking spray, and press crumb mixture into bottom and up sides of pan. Use a small greased bowl or measuring cup to help. Bake the crust at 350 degrees F for 10 minutes. Let cool completely.
  2. While crust is baking, heat chocolate chips and whipping cream in the microwave, stirring every 30 seconds, until chocolate is melted. Add peanut butter and stir until smooth. Microwave additional 15 seconds if mixture is not hot enough to melt peanut butter. Stir in vanilla. Chill mixture in the refrigerator until room temperature and beginning to hold it's shape. It should be about the consistency of peanut butter. Whisk briefly by hand, just until mixture begins to lighten in color. Immediately spread into cooled crust and refrigerate, about 30 minutes to an hour, until firm.
  3. Dust generously with powdered sugar and serve. Store leftovers in the refrigerator.
Notes
  1. You can use different cereals (rice krispies, corn flakes, etc.), as long as they are unsweetened and crunchy. You need 2 cups once crushed.
  2. Substitute semisweet chocolate with any chips you like.
  3. Any nut butter or Nutella can be substituted for the peanut butter.
  4. Top with crushed nuts or sprinkles instead of powdered sugar, if desired.
Print
The Archaeologist Bakes http://www.thearchaeologistbakes.com/

Merry Christmas!

Sugar Cookies, Cran-Rasp Pinwheels, Gluten-Free Chocolate Spritz, Nut Balls, Cheesecake Stuffed Gingerbread, Browned Butter Apple Cider Shortbread

It’s just a few days before Christmas, and I am finally back in town for a little while. I will have to get some pictures of this last project together to share with you all soon.

In the meantime, I wanted to quickly share with you the cookies I made for Christmas this year. It is a shorter list than most years, since I didn’t have much time for baking. But, if you are still looking for a few ideas for this weekend, here you go!

Starting in the upper left corner, and moving clockwise:

Cheesecake Stuffed Gingerbread

Basic Sugar Cookies, decorated as snowflakes

Gluten-Free Chocolate Spritz

Nut Balls/ Russian Tea Cakes

Cran-Raspberry Pinwheels

Browned Butter Apple Cider Shortbread with Salted Caramel Drizzle

I hope you find something here that sounds good and give them a try. The Nut Balls are a long-time family favorite. I have used plain raspberry, plain cranberry, and this year a cran-raspberry filling for the pinwheels and they are always a hit. They look fancy, but are really pretty simple to make.

And the newcomer this year is the shortbread – browned butter, apple cider, and topped with a salted caramel drizzle. They were the absolute favorite of most of the people I shared them with. I had pinned a recipe for browned butter shortbread, and then I saw a recipe for apple cider shortbread. I decided they needed to be combined. And then I saw Wilton’s salted caramel candy melts (Hershey’s just came out with a salted caramel baking chip as well), and figured it was a natural match. It was a very good idea.


Merry Christmas! I hope you all have a safe and happy holiday season!

Cheesecake Stuffed Gingerbread Cookies


Cheesecake Stuffed Gingerbread Cookies

Hi everyone!

Between work and travelling home to Cleveland for Thanksgiving, I’ve been super busy the last few weeks. But the good news is – I made you cookies! And these aren’t just your basic cookies. These are soft and molasses-y gingerbread cookies.

That I stuffed with a cheesecake filling. You’re welcome. 🙂

Cheesecake Stuffed Gingerbread Cookies

I first came up with this idea last year, when I tried these cheesecake-filled pumpkin snickerdoodles.  Umm…you should probably try those too. Seriously one of the best cookies I’ve ever eaten. But because I couldn’t leave it alone, I started thinking of other flavors that would pair well with the cheesecake filling.  Since we have finally made it to the holiday season, the first thing that came to mind was my family’s gingerbread cookies. They are soft and a little cakey, much like the original pumpkin version.

These are perfect for Christmas, with a little colored sugar on top. But you could roll them in plain granulated sugar as well. A little bit of lemon zest in the cheesecake filling would also be delicious. Or, for that matter, a lemon cookie would also be great. Or chocolate, or peanut butter….I’ve got a ton of ideas for the base recipes, and I plan to work on some other cookie flavors to pair with it. In the meantime, enjoy the gingerbread. It is that time of year, after all. 🙂

Cheesecake Stuffed Gingerbread Cookies

Cheesecake Stuffed Gingerbread Cookies
Yields 48
For the filling
  1. 8 ounces cream cheese, softened
  2. 1/4 cup granulated sugar
  3. 2 teaspoons vanilla extract
For the cookies
  1. 1 cup vegetable shortening
  2. 1 cup sugar
  3. 1 egg
  4. 1 cup molasses
  5. 2 tablespoons white vinegar
  6. 1 tablespoon ground ginger
  7. 1 tablespoon ground cinnamon
  8. 1 teaspoon cloves
  9. 1 1/2 teaspoons baking soda
  10. 1/2 teaspoon salt
  11. 5 cups flour
  12. Coarse red and green sugar, for decorating - optional
Add ingredients to shopping list
If you don’t have Buy Me a Pie! app installed you’ll see the list with ingredients right after downloading it
For the filling
  1. Beat all ingredients together with an electric mixer until well combined. Scoop by teaspoonfuls onto a parchment- or wax paper-lined cookie sheet. Freeze 15 minutes until firm.
For the cookies
  1. Cream shortening and sugar until fluffy. Add egg, molasses, and vinegar and mix well. Mixture will look curdled. Combine dry ingredients and add to shortening mixture slowly. Mix until well combined.
  2. Using a scant tablespoon of dough, flatten slightly and top with one teaspoon of the chilled cream cheese mixture. Top with another slightly flattened scant tablespoon of cookie dough. Seal edges and roll into a ball. Dip the top in colored sugar, or roll completely in granulated sugar. Place on baking mat- or parchment-lined cookie sheets. Flatten slightly.
  3. Bake at 350 degrees F for 12-15 minutes, or until cookies have puffed and started to crack, and are beginning to firm up around the edges. Cool 5 minutes on cookie sheet, then remove to wire rack to cool completely.
Notes
  1. Add a teaspoon of lemon or orange zest to the filling for a delicious twist!
Print
The Archaeologist Bakes http://www.thearchaeologistbakes.com/

Cran-Raspberry Pretzel Salad

Hi Everyone!

I’ve been super busy and on the road the last few weeks, so I didn’t get a chance to post a new recipe. To make up for it, I’ve got both a recipe and a gallery of decorated food for you today! I added a new page at the top of the site with pictures of a lot of the cakes and cookies I have decorated. I plan to keep updating it both with old items I already have pictures of, and with new items as I create them. 

And, as I said, I have a new recipe for you. This is a take on the old Strawberry Pretzel Jello Salad that I’m sure many of you have had. It’s a buttery pretzel crust with a sweet cream cheese filling topped with strawberry studded Jello.
Cream Cheese Filling

Since I’m not a big fan of strawberries, my mom started making this with raspberries and raspberry Jello. I decided to change it up again and make it more Thanksgiving- and Christmas-oriented. I made a basic cranberry sauce, but I amped it up with a little bit of raspberry as well. And I decided to make them individual-sized in cupcake liners.

Cran-Raspberry Pretzel Jello

You can make this in small mason jars, or in an 8″ square pan. Or double it so it’s the size of the original recipe and make it in a 9×13-inch pan. I didn’t add any flavors, like cinnamon or orange zest, to the cranberry sauce, but they would be great additions. And if you prefer to go a little more traditional, or want to make it a different time of year, you can use any combination of frozen fruit and jello. How does cherry sound? Or what about blueberry in the spring? You could add a little lemon zest into the cream cheese layer for any of the berry flavors. Or maybe a sprinkle of mini chocolate chips instead with the cherry (or raspberry or strawberry…) version. (So that’s going on my to-make list. 🙂 )

Cran-Raspberry Pretzel Jello

It’s not overly sweet, so it can be served as a side dish or a dessert. It wouldn’t be out of place on a brunch menu either. Anyway, I hope you guys try this out, whatever version you choose!

Cran-Raspberry Pretzel Jello


Individual Cran-Raspberry Pretzel Salads
Yields 12
For the Crust
  1. 2 cups (3 ounces) mini pretzel twists or thin sticks
  2. 2 teaspoons granulated sugar
  3. 6 tablespoons butter, melted
For the Cream Cheese Layer
  1. 4 ounces cream cheese, softened
  2. 1/4 cup granulated sugar
  3. 4 ounces (half of an 8 ounce tub) frozen whipped topping, thawed
For the Cran-Raspberry Layer
  1. 6 ounces (about 1 1/2 cups) fresh or frozen cranberries
  2. 2 ounces (about 1/2 cup) fresh or frozen raspberries
  3. 1/4 cup water
  4. 1/2 cup sugar
  5. 1 tablespoon raspberry jam
Add ingredients to shopping list
If you don’t have Buy Me a Pie! app installed you’ll see the list with ingredients right after downloading it
For the Crust
  1. Preheat the oven to 400 degrees F. Line a 12-cup cupcake pan with cupcake liners and spray with baking spray. Or, spray an 8-inch square baking pan or 12 small mason jars with baking spray.
  2. Combine the pretzels and sugar in a food processor and pulse until the pretzels are coarse crumbs. Add the melted butter and pulse a few times until combined.
  3. Divide crumbs between the 12 liners, 12 jars, or dump into square pan. Pack crust down firmly. Bake for 5-10 minutes, depending on container, or until lightly browned. Let cool completely.
For the Cream Cheese Filling
  1. Combine the cream cheese and sugar with a hand or stand mixer until light and fluffy. Fold in the whipped topping. Spoon or pipe onto cooled crust. Refrigerate while you make the final layer.
For the Cran-Raspberry Layer
  1. Combine the cranberries, raspberries, water, and sugar in a saucepan. Cook over medium heat, stirring occasionally, until the mixture begins to simmer. Reduce heat slightly and continue cooking until all of the cranberries have popped and the mixture has thickened, 10-15 minutes. Remove from heat and stir in the raspberry jam. Cool to room temperature.
  2. Once cooled, spoon or pipe onto cream cheese layer. Return to refrigerator and chill for at least 2 hours.
  3. Keep leftovers refrigerated.
Print
The Archaeologist Bakes http://www.thearchaeologistbakes.com/

Fall Pumpkin Chocolate Bark

Pumpkin Spice Fall Chocolate Bark. Perfect for Thanksgiving and Halloween!

It’s back to the field for me this week, so I’ve got a really quick recipe for you. Actually, it’s not even a recipe. Chocolate bark is so easy, and infinitely customizable.

I had a bag of pumpkin spice chips sitting in my pantry, and I’ve been trying to decide what to make with them. Cookies, bars, cupcakes – they’ve all been done. But pumpkin spice chocolate bark? That sounded perfect for a busy weekend.

Pumpkin Spice Pumpkins for Fall Chocolate Bark

I dug though my collection of chocolate molds, and found that I had a pumpkin version. Mine has 12 cavities that are about 1 inch across. You can find these in some hobby stores, as well as in cake decorating supply stores (there is usually at least one in good-sized cities) and online. I started by melting down a few green candy melts and piped that into the stems. You can also paint it in with a paintbrush (that you use only for food) or even a toothpick. Then I melted about 1 cup of the chips and spooned that into the pumpkins. I melt my chips and candy melts in the microwave in 15 to 30 second bursts. The one cup of chips made 24 pumpkins, or two trays worth in my mold.

Fall Halloween Thanksgiving Pumpkin Chocolate Bark

While the pumpkins were firming up in the refrigerator for about 10 minutes, I melted a pound of chocolate almond bark. I spread that out between 1/8 and 1/4 inch thick on a parchment (or wax-paper) lined baking sheet. Before it set, I added the pumpkins and threw on some fall leaf sprinkles for a little color and variety. Once it started to set, but before it was completely firm, I scored it into pieces with a sharp knife. I put it in the refrigerator for a few minutes so it could set completely, and then broke it along the scored lines.

Pumpkin Chocolate Bark Fall Halloween Thanksgiving

The best part about this is how easy it is to customize. You could use any flavor almond bark or chocolate for the base – try different baking chip flavors like butterscotch, cinnamon, or white chocolate. The same goes for the pumpkins. And you don’t have to have a chocolate mold – you could pipe simple shapes onto wax paper and let them set before dropping them onto the base chocolate. Or if all you have are some pretty sprinkles, drop the contrasting chocolate by spoonfuls onto the base and swirl with a skewer or knife before adding the sprinkles. This was so much fun and gave me so many other ideas! I’m sure you’ll see the concept again around Christmas!

Pumpkin Spice Chocolate Bark for Fall Halloween Thanksgiving

Pull-Apart Crazy Bread

img_0410

I’ve had a couple of busy weekends, so I haven’t had a lot of time to get a new recipe to you. Last weekend I was elbows-deep in flour and sugar, making a cake for a co-worker’s granddaughter’s 18th birthday. I really enjoy making and decorating cakes and cookies, and I’ve been thinking about adding a section to this website with some of my work. Look for that soon.

img_0404

For now, let’s talk about this bread. Growing up, I loved Little Caesar’s pizza. (Ok,  I still do.) Whenever we got take-out pizza, it was always Little Caesar’s. I had it for my birthday dinner most years. And if you are going to order their pizza, you must get the Crazy Bread. Please tell me you know what Crazy Bread is.  They bake their pizza crust into breadsticks, and slather it with butter, garlic, and parmesan cheese. Seriously. Delicious.

As I’ve been brainstorming ideas (by which I mean spending too many hours on Pinterest) for this blog, I still keep seeing pull-apart breads. They seemed to get pretty popular a few years ago. The first one I saw was a cinnamon version. At the time, I was baking for a few farmer’s markets and decided to try it out. That version is delicious, but I really wanted to have some savory items too. So tried making one with cheddar cheese and chives, and then I made a French Onion one. They were both very good ideas, and I’ve included those options in the recipe below. But, since I keep seeing commercials for Crazy Bread, this is the version that’s been stuck in my head for a few weeks now.

img_0394

img_0395

img_0400

I start with my mom’s pizza crust recipe.  It’s a nice soft dough that makes a pretty soft crust – perfect for Crazy Bread. It’s also super simple, and doesn’t require a mixer. The dough comes together in about 5 minutes, and then you let it rise. Once it’s risen, roll it out into a rectangle, slather it with garlic butter and cheese, and then cut it into strips. Stack those strips up, and cut into squares. Then  you just put those into the pan, and sprinkle with more cheese. Let it rise briefly, bake, and brush on the rest of that garlic butter. And then devour, with marinara sauce if you’d like.

img_0413

Pull-Apart Crazy Bread
Yields 1
Garlic, Butter, Parmesan, Bread. What more could you want?
For the dough
  1. 1 package active dry yeast (about 2 1/4 teaspoons)
  2. 1 1/2 cups warm water
  3. 2 tablespoons sugar
  4. 2 tablespoons olive or vegetable oil
  5. 1 teaspoon salt
  6. 3 to 4 cups flour
For the filling
  1. 6 tablespoons unsalted butter
  2. 1/4 teaspoon salt
  3. 1/2 teaspoon garlic powder
  4. 1/2 cup grated parmesan cheese
Add ingredients to shopping list
If you don’t have Buy Me a Pie! app installed you’ll see the list with ingredients right after downloading it
For the dough
  1. Combine yeast, water, sugar, and oil in a large bowl and let sit for 5 minutes. Add salt and 3 cups of flour and stir to combine. Add more flour as necessary to make a soft dough that doesn't stick to your hands. Do not use more than 4 cups flour - the dough should be very soft. Place into a greased bowl, cover, and let rise in a warm place until doubled, about 45 minutes.
To assemble
  1. Grease, or spray with non-stick spray, a 9" by 5" loaf pan.
  2. Melt butter with salt and garlic powder, either in the microwave on 50% power or on low on the stovetop.
  3. Turn the dough out onto a floured surface and roll into a 12" by 20" rectangle. It doesn't have to be perfect. Brush on about half of the garlic butter. Sprinkle with all but 1 tablespoon of the cheese.
  4. Cut the rectangle into 6 long strips, about 2" by 20". Stack all of the strips on top of each other and cut into 4 pieces. You will then have 4 stacks of small rectangles.
  5. Place the stacks, on their sides, into the pan. They should be stable enough that you can do this one stack at a time.
  6. Sprinkle with the remaining cheese, then cover loosely with a towel and set aside to rise for 20 minutes.
  7. While the dough rises in the pan, preheat the oven to 350 degrees.
  8. Bake for 35-40 minutes, or until the bread is golden brown. Remove from oven and brush with the remaining garlic butter.
  9. Let cool 5 to 10 minutes before turning out of the pan and serving.
Variations
  1. Cheddar-Chive: Use 3 tablespoons butter, melted, to spread on the rolled-out dough. Sprinkle with about 1 cup shredded cheddar cheese and 2 tablespoons chopped chives. Slice, stack, and bake as above, but no need to add extra butter after baking.
  2. Cheddar-Jalapeno: Same as Cheddar-Chive, but substitute chopped jalapenos, fresh or pickled, for the chives.
  3. French Onion: Melt 1/2 cup butter and combine with half an envelope of dry french onion soup mix. Brush this onto the rolled-out dough, and continue as above. Add shredded Swiss cheese on top if desired. No need to add extra butter after baking.
Print
The Archaeologist Bakes http://www.thearchaeologistbakes.com/

Caramel Apple Bars

img_0375

It’s finally fall!

I haven’t had a lot of field work this summer, which has actually been a little bit of a relief, since it has been SO HOT. I have been ready for fall for about a month now, and next week we are finally supposed to have some fall-like weather. Yay! Just in time too, since I’ll be heading back out to the field for the week.

Anyway, in honor of fall and apple season, I decided to put a spin on a family favorite recipe. Originally, these were called Cherry Bars. It’s a recipe my family has been making for years. It makes an appearance at family picnics and gatherings all through the summer. Moist yellow cake dolloped with cherry pie filling and topped with an almond glaze. What’s not to love?

img_0356

Well, if you’re like me, the cherries are what’s not to love. I love cherry flavor, just not the texture of cooked cherries. This was one dessert I usually skipped. The few bites I have eaten, around the pieces of cherries, were delicious. So, I decided to change it up. Any fruit pie fillings would work here, but since it’s fall, I decided it was time for apples.

img_0373

You can absolutely use a can of your favorite pie filling. Cherry, blueberry, peach – the sky’s the limit! That’s how we’ve always made the cherry version. But for the apple, I decided to make a homemade filling. The trick is to cook it all the way on the stovetop first, like a canned filling would be. Just peel and chop the apples, then combine them with butter, sugar, flour, and spices. Cook the mixture in a covered pot until the apples are cooked and the juices are thickened. Let it cool completely while you whip up the cake batter.

Cream your butter and sugar, add your vanilla and eggs, and then mix in the dry ingredients. So easy! Spread part of the batter into your pan, and dollop on the pie filling. Drop the rest of the batter by spoonfuls over the filling. Bake it up, let it cool, and drizzle it with a delicious glaze. I sprinkled on a few chopped pecans, but that’s always optional.

img_0370

The glaze is minimal, but adds so much flavor. Almond goes so well with cherries, and I highly recommend this glaze if you make the cherry bars. A sprinkle of sliced almonds would add a nice crunch as well. While I love almond flavor, caramel and apples just seem to belong together. And a scattering of pecans or walnuts is perfect with those flavors. I would try a lemon glaze with a blueberry filling (just add some lemon zest and use lemon juice instead of milk – leave out the extract). And you could make a vanilla glaze to go with any of these flavors by using vanilla extract instead of the other flavorings. What flavors would your family like?

img_0380

Caramel Apple Bars
Yields 24
Yellow cake, pie filling, and a drizzle of caramel!
For the Filling
  1. 21-ounce can of your favorite fruit pie filling, OR
  2. 4 cups diced apples (about 1/2-inch dice)
  3. 6 tablespoons sugar
  4. 1/4 teaspoon ground nutmug
  5. 2 teaspoons ground cinnamon
  6. heavy pinch of salt
  7. 1 tablespoon butter
  8. 2 tablespoons flour
For the cake
  1. 1 cup butter or margarine
  2. 1 3/4 cup sugar
  3. 1 teaspoon vanilla extract
  4. 4 eggs
  5. 1 1/2 teaspoons baking powder
  6. 3 cups flour
For the glaze
  1. Powdered sugar glaze, OR
  2. 1/2 cup brown sugar
  3. 1/4 cup butter
  4. 1/2 teaspoon salt
  5. 2 tablespoons milk
  6. 1 cup powdered sugar
  7. 1 teaspoon vanilla extract
  8. 2 tablespoons chopped pecans
Add ingredients to shopping list
If you don’t have Buy Me a Pie! app installed you’ll see the list with ingredients right after downloading it
For the apple pie filling
  1. Combine all ingredients in a saucepan and heat over medium heat, stirring frequently, until butter is melted and apples are beginning to soften. Cover pan and reduce heat to medium-low. Cook until apples are cooked through, stirring occasionally, about 25-30 minutes. Remove from heat and cool.
For the cake
  1. Preheat oven to 350 degrees. Grease a 10x15-inch pan.
  2. Cream butter and sugar. Add vanilla extract and eggs and beat well. Add dry ingredients and mix until combined. Spread two-thirds of the batter into the prepared pan. Dollop the pie filling over the batter. Drop the remaining batter by spoonfuls over the pie filling. Bake for 35-45 minutes or until golden brown and a toothpick inserted near the center comes out clean. Cool.
For the glaze
  1. Heat brown sugar and butter in a saucepan over medium heat until both are melted. Bring to a boil and add salt and milk. Return to a boil. Remove from heat and whisk in powdered sugar and vanilla extract. Drizzle over cooled cake and immediately sprinkle with chopped pecans if desired.
Notes
  1. This cake is best within a day or two. If you want to keep it longer, store it in the refrigerator.
  2. Use whatever pie filling you like. One 21-ounce can is about 2 1/2 cups of homemade filling.
  3. Adapt the glaze flavor to the pie filling you are using. Vanilla, almond, lemon - the possibilities are endless!
Print
The Archaeologist Bakes http://www.thearchaeologistbakes.com/
 Caramel glaze adapted from Cooking Club of America.


Peanut Butter Potato Chip Bars

img_0337

Lately I’ve been seeing a lot of variations on the marshmallow krispie treats that don’t actually involve cereal. Like this potato chip version, or this “junk food” version. With that combination of sweet and salty, I can see why they’re so popular. I love the idea, except…

 
img_0330

I don’t like marshmallows. I know, I know. Please don’t leave. I don’t know what it is about them, but I just don’t like the flavor or texture. I’m weird, what can I say. Luckily, there is a marshmallow-free peanut butter version of the krispie treats that we have been making for years. And while I don’t like marshmallows, I do like potato chips and pretzels dipped in peanut butter. So, I did what anyone would do, and swapped out the cereal for some snack food. Any salty treat would work well here. Try adding in popcorn if that’s your thing. Or maybe you prefer corn chips?

img_0319

Oh, and did I mention that there is a chocolate frosting poured all over the top?

img_0336

You start by combing the sugar and corn syrup. Stir in the peanut butter until it melts, and then add in your crushed up chips and a handful of peanuts. Press it into a pan and get to making that frosting.
 img_0341

Combine all your ingredients, boil for a few minutes, and pour it on. Then let cool (if you can wait), and find a place to hide them. Because you will not want to share.

img_0348


Peanut Butter Potato Chip Bars
Yields 24
For the bars
  1. 1 cup granulated sugar
  2. 1 cup corn syrup
  3. 1 1/2 cups peanut butter, creamy or crunchy
  4. 4 cups potato sticks or crushed potato chips
  5. 2 cups crushed pretzels
  6. 1/2 cup coarsely chopped salted peanuts
For the frosting
  1. 1 1/2 cups granulated sugar
  2. 6 tablespoons milk
  3. 6 tablespoons cocoa powder
  4. 6 tablespoons butter
  5. pinch salt
Add ingredients to shopping list
If you don’t have Buy Me a Pie! app installed you’ll see the list with ingredients right after downloading it
For the bars
  1. Combine the sugar and corn syrup in a large pot and bring to a boil over medium-high heat. As soon as the mixture boils, turn off heat and add peanut butter. Once peanut butter is melted, mix in the chips, pretzels, and peanuts. Stir until everything is coated and press into a greased 9x13 pan.
For the frosting
  1. Combine all ingredients in a saucepan and bring to a boil over medium to medium-high heat, stirring frequently. Boil for 3 minutes, then remove from heat. Let cool slightly, about 10-15 minutes. Pour over bars and let cool completely before cutting into squares and devouring.
Notes
  1. Add your choice of chips, pretzels, popcorn - whatever sounds good to you! There should be 6 to 6 1/2 cups total.
Print
The Archaeologist Bakes http://www.thearchaeologistbakes.com/