Tag Archives: Fall

Pumpkin Sausage Lasagna

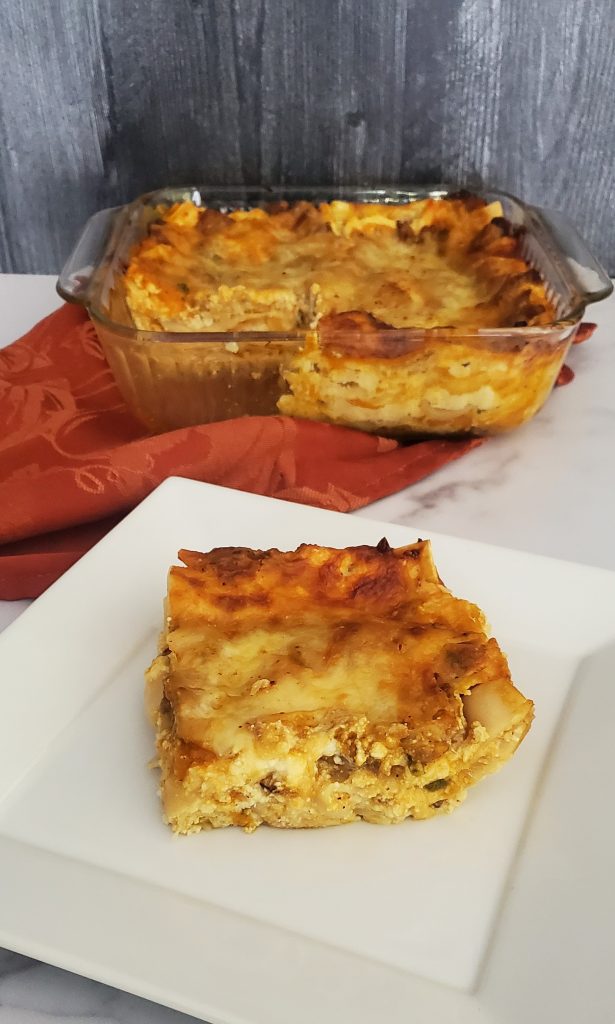
I’m back with the perfect fall dinner for you! This Pumpkin Sausage Lasagna has sweet, earthy pumpkin, savory Italian sausage, and plenty of creamy, gooey cheese! It’s a great weeknight meal, especially if you assemble it ahead of time, or perfect for those lazy fall weekends when you want to spend a little time in the kitchen.

Pumpkin Sausage Lasagna - The Archaeologist Bakes

If you’ve never made homemade lasagna, don’t be intimidated. There are a number of steps, but each one is very easy. You can spread it out over two days if that’s easier for you, or go for it all at once. Just organize yourself from the beginning, and it’s really an easy dish to make.

This lasagna starts with an easy pumpkin and sausage sauce, instead of the typical marinara. As always, there are substitutions you can make. For the pumpkin, feel free to use cooked and pureed butternut squash, acorn squash, or even sweet potatoes. Each of them has a different level of sweetness, so use something you’ll enjoy in a savory dish. I used mild Italian sausage, but you can certainly use a hot sausage, or even half mild and half hot. Again, use the sausage that you enjoy.

The cheese mixture is a simple mixture of ricotta and Parmesan, with a sprinkle of mozzarella. If you prefer cottage cheese instead of ricotta, or maybe that’s what you have on hand, that’s a great substitution. Parmesan can be replaced with Romano, Asiago, or any other hard, sharp cheese that you enjoy. And Provolone, Swiss, or other good melting cheeses can take the place of the mozzarella.

Pumpkin Sausage Lasagna - The Archaeologist Bakes

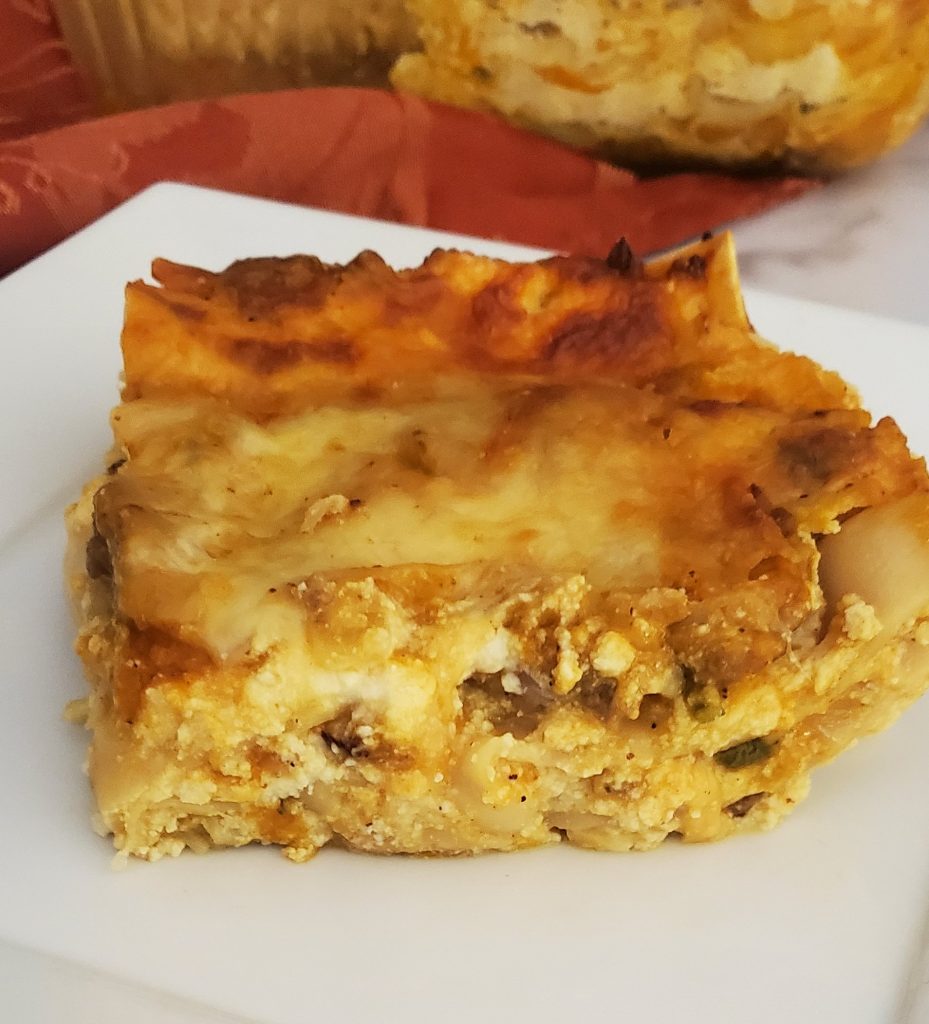
Just a few more tips and notes. I like to use the flat, no boil lasagna noodles, but use the ones you’re most comfortable with. If you use regular lasagna noodles, make sure to pre-boil them though. The fresh sage really is a must. I wouldn’t substitute with dried. Fresh parsley would work, but the sage really brings a great fall flavor that marries so well with the pumpkin. Finally, a made a smaller batch because there are only two of us, but you can easily double this recipe and make it in a 9×13 or lasagna pan.

I really hope you try this! It’s such a fun recipe – warm and cozy, cheesy and creamy. It’s everything you want on a cool fall night. If you make it, be sure to let me know what you think, and if you made any substitutions.

Pumpkin Sausage Lasagna - The Archaeologist Bakes
Print Recipe
Pumpkin Sausage Lasagna
A creamy, cheesy lasagna with sausage and pumpkin, perfect for cool fall nights.
Servings
Ingredients
Servings
Ingredients
Instructions
  1. Add sausage and onions to a large skillet. Cook over medium heat until sausage is browned and cooked through and onions are soft. Add garlic and cook for another 30 seconds until garlic is fragrant.
  2. Stir in broth, pumpkin, nutmeg, and sage. Bring to a simmer and cook until heated through. Taste and season with salt and/or pepper as needed.
  3. Set sauce aside to cool slightly. Meanwhile, combine ricotta, 3 tablespoons Parmesan, and salt and pepper to taste (about 1/4 teaspoon each). If desired, refrigerate sauce and cheese at this point and assemble lasagna the next day.
  4. Assemble the lasagna in an 8x8-inch greased baking pan. Place 1/2 cup pumpkin sauce in the bottom of the pan and top with a layer of noodles. Add 1/3 of the ricotta mixture and spread evenly. Top with 1/3 of the remaining pumpkin sauce, and sprinkle with 1/3 cup (slightly less than a third of the total) mozzarella. Repeat the layers twice, ending with the rest of the mozzarella and the remaining tablespoon of Parmesan.
  5. You can refrigerate or freeze the lasagna at this point before baking. Cover tightly with plastic wrap and refrigerate overnight, or add a layer of foil and freeze up to a month.
  6. Bake at 350 degrees Fahrenheit. If baking immediately, bake for 30-45 minutes until bubbly and browned. If cheese begins to brown too quickly, cover loosely with foil. If refrigerating overnight, remove from refrigerator while preheating oven. Remove plastic wrap and cover loosely with foil. Bake 30-45 minutes. Remove foil and bake another 15-20 minutes until bubbly and cheese is browned. If lasagna has been frozen, thaw in refrigerator overnight, then follow directions for baking refrigerated version.
Recipe Notes
  • Cooked and pureed butternut squash, acorn squash, or sweet potatoes can be substituted for the pumpkin. The sweetness level will vary, so use something you enjoy.
  • Cottage cheese can be swapped for the ricotta.
  • Any hard, sharp cheese can be used in place of the Parmesan.
  • Any good, melting cheese like Provolone or Swiss, can be used instead of or in combination with the mozzarella.
  • Use regular lasagna noodles if desired, but boil them first.
  • Double the recipe and assemble in a 9x13 or lasagna pan.
Share this Recipe

Mom’s Zucchini Bread 2.0

I have the best zucchini bread for you today, ready to use up the last of the fresh zucchini coming in from your gardens and farmer’s markets. I started with a tried and true family favorite, but made some slight adjustments. I think it’s the best zucchini bread out there! It’s still moist and cakey without being dense, and has the best cinnamon flavor without being too sweet. It’s perfect for breakfast, snack time, or even dessert!

Mom's Zucchini Bread 2.0 - The Archaeologist Bakes

As I mentioned, I started with my mom’s recipe that we’ve been using for years. And based on a quick internet search, it seems like a lot of moms and grandmas out there are using the same recipe. And it really was good to begin with, but I wanted to make a few changes.

The first problem I encountered with the original recipe was that it was created for 8×4-inch loaf pans. All of my loaf pans are 9×5-inch, and I bet a lot of you have the same size. This meant the loaves (each batch makes two) were pretty flat and sad-looking. But it was too much batter for just one 9×5-inch loaf. So I upped the quantities and now you get two perfectly sized loaves. If you are using 8×4-inch pans, you’ll just get three loaves instead.

Mom's Zucchini Bread 2.0 - The Archaeologist Bakes

The next problem was that while I love a nice, moist, cakey quick bread, most of the zucchini breads I have tried tend to be a little dense and almost wet. I took a page out of some other recipes I had seen, and decided to squeeze out some of the moisture from the zucchini before adding it to the batter. It doesn’t have to be squeezed completely dry, but removing about 1/4 to 1/3 cup of liquid from it helps a lot with the texture of the finished bread.

Because I was removing some of the bitter liquid, and because I sometimes find zucchini bread to be on the sweet side, I also reduced the sugar a bit. It’s still sweet, but it has a nice balance with the other flavors. And while I just use cinnamon, you could easily substitute the spices of your choice. Use apple pie or pumpkin pie spice, or make a blend of your favorite spices (I’m thinking cinnamon, cloves, and cardamom next time).

Mom's Zucchini Bread 2.0 - The Archaeologist Bakes

I add nuts to my zucchini bread, pecans and walnuts to be specific, but as with almost every recipe, those are optional. Use whatever nut or seed you like – pumpkin or sunflower seeds would be great! Just avoid any that are salted for this recipe. Or, make it even more decadent and add chocolate chips, whatever flavor you prefer! You can even leave the add-ins out entirely.

Whatever mix-ins or spices you choose, I hope you give this recipe a try. It is seriously the best zucchini bread I’ve ever eaten, and I think you’ll love it too!

Mom's Zucchini Bread 2.0 - The Archaeologist Bakes
Print Recipe
Mom's Zucchini Bread 2.0
Servings
loaves
Ingredients
Servings
loaves
Ingredients
Instructions
  1. Place grated zucchini in a clean tea towel and squeeze out excess moisture. It doesn't have to be completely dry, but give it a good squeeze to eliminate the excess liquid. You should remove 1/4 to 1/3 cup. Set zucchini aside.
  2. Combine eggs, oil, sugar, and vanilla in a large mixing bowl. Whisk together until well combined.
  3. Add zucchini and stir until incorporated.
  4. Add all dry ingredients except nuts and stir just until there are no streaks of flour remaining.
  5. Stir in nuts.
  6. Pour into two greased 9x5-inch loaf pans. Bake at 325 degrees F for 60 to 70 minutes or until a toothpick inserted near the center has a few moist crumbs attached.
  7. Cool in pans for 10 minutes before removing to wire rack to cool completely.
  8. Store in an airtight container at room temperature for up to 5 days, or freeze, well-wrapped, for up to 3 months.
Recipe Notes
  • Use three pans if you have 8x4-inch loaf pans. It's ok to bake two and keep the remining batter refrigerated until you can wash and re-use one of the pans.
  • As always, nuts are optional. Use any unsalted variety you like, or substitute with seeds or chocolate chips. 
  • Instead of cinnamon use apple pie or pumpkin pie spice. Or create your own spice blend. Just use the same total amount -  1 1/2 tablespoons.
Share this Recipe

Easy Apple Spice Cake with White Chocolate Browned Butter Buttercream

A super-easy apple spice cake made from a mix, with a perfectly fluffy white chocolate browned butter buttercream that has only two ingredients. It’s the cake that this early fall season is begging for!

I hadn’t really planned on sharing this recipe, but I decided it was too delicious not to. It all came about mostly by accident. I was shopping at Wal-Mart this week, and found the sprinkles I ended up using on this cake. I love fall, and I love sprinkles, and I didn’t have these…so I couldn’t help myself and bought them. Look at how perfectly fall-inspired they are! But then I needed to make something to use them on. When I got home, I started thinking about what I could bake that needed these sprinkles. I remembered I had a spice cake mix in the pantry, so I pulled that out and started mixing it up. But to add just a little more fall flavor, I decided to use unsweetened applesauce in place of the oil. It adds just the slightest hint of apple that works so well with the spice cake.

I know, that’s not much of a recipe yet. But then I needed to make a frosting for it. I was going to just make my standard browned butter buttercream, but I checked my baking supplies and realized I was pretty low on powdered sugar. I wasn’t sure I would have enough for a full batch of buttercream. So I thought I would make Swiss meringue buttercream with browned butter. And I checked my eggs. Not enough of those either. (I’ve been out of town for work and haven’t been baking much.) At this point I was getting desperate, because I really didn’t want to go back to the store. And my cake was already in the oven. That’s when I remembered a two-ingredient chocolate frosting I had tried previously, and wondered if it could be made with white chocolate. I went back to the original blogger, and sure enough, it can be made with white chocolate chips! At this point I was fairly certain I could also use browned butter, so I just went for it. It was the right decision. This frosting is not too sweet, and the combination of white chocolate and nutty browned butter pair perfectly with the spice cake.

Anyone can make this frosting. Seriously, anyone. And it’s so impressive, even if you’re not a baker people will be raving over this dessert. All you do is brown butter and add white chocolate chips. To brown the butter, put it in a light-colored (not non-stick) pan and melt it over medium-low heat. It will start to bubble – that’s what you want. Let it continue to cook until you start to see brown spots at the bottom. That’s the milk solids starting to brown, which is what gives it a nutty flavor. Once the melted butter is golden and the bits are a medium brown, take it off the heat and cool it slightly. Once it is warm, but not hot, add the white chocolate chips and let them melt. Chill it until solid, bring to room temperature, and whip it up. That’s it. Delicious, sophisticated frosting with almost no effort.

I baked this in three 6-inch pans, but you can bake it in any pans you would like. Use two 8- or 9-inch, or even a 9×13-inch pan for an even easier dessert. Want to mix it up and make it your own? Add some chopped, toasted pecans on top or in the middle frosting layers. Use apple cider instead of water in the cake for an even more prominent apple flavor. Add a drizzle of caramel or melted cookie butter on top (definitely going that route next time myself!). Which ever way you make it, just make sure to give this frosting a try. It couldn’t be easier, and it will definitely impress your friends and family!

Print Recipe
Easy Apple Spice Cake with White Chocolate Browned Butter Buttercream
Servings
Ingredients
Cake
Frosting
Servings
Ingredients
Cake
Frosting
Instructions
Cake
  1. Combine all ingredients in mixing bowl. Mix on low speed just until combined. Increase speed to high and mix for 2 minutes.
  2. Divide batter evenly between two greased 8- or 9-inch pans, or three greased 6-inch pans.
  3. Bake at 350 degrees F for 20-28 minutes, depending on size of pans.
  4. Cool on wire racks for 5 minutes. Remove from pans and cool completely.
Frosting
  1. Melt butter in a medium saucepan over medium-low heat. Continue cooking until butter boils and begins to brown. Once solids have lightly browned and liquid is golden in color, remove from heat and transfer to a heat-proof bowl.
  2. Let cool slightly before adding white chocolate chips. Butter should be warm enough to melt the chocolate, but not so hot it will burn. If butter has cooled to far, microwave in 30 second bursts until chocolate is melted.
  3. Cool mixture in the refrigerator until solidified. Remove from refrigerator and bring back to cool room temperature.
  4. Place in large mixing bowl and beat at medium speed with whisk attachment until light and fluffy, about 2 minutes.
  5. Fill and frost cake.
Recipe Notes
  • Use apple cider instead of water in the cake mix for even more apple flavor.
  • Add chopped, toasted pecans on top or in the middle frosting layers.
  • Drizzle the top with caramel or melted cookie butter.
Share this Recipe
 

Maple Mousse

It’s finally fall! I’m so excited – cool evenings and cooler days, crops are being harvested (no more walking through 10-foot-tall corn!), and all the mouthwatering flavors that come with this time of year.

I grew up in northeast Ohio where there is a festival every spring dedicated to maple, since that’s when it’s produced. It has always been a favorite flavor around our house any time of year. But most people, myself included, consider it to be a fall flavor. Maybe that’s because it goes so well with other fall and winter flavors like the warm spices, tart cranberries, and roasted nuts that are so prevalent during this season.

Whatever the time of year, this recipe is delicious. It is a very light mousse with a strong maple flavor. It’s perfect for the holiday season when there is so much heavy food around, but it would also be wonderful as a light dessert in the spring or summer. You can serve the mousse in bowls as I did, or use it fill cannoli shells or cream puffs. I added some fun fall sprinkles, but chopped or candied walnuts would also work well.

This mousse does involve a little cooling time, but it is generally very simple. You start by making a maple custard, which is good all on it’s own. It has to chill completely before you add in the whipped cream. The mousse ends up being very light and slightly loose in texture. If you prefer a firmer mousse, use a stabilized whipped cream that is made with gelatin. Maple syrup is a must – no substituting pancake syrup!

This recipe serves four, but doubles very well, which makes it great for entertaining. Although it is best served within a few hours, the custard can be made a day ahead. Just whip the cream and fold in right before serving and top as desired. I hope you give it a try soon!


Print Recipe


Maple Mousse

Servings


Ingredients

Servings


Ingredients


Instructions
  1. Heat syrup and 3/4 cup milk in a saucepan over medium heat until simmering.

  2. Combine cornstarch, salt, and remaining milk. Add to simmering syrup mixture, stirring constantly.

  3. Cook over medium-high heat, stirring constantly, until mixture is thickened and begins to bubble.

  4. Reduce heat to medium; cook and stir 2 minutes.

  5. Beat egg in a small bowl. Add in a small amount of the hot mixture and stir well.

  6. Add egg mixture to pan and cook, stirring constantly, until mixture simmers. It will be thick.

  7. Continue to cook and stir for 2 additional minutes.

  8. Pour into a heat-proof bowl. Cover with plastic wrap or waxed paper, making sure wrap touches the surface of the custard to prevent a skin, and refrigerate until cool, 4 hours or overnight.

  9. When custard is cool, whip cream until stiff peaks form.

  10. Gently fold into cooled custard, then transfer to serving bowls. Top as desired and serve.


Recipe Notes
  • Candied or roasted walnuts would be a great addition to the top of this mousse.
  • Use mousse as a filling for cannoli or cream puffs.
  • For a firmer mousse, use a stabilized whipped cream (with gelatin).
  • Best eaten within a few hours.


Share this Recipe

Apple Cider Cookies for the Go Bo! Bake Sale

If you follow me on Facebook, you may have seen recently that I signed up to donate decorated cookies for the Go Bo! Bake Sale. For the whole story, go check out that link. In short, a 12 year-old boy (Bo) was diagnosed with a rare form of leukemia. While fighting cancer, he started the Go Bo! Foundation to fund cancer research and childhood treatment. The year he passed, a bake sale was planned as a fundraiser for the foundation. A local cookier took to social media to spread the word about the bake sale and ask any other cookiers to donate decorated cookies. That was in 2012, and they raised $5,000 at that bake sale. As word has spread, more and more cookiers have donated. Last year they were able to raise over $30,000!

When I heard about the fundraiser, I knew I wanted to decorate some cookies to donate. I pored over cookie after cookie on Pinterest, and finally settled on a design. It was a hybrid of a few others I had seen out there, and I have to say I really love the way they came out. I made royal icing transfer and then attached them to the flooded cookies. Here are the images I used as templates.

After I knew what design I wanted to create, I had to decide what flavor to make. I love my basic butter cookie recipe, but I wanted something a little more special. So I thought about the apple cider shortbread I had made at Christmas last year. I knew I could combine that idea with my favorite butter cookie, so that’s what I did. Most of the flavor comes from instant hot cider mix, but I felt like it needed another punch of apple flavor, so I reduced some apple cider down to a syrup and mixed that in as well. It was exactly what I was looking for! I think these will be making a reappearance at Christmas this year!

There aren’t a lot of easy substitutions for this recipe. But you could brown the butter and then cool and solidify it before creaming with the sugar. Or, use maple syrup instead of the cider syrup for a hint of maple. And, I suspect you could use instant (sweetened) ice tea mix instead of the cider mix (leaving out the reduced cider syrup) for a summery version of this cookie. In fact, I may try that next summer!

Print Recipe
Apple Cider Cookies
Servings
Ingredients
Servings
Ingredients
Instructions
  1. Place apple cider into a saucepan. Bring to boil over medium heat and cook until it is reduced to 2 tablespoons. Set aside to cool.
  2. Cream butter with sugar and hot cider mix.
  3. Beat in egg, vanilla, and cooled reduced cider.
  4. MIx in salt and flour until well blended.
  5. Depending on how warm your butter was, you may need to chill the dough for up to an hour to make rolling easier.
  6. Roll out dough on a lightly floured surface to nearly 1/4 inch thickness, and cut out with desired cookie cutter.
  7. Place on ungreased cookie sheet and bake at 350 degrees F for 15 to 20 minutes. Cookies should be lightly browned around the edges.
  8. Cool on cookie sheets for 5 minutes before moving to a rack to cool completely.
  9. Decorate as desired. You can also decorate with sprinkles before baking.
Recipe Notes
  • Use parchment or silicon mats on the cookie sheets if desired.
  • Roll thinner if a crisper cookie is desired.
  • Use maple syrup in place of the reduced cider for a slight variation.
  • Omit the reduced cider and replace the hot cider mix with sweetened ice tea mix for a summery cookie.
Share this Recipe