Archives

Ginger-Lime Thumbprint Cookies

The first time I made a cookie similar to this was while I was on a project and living in a hotel room. I was baking for the crew almost every weekend, but since I was in a hotel and cooking in a toaster oven with only a few tools, I tried to use shortcuts where I could. I was looking for ways to easily dress up a cookie mix when I stumbled upon a recipe for ginger-lime sugar cookies and decided that could work. I just mixed up the mix and added lime zest and fresh ginger. I stirred in some white chocolate chips and baked them up. Everyone went crazy for them!

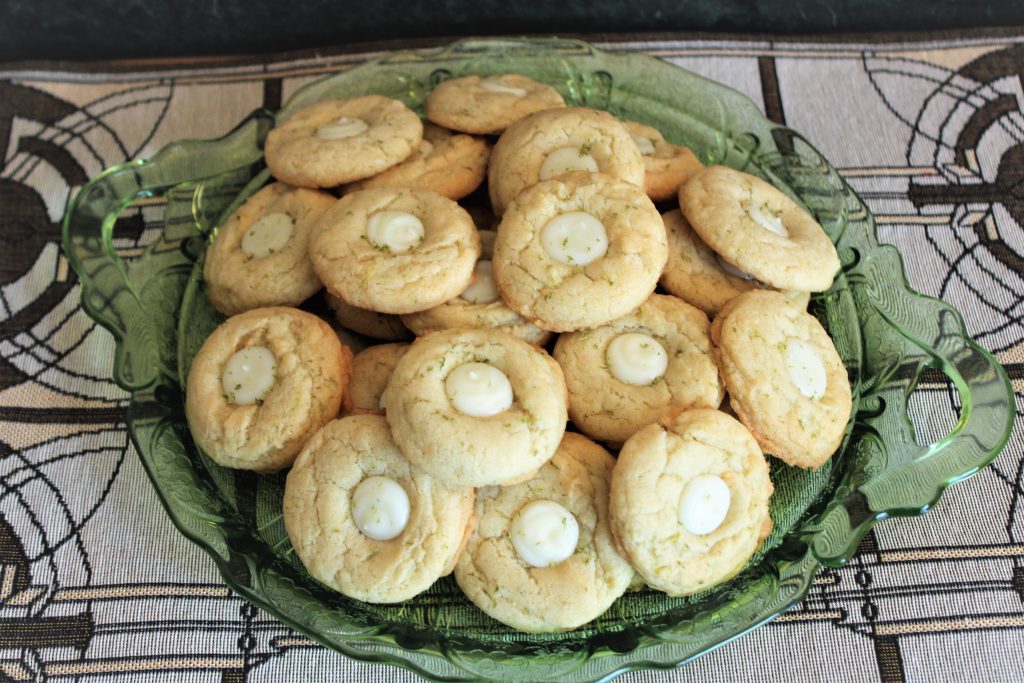
I fell in love with the ginger-lime combination at that point, and I have made similar cookies many times since. I wanted to dress them up a little for you, though, so I turned them into thumbprint cookies!  These are soft, chewy cookies that actually stay soft and chewy for up to a week. For the filling, I use vanilla almond bark because I prefer it over actual white chocolate. You can use whichever you prefer or have on hand. These have a tropical vibe to them, so I think a sprinkle of toasted coconut or toasted macadamia nuts would be perfect. You could either sprinkle some on top of the ganache before it sets, or go all out and roll the cookie dough in them before baking!


Print Recipe
Ginger-Lime Thumbprint Cookies
Servings
dozen
Ingredients
Servings
dozen
Ingredients
Instructions
  1. Melt butter.
  2. While still warm, add cubed cream cheese, sugar, and oil. Whisk until combined and cream cheese is mostly melted.
  3. Add lime, ginger, and egg and mix well.
  4. Stir in flour, baking soda, baking powder, and salt until a smooth dough is formed.
  5. Refrigerate dough for at least 30 minutes or up to several hours.
  6. Scoop dough, using a 1 1/2 tablespoon scoop, onto a parchment or silicone lined cookie sheet.
  7. Bake at 350 degrees F for 8 to 10 minutes, or until lightly golden brown around the edges.
  8. As soon as the cookies come out of the oven, press an indentation in the middle with a small (1/2 teaspoon) measuring spoon.
  9. Cool 5 minutes, then move to a cooling rack to cool completely.
  10. Once cookies are baked, make the ganache by combining almond bark with heavy cream in a microwave safe bowl.
  11. Microwave 30 seconds at a time, stirring after each. Continue until chocolate is completely melted and mixture is smooth.
  12. Spoon, or pipe with a piping or plastic bag, the ganache into the indents in the cookies. Let set until firm, about 1 hour.
  13. Sprinkle with additional lime zest if desired.
Recipe Notes
  • Sprinkle with toasted coconut or toasted, chopped macadamia nuts before the ganache sets.
  • Roll the cookie dough in coconut or chopped macadamia nuts before baking.
Share this Recipe

Pecan Sticky Buns

Do you have breakfast plans this weekend? Or are you looking for something sweet to add to your Easter brunch next weekend? If so, you’re in luck, because I have the recipe for the best-ever sticky buns.

These are one of my favorite breakfast treats. My mom made them on occasion when I was a kid, and I was always excited when they made an appearance on the breakfast menu.  I’ve tried a number of other sticky buns since then, and I have yet to find any that are as good as these. They are full of caramel and pecans, with a hint of cinnamon. And they are perfectly gooey and sticky.

Sticky buns may seem intimidating, but they are really pretty simple to make. If you can make a cinnamon roll, you can definitely make these. It starts with a rich yeast dough which is filled with chopped pecans, butter, brown sugar, and a little cinnamon. The topping is just brown sugar, butter, corn syrup, a little more cinnamon, and a ton of pecans.

As always, you can leave the pecans out of both the topping and the filling, or substitute another nut of your choice. Most of the sticky bun recipes I see do not include cinnamon, especially in the topping. I really like it in there, but you can definitely leave it out as well. And you could put whatever you like in the filling – add a handful of raisins or other dried fruit if you’re so inclined, or even some mini chocolate chips if you want to really take it over the top.


These are so good, and you probably have everything you need already in your pantry. Make these this weekend or for Easter brunch (or both!). I promise you will love them!

Print Recipe
Pecan Sticky Buns
Servings
Ingredients
Rolls
Topping
Filling
Servings
Ingredients
Rolls
Topping
Filling
Instructions
Dough
  1. Dissolve the yeast in the warm water.
  2. Scald the milk (bring it just to a simmer) and add the butter. Let cool to warm room temperature while the butter softens and partially melts.
  3. Transfer milk mixture and yeast to stand mixer. Add sugar and eggs and mix well with the paddle attachment. (You can also do this by hand with a large spoon).
  4. Add salt and 4 cups flour and mix well with the dough hook attachment (or a spoon).
  5. Continue to knead dough, adding up to 1/2 cup additional flour, until dough is only slightly sticky, about 5 minutes with the mixer.
  6. Place in a greased bowl, cover, and let rise until doubled, about 1 hour.
Topping
  1. Combine all ingredients except pecans in a medium saucepan and bring to a boil over medium heat.
  2. Boil for 1 minute.
  3. Pour into a greased 9"x13" baking pan and sprinkle with pecan halves. Set aside.
Filling and Assembly
  1. Combine brown sugar, cinnamon, and pecans in a small bowl.
  2. Roll dough, once doubled, into a 12"x 22" rectangle.
  3. Brush with melted butter and sprinkle with filling.
  4. Roll up, jelly-roll style, starting on the short end. (You should end up with a roll 12" long.)
  5. Cut into 1" slices and place, cut side up, onto topping in prepared pan.
  6. Cover and let rise again until doubled. See note to prepare the night before and bake in the morning.
  7. Bake at 350-degrees F for 15-20 minutes or until golden brown.
  8. Remove from oven and cool for 10 minutes (no longer!) for the topping to harden slightly.
  9. Invert onto serving platter, scraping any pecans and topping left in the pan onto the top of the rolls.
  10. Enjoy warm! Rolls will keep up to 3 days covered at room temperature, but do yourself a favor and microwave them for a few seconds to rewarm before eating. 🙂
Recipe Notes

Note: To make these the night before, follow instructions until the second rise (in the pan). When rolls are not quite doubled in size, cover with plastic wrap and refrigerate. The next morning, remove from refrigerator and preheat oven. Once oven is preheated, bake rolls for 25-30 minutes, or until golden brown.

  • Substitute pecans for your favorite nut, or leave out completely.
  • Leave out cinnamon in the topping and/or filling if you prefer. If leaving the cinnamon out of the topping, consider adding a pinch to 1/4 teaspoon of salt for that salted caramel flavor.
  • Add fillings of your choice - raisins, dried fruit, mini chocolate chips, etc.
Share this Recipe

Mud Pie for Grandpa

I am a long-time collector of recipes. Cookbooks, magazines, recipe cards – I love them all. For years I copied or clipped recipes from all of the above, and I keep them in a set of binders. More recipes than I’ll ever get around to making. As I was looking through those binders looking for inspiration, I came across an old recipe for Mud Pie. It came out of a children’s cookbook, Alpha Bakery by Gold Medal Flour.

Sometime in roughly the mid-90’s, I made this recipe for a family dinner. I don’t remember the exact occasion, but my grandparents, and maybe others, had come to dinner. Anyway, I made the mud pie and we all thought it was delicious. Several months or maybe even a year later, my grandfather asked about the dessert. He wanted me to make it again. He described it as a brownie or cake with whipped cream on it. Well, neither my mom nor I, or anyone else, could remember such a recipe. (I know – that really makes you want to try a recipe we couldn’t remember a relatively short time later.) He continued to talk about it on occasion, and how much he liked it. But we just could not figure out what that recipe was.

My grandpa passed away in 2006, and I still hadn’t figured out what dessert he was remembering. Fast forward several years, when my parents were moving into their current house and I was helping them to pack up. I was looking through all of my mom’s cookbooks while packing them when I came across the Alpha Bakery cookbook. I flipped through it to see if there were any recipes worth saving, and as soon as I saw the Mud Pie recipe I knew that was recipe Grandpa kept asking about. I copied it then and put it into my binder, to be forgotten again until this past weekend. Since his 95th birthday would have been later this week, I knew it was time to make it again.

The base is a rich brownie with chopped nuts. I used slivered almonds because I had some on hand. But you can of course use the nuts of your choice, or leave them out. Replace them with chocolate chips (any flavor) if you’d like. You top the brownie with hot fudge sauce. I used a homemade sauce, but you can definitely use a jarred sauce – fudge sauce, not chocolate syrup. I also think this would be delicious with a caramel sauce instead. Then top it all with whipped cream. I used a stabilized whipped cream, since I knew we wouldn’t eat it all at once. You could use regular whipped cream if you have enough people to serve that there won’t be leftovers. Or Cool Whip works too. But if you are making your own whipped cream, consider playing around with the flavors. Personally, I think a little almond extract in it would be perfect. But strawberry or cherry extract and a little red or pink food coloring would be delicious. Or peppermint extract and green food color for a grasshopper type of pie. The possibilities are endless.

Happy Birthday Grandpa!

Print Recipe
Mud Pie
A dense, fudgy brownie topped with hot fudge sauce and whipped cream. Lightly adapted from Gold Medal Flour's Alpha Bakery
Course Dessert
Servings
Ingredients
Brownie Base
Whipped Cream
Course Dessert
Servings
Ingredients
Brownie Base
Whipped Cream
Instructions
Brownie Base
  1. Heat oven to 325 degrees F and grease an 8-inch cake pan or pie plate.
  2. Mix butter, sugar, eggs, vanilla, and salt in a medium bowl.
  3. Stir in flour, cocoa powder, and nuts.
  4. Pour into prepared pan and bake for 25-35 minutes or until a toothpick inserted halfway between the center and the edge comes out clean. Time will depend partly on the size of your pan.
  5. As soon as the brownie comes out of the oven, poke it all over with a skewer or fork. Spread the fudge sauce over the brownie and let cool completely.
Whipped Cream
  1. For stabilized whipped cream, combine gelatin and water in a small saucepan and let sit until thick.
  2. Melt gelatin over low heat, stirring constantly. Once melted, remove from heat and cool slightly.
  3. While gelatin cools, whip cream and powdered sugar until soft peaks form. Add vanilla. (At this point, for regular whipped cream, whip a little longer until stiff peaks and use immediately.)
  4. Beating slowly, gradually add the cooled gelatin mixture to the whipped cream. It will start to look a little curdled, but beat at low to medium speed just until combine and peaks are stiff.
  5. Spread or pipe onto cooled brownie base.
  6. Serve with shaved chocolate or additional hot fudge sauce.
  7. Store in refrigerator.
Recipe Notes
  • Use any nuts you like, or substitute with any flavor of chocolate chips.
  • Jarred or homemade hot fudge sauce works great. Experiment with flavors. Try caramel sauce, or chocolate-mint fudge sauce instead.
  • Use Cool Whip in place of whipped cream.
  • Or flavor your whipped cream with any extract you like. Enhance with food color if desired. Think mint, strawberry, etc.
Share this Recipe

Apple Cider Cookies for the Go Bo! Bake Sale

If you follow me on Facebook, you may have seen recently that I signed up to donate decorated cookies for the Go Bo! Bake Sale. For the whole story, go check out that link. In short, a 12 year-old boy (Bo) was diagnosed with a rare form of leukemia. While fighting cancer, he started the Go Bo! Foundation to fund cancer research and childhood treatment. The year he passed, a bake sale was planned as a fundraiser for the foundation. A local cookier took to social media to spread the word about the bake sale and ask any other cookiers to donate decorated cookies. That was in 2012, and they raised $5,000 at that bake sale. As word has spread, more and more cookiers have donated. Last year they were able to raise over $30,000!

When I heard about the fundraiser, I knew I wanted to decorate some cookies to donate. I pored over cookie after cookie on Pinterest, and finally settled on a design. It was a hybrid of a few others I had seen out there, and I have to say I really love the way they came out. I made royal icing transfer and then attached them to the flooded cookies. Here are the images I used as templates.

After I knew what design I wanted to create, I had to decide what flavor to make. I love my basic butter cookie recipe, but I wanted something a little more special. So I thought about the apple cider shortbread I had made at Christmas last year. I knew I could combine that idea with my favorite butter cookie, so that’s what I did. Most of the flavor comes from instant hot cider mix, but I felt like it needed another punch of apple flavor, so I reduced some apple cider down to a syrup and mixed that in as well. It was exactly what I was looking for! I think these will be making a reappearance at Christmas this year!

There aren’t a lot of easy substitutions for this recipe. But you could brown the butter and then cool and solidify it before creaming with the sugar. Or, use maple syrup instead of the cider syrup for a hint of maple. And, I suspect you could use instant (sweetened) ice tea mix instead of the cider mix (leaving out the reduced cider syrup) for a summery version of this cookie. In fact, I may try that next summer!

Print Recipe
Apple Cider Cookies
Servings
Ingredients
Servings
Ingredients
Instructions
  1. Place apple cider into a saucepan. Bring to boil over medium heat and cook until it is reduced to 2 tablespoons. Set aside to cool.
  2. Cream butter with sugar and hot cider mix.
  3. Beat in egg, vanilla, and cooled reduced cider.
  4. MIx in salt and flour until well blended.
  5. Depending on how warm your butter was, you may need to chill the dough for up to an hour to make rolling easier.
  6. Roll out dough on a lightly floured surface to nearly 1/4 inch thickness, and cut out with desired cookie cutter.
  7. Place on ungreased cookie sheet and bake at 350 degrees F for 15 to 20 minutes. Cookies should be lightly browned around the edges.
  8. Cool on cookie sheets for 5 minutes before moving to a rack to cool completely.
  9. Decorate as desired. You can also decorate with sprinkles before baking.
Recipe Notes
  • Use parchment or silicon mats on the cookie sheets if desired.
  • Roll thinner if a crisper cookie is desired.
  • Use maple syrup in place of the reduced cider for a slight variation.
  • Omit the reduced cider and replace the hot cider mix with sweetened ice tea mix for a summery cookie.
Share this Recipe

Zucchini Bread – Made with Spaghetti Squash!

Hi Everyone! I know I’ve been pretty absent here this summer, but I promise I am getting back to baking and will be bringing you lots of new recipes soon! I am so ready for fall – fall weather, fall flavors, fall color. It’s my favorite time of year. 🙂

But for those of you still clinging on to summer, and the bounty of your vegetable garden, I have one more summer recipe for you. Actually, with the cinnamon, it tastes like the start of fall, but it’s a great way to use up your squash.

This was originally my mom’s zucchini bread recipe, and people LOVE this bread. It’s got a nice strong cinnamon flavor and is super moist because of the zucchini. I was gifted a spaghetti  squash from a co-worker, and of course I was immediately challenged to bake something with it. I wondered if I could use it in place of zucchini in baked goods. So I did a little research, crossed my fingers, and went for it. 

This is the second recipe I’ve tried using that substitution, and I can’t tell the difference between the original and the spaghetti squash version. Yes – it works! The only difference is that you have to cook, and shred, the spaghetti squash first, whereas the zucchini is shredded and added to the batter raw. Also, you need to measure the squash by weight, since it is much more dense than shredded zucchini. 

Yes, you can absolutely use zucchini as originally intended. And while I used walnuts in mine, as always, the nuts are optional or changeable. Pecans are always delicious in sweet breads. Hazelnuts or macadamia nuts would be really interesting too.  This recipe uses only cinnamon, but you could change that up too. Add in a little bit of nutmeg or cloves for more of a fall flavor. And you can absolutely bake this in standard 8″x4″ loaf pans. I couldn’t resist trying out this beautiful new swirl pan I just got. And I have to say that I am loving it.

Serve this warm or at room temperature. Or toast it and spread on a little butter. Or cream cheese. Or, if you want to go all out, drizzle on some cream cheese icing for a decadent treat. I think I need to go make another batch of this and do just that….


Print Recipe
Zucchini Bread - with Spaghetti Squash!
Course Breakfast, Dessert
Servings
Loaves
Ingredients
Course Breakfast, Dessert
Servings
Loaves
Ingredients
Instructions
  1. Whisk eggs and sugar together until thick and very light yellow in color.
  2. Whisk in oil and vanilla until combined.
  3. Stir in shredded zucchini or squash.
  4. Combine dry ingredients and stir into batter along with nuts, if using, just until combined.
  5. Pour into two 8"x4" greased loaf pans.
  6. Bake at 325 degrees F for 60-70 minutes. (See notes).
  7. Cool 10 minutes before turning out onto a cooling rack to finish cooling. Serve warm or room temperature.
  8. Store in an airtight container for 2-3 days at room temperature or a week refrigerated.
Recipe Notes
  • Zucchini should be grated raw, with or without the peel.
  • Spaghetti squash should be cooked (steamed or baked) and shredded before adding to batter.
  • If you are using larger loaf pans (like the pan I used, or a 9"x5" pan) the bread will cook faster. Start checking after 35 minutes.
Share this Recipe

Coffee Chocolate Chip Oatmeal Cookies

I know what you’re thinking. You’re thinking you don’t need another chocolate chip cookie recipe. But you’re wrong. Because not only is this cookie delicious and different than most of your chocolate chip cookie recipes, this one doesn’t have to be a chocolate chip cookie.

This recipe is based off of a recipe we made all the time as kids. We always had homemade cookies in our school lunch. Always. (My mom is the best. 🙂 ). The oatmeal chocolate chips cookies were a regular and a favorite. I was thinking about them the other day, and I thought they might be improved with a bit of coffee. (I was right). I made a few other changes (took out one egg white, used all brown sugar, melted the butter) to make them even chewier. Also a good idea.

But as I said, these don’t have to be chocolate chip cookies. In fact, the original recipe called for either chocolate chips OR shredded coconut. You could absolutely make that substitution here. Or add chopped nuts. Or dried fruit (you know, like raisins, if you’re in to that kind of thing). Or any combination of the above. The coffee is not an overwhelming flavor, but it really does add an interesting element to the cookie. Yes, you can leave it out. Or, if you want a real coffee punch, use up to twice the amount I’ve called for.

One thing you shouldn’t do is skip the chilling the dough step. Especially when using the melted butter, you really need to chill the dough to get a thicker, chewy cookie. Unless you want a thinner, crispier cookie. In which case, you should bake these as soon as they are mixed. (But seriously, why would you want that??) Whatever way you make these, you should definitely make them soon. I was informed that these are “husband approved”, and that I didn’t need to bring these in to the office to share. (Sorry guys!) 🙂

Print Recipe
Coffee Chocolate Chip Oatmeal Cookies
Course Dessert
Servings
cookies
Ingredients
Course Dessert
Servings
cookies
Ingredients
Instructions
  1. Combine melted butter and brown sugar and mix well.
  2. Add egg, egg yolk, coffee (dissolved in water), and vanilla and mix until combined.
  3. Add dry ingredients, mixing just until combined.
  4. Stir in chocolate chips or other mix-ins.
  5. Refrigerate dough at least 30 minutes.
  6. Scoop chilled dough by heaping tablespoons onto cookie sheets.
  7. Bake at 350 degrees F for 12 to 15 minutes or until golden brown and just set. Do not overbake.
  8. Cool completely on wire rack. Store in airtight container up to a week.
Recipe Notes
  • Use any flavor chips you like.
  • Substitute chopped nuts, shredded coconut, and/or dried fruit.
  • Use any combination that sounds good to you!
Share this Recipe
 

Chocolate Covered Strawberry Ladybug Cookies

I promised you more spring treats, so here you go! As some of you may know, and many of you probably don’t, I have adored ladybugs my whole life. I have collected ladybugs in any form for as long as I can remember. And I have to tell you, most of the year there aren’t many ladybugs to be found in the stores. My sister collected pandas, and you could find those almost anywhere. I’ve known people who collect pigs or roosters – also pretty easy to find. Ladybugs – not so much. Around Valentine’s Day and Easter you see a few more around, but even then they are pretty scarce. Even so, I have amassed a pretty impressive collection, if I do say so myself. Towels, jewelry, wall art, soap dishes (that one in the picture above – I use it for a spoon rest on my stove!), toys, figurines, etc., etc. But I’m pretty sure it all started with this lovely lady right here.

These cookies are an adaptation of a cookie we started making when I was pretty young. My mom had saved a pull-out section of a Good Housekeeping magazine from the 1980s. It was a special Christmas cookie section for “Christmas Toy Cookies”. One of the recipes was for a ladybug cookie. What that has to do with Christmas or toys, I don’t really know. But I do know I loved making and eating those cookies. The original recipe was for a vanilla cookie with maraschino cherry, or red hots, spots. I decided to go more true-to-life, and make a red body with chocolate chip spots. And if I was going to add color, I figured I might as well add flavor!

The recipe as I have written it adds strawberry flavoring, which I’m sure many of you will enjoy. I, on the other hand, do not like strawberries. I know, I know. I told you I was a picky eater. I did have a bottle of pomegranate flavoring in my cabinet, begging to be used, though, and this seemed like the perfect opportunity. You can use either of those flavors, or go with cherry or raspberry. Ooohh, or cinnamon….that would be fantastic, too. You could even leave the flavoring, and the color, out if you wanted to. This is a soft, slightly cakey cookie full of flavor. And they are pretty darn cute, too. 🙂


Print Recipe
Chocolate Covered Strawberry Ladybug Cookies
Servings
cookies
Ingredients
Servings
cookies
Ingredients
Instructions
  1. Cream butter and sugar until light and fluffy. Mix in eggs.
  2. Add salt, baking soda, and flour; mix well.
  3. Remove 1/4 cup of the dough, and stir the melted chocolate into that portion.
  4. Add the extract and food color to the plain dough. I used enough food color to make a bright red, but adjust to your tastes.
  5. Divide the red dough into 36 pieces, each approximately 1 to 1 1/2 tablespoons. Shape each piece into an oval and place onto ungreased cookie sheets.
  6. Divide the chocolate dough into 36 pieces, about 1/2 teaspoon each, and push into one end of each oval.
  7. Use the back of a butter knife to make a deep line down the center of each cookie, to define the "wings".
  8. Push mini chocolate chips into each wing. I use 2 or 3 per side, but use as many as you'd like.
  9. Bake at 350 degrees F for 12 to 15 minutes, or until cookies are set. If you don't use the food coloring, there will be very light browning, but you cannot see this on the red cookies.
  10. Cool completely on wire racks and store in an airtight container up to a week.
Recipe Notes

Use any flavor extract, and food coloring, you like. Raspberry, cherry, pomegranate (like I did), even cinnamon would be good if you want to keep them red. Or leave out the extract (use some vanilla),  and food coloring if you prefer.

I used flavoring oil, from LorAnn, which is much more concentrated. If you use those, start with 1/4 teaspoon and slowly add from there. I used about 1/2 teaspoon of the pomegranate flavor.

For an extra hit of chocolate, dip the bottom of cooled cookies into melted dark or milk chocolate and set on waxed paper until chocolate sets.

Share this Recipe

Mocha Irish Cream Cupcakes for St. Patrick’s Day

It snowed this morning!! We have had almost no snow this year, and actually hit 80 degrees last week, and I was missing winter. But I woke up this morning to big wet snowflakes! That has absolutely nothing to do with these cupcakes, but I was so excited I just had to share. 🙂  

Anyway, on to the cupcakes! Do you guys do anything special for St. Patrick’s Day? Do you attend a parade, or bake anything special? I’ve never really celebrated it much, but a few weeks ago I was in Michaels, mostly just browsing, but with my Cherry Chocolate Chip Rolls in mind. I was supposed to be looking for something Valentine’s Day related while I was walking down the baking aisle, and then I spotted these St. Patrick’s Day sprinkles.


I decided I had to have them, but then I had to figure out what to do with them. Cupcakes sounded like a good idea, but what kind? So I started searching Pinterest for St. Patrick’s Day ideas. It seems like Irish cream is pretty popular right now. And since Irish cream has a lot of the same flavors as mocha, I decided to incorporate in into a favorite mocha cake of mine. And make them cupcakes, because cupcakes are just more fun.

I thought it might be easier (and cheaper!) to use an Irish cream coffee creamer. Since I don’t drink coffee, I had never tried the creamer before. Before I started trying to add it to my cake recipe, I tried it straight. Oh my goodness, you guys, it is SWEET. So I knew immediately I would have to reduce the sugar in the recipe. Thankfully, it turned out perfectly on my first attempt, but I sure am glad I tried the creamer first!

To top the cupcakes, I figure I might as well go all the way and make an Irish Cream buttercream. It was a good idea. The cupcakes aren’t overly sweet, so a nice big swirl of buttercream compliments them nicely. And it gives the sprinkles a pretty place to land. 🙂

If you aren’t a fan of Irish cream, or coffee in general, you can make some adjustments to this recipe pretty easily. Try any flavor of creamer that sounds good to you. And if you are using a non-mocha flavoring you can leave the instant coffee out of both the cake and frosting. Amaretto would be fantastic (I LOVE chocolate and almond together!). You can amp up the flavor by adding a little bit of almond extract. Or what about the salted caramel mocha? I might add some salted caramel into the buttercream for that one. A peppermint or peppermint mocha version would be fantastic at Christmas! For now, I’m going to stick with the Irish cream, but I definitely have other ideas brewing! 😉


Print Recipe
Mocha Irish Cream Cupcakes
Adapted from the Mocha Coffee Cake at Health.com. http://www.health.com/health/recipe/0,,50400000112136,00.html
Course Dessert
Servings
cupcakes
Ingredients
Cupcakes
Course Dessert
Servings
cupcakes
Ingredients
Cupcakes
Instructions
Cupcakes
  1. Heat oven to 350 degrees F. Line 24 cupcake cups with liners and spray lightly with non-stick spray.
  2. Whisk together flour, baking powder, salt, and cocoa powder in a bowl and set aside.
  3. Dissolve instant coffee granules in the coffee creamer and set aside.
  4. Cream butter and sugar until very well combined, about 2 minutes.
  5. Add eggs, one at a time, beating well after each.
  6. Add the flour mixture in three batches, alternating with first the sour cream and then the creamer. Mix just until combined after each addition.
  7. Divide batter evenly between the cupcake tins, filling each about 3/4 full.
  8. Bake for 20 to 22 minutes, or until a toothpick inserted in the center of a cupcake comes out clean.
  9. Cool completely before frosting. Keep in an airtight container for up to a week.
Frosting
  1. Combine creamer and instant coffee. Set aside.
  2. Beat butter, shortening, and salt with an electric mixer on medium speed until well combined.
  3. Add half of the powdered sugar and beat until creamy. Add half of the creamer mixture and mix again.
  4. Add the remaining powdered sugar, followed by the remaining creamer mixture. Beat until combined.
  5. Turn mixture on high and beat for 5 minutes until light and fluffy. Add additional powdered sugar 1/4 cup at a time or creamer 1 tablespoon at a time to adjust consistency if necessary.
  6. Pipe or spread onto cooled cupcakes.
Recipe Notes

Buttercream makes enough to generously frost 24 cupcakes. If you prefer a smaller layer of frosting, cut recipe in half.

Substitute any flavor creamer for the Irish cream, eliminating the instant coffee granules if preferred. Enhance with extracts if desired. Almond in Amaretto, peppermint in peppermint mocha, etc.

Share this Recipe

Mardi Gras Cookies, and Let’s Talk about Archaeology

Hi everyone! I’ve been kind of under the weather this week, so I decided to make a pretty simple cookie. They take almost no time to put together, they are delicious, and you can totally customize the colors to suit any occasion.

Since it’s a short and sweet recipe, I thought now would be the perfect time to talk a little about archaeology, and to show you some pictures from past projects I’ve been on. If you’re just here for the recipe, go ahead and scroll down to the bottom of the post – I won’t be offended. 🙂

For those of you who are interested in my “other” job, let’s run through a quick FAQ.

First, What is archaeology? Well, the biggest misconception is that archaeologists dig up dinosaurs. In fact, paleontologists deal with dinosaurs, while archaeologists deal with the human past. Specifically, the material remains left by humans. This includes everything from arrowheads and other stone tools to foundation remnants and broken plates and glasses.

Second, Why do archaeologists do what they do? There are a lot of ways to interpret this question, but here I am getting at the reason my job exists. Because of the Historic Preservation Act of 1966, and specifically Section 106, all federally funded or permitted projects have to undergo a historic and archaeological review to determine the impact that the project will have on any historic sites. That means if federal funds or permits are involved, archaeologists and/or historians have to survey the area to be impacted to determine if there are significant historic or archaeological sites that may be impacted. If there are, the project is either re-routed, or the site is excavated to retrieve any data possible.

So, finally, What do I actually do? The vast majority of the fieldwork that I do involves archaeological survey. In other words, I am out walking across the project area. In plowed fields, we simply look for artifacts that have been brought to the surface by the plowing. In pastures and other where the ground surface isn’t visible, we dig small holes at regular intervals, and pass the dirt through a mesh screen to look for artifacts. When we find artifacts or structure remnants like foundations, we record the site and report it’s location and any information we can gather to the state. If the state determines the site may be significant, we may have to return to do further testing on the site, and perhaps even full excavation, but this is rare. Many sites are not considered significant, that is, they won’t provide us new or important information. And those that are, or may be, or often avoided by the project by a re-route.

Ok. I’m sure I’ve bored you completely by now. 🙂  But now, its time for cookies. These really couldn’t be more simple. It’s a quick and easy dough to put together. Then you divide the dough in half, roll each half into a rectangle, and add sprinkles. Roll it up, chill it, slice it, and bake it. And like I said earlier, if you’re not celebrating Mardi Gras, or want to use the recipe for a different celebration, you can just change up the sprinkles. Think red, white, and blue for July 4th…or red and green for Christmas…or brown, yellow, and orange for the fall…or school colors for graduation. I could go on and on with all the ideas I have for this, but I’m sure you’ve got ideas too, so I’ll just give you the recipe so you can get baking!


Print Recipe
Mardi Gras Cookies
Course Dessert
Servings
cookies
Course Dessert
Servings
cookies
Instructions
  1. Cream butter and sugar with an electric mixer until light and fluffy.
  2. Add egg and vanilla, and mix well.
  3. Add salt and flour, and mix until combined.
  4. Divide dough in half. Place one half onto a lightly floured piece of waxed paper. Dust lightly with flour and cover with another piece of waxed paper. (Or chill until firm enough to roll without sticking to the rolling pin.)
  5. Roll into a 12-inch by 8-inch rectangle, about 1/8-inch thick.
  6. Using one color of sprinkles at a time, coat the dough with a long "stripe" of sprinkles, covering about a third of the rectangle. Repeat with the remaining colors, lined up next to each other.
  7. Roll the dough up tightly, starting from the long end.
  8. Wrap the dough cylinder in the waxed paper and refrigerate 1 hour, or freeze 15-20 minutes.
  9. Repeat with remaining half of dough.
  10. Remove waxed paper, and slice dough into 1/4-inch slices. Place on Silpat or parchment-lined baking sheet.
  11. Bake at 350 degress F for 15-20 minutes or until lightly browned.
  12. Remove from baking sheet to cool completely. Store in airtight container up to one week.
Recipe Notes

Change the sprinkle colors to suit the celebration. For example, red, white, and blue for July 4th. Red and green for Christmas. School colors for a graduation, etc.

Share this Recipe

Cherry Chocolate Chip Sweet Rolls

Hi everyone! I have something really exciting to share with you today! Oh – and I made you Cherry Chocolate Chip Sweet Rolls. 🙂

So I’ve been back down in Oklahoma, but this time I’ve been in Ponca City, which just happens to be the next town over from Pawhuska. Now, if you read many food blogs, or watch Food Network, you may recognize that name. That’s because it’s where Pioneer Woman lives, and where her Mercantile is located. Well, I was fortunate enough to get to go visit the Mercantile and eat dinner there! The store is really amazing, and the food was fantastic. I bought a cookbook and a few bowls, and then spent too much money at the bakery. 🙂 And dinner was worth the wait (the line was out the door when we first got there!). I had the grilled cheese, and others I went with tried the ribeye reuben, the chicken fried steak, and the fried chicken sandwich. They are all highly recommended by us!

That was exciting enough, but what made the day even better was that the lodge, the guesthouse on their ranch where Ree films her Food Network show, was open for tours that day, and I managed to get there just before they closed! It was really cool to visit both her “studio” and the Mercantile. The Pioneer Woman is one of the most successful and well-known food blogs, so for a new blogger it was a real treat. I definitely recommend stopping at the Mercantile if you ever find yourself anywhere near Pawhuska!

Anyway, let’s get back to these sweet rolls. They are somewhat inspired by Pioneer Woman, since I tried her cinnamon rolls at the bakery (too die for!!), and in the cookbook I bought she has a recipe for Raspberry Cream Cheese Sweet Rolls.  I was really craving some kind of sweet roll, and with Valentine’s day coming up, chocolate and cherry seemed to be an appropriate combination. 🙂

These start with a cherry curd, which is really simple to make. You just need frozen cherries, sugar, butter, egg yolks, and corn starch. The recipe makes about 2 cups, and you only need 1/2 cup for this recipe, so there is plenty left over. Spread it on toast, biscuits, pancakes, ice cream, pork chops….well, pretty much anything! You can also substitute any frozen berries in this recipe, and it would be just as delicious.

The filling is just the curd and chocolate chips, but there is so much room for adjustments! Prefer lemon curd? Go for it. Or want them even faster? Use a store-bought jam. Leave out the chocolate chips, or change up the flavor (white chocolate with the lemon curd would be perfect). Add nuts with the chips or in place of them. The possibilities are endless!

This recipe is scaled to make 6 rolls, but can easily be doubled to make a dozen in a 9×13-inch pan.

Oh, and did I mention these come together in about an hour, if you already have the curd made? That’s right – you are only an hour away from warm, chocolatey, sweet-tart cherry sweet rolls!


Print Recipe
Cherry Chocolate Chip Sweet Rolls
Course Breakfast
Prep Time 40 minutes
Cook Time 20 minutes
Servings
rolls
Ingredients
Course Breakfast
Prep Time 40 minutes
Cook Time 20 minutes
Servings
rolls
Ingredients
Instructions
  1. Combine 1 cup flour and the yeast in a large bowl, or the bowl of a stand mixer.
  2. Combine milk, water, sugar, oil, and salt in a microwave safe bowl. Microwave for 30 seconds at a time, stirring after each, until mixture is slightly warm, about 1 minute.
  3. Add the milk mixture to the flour and yeast along with the egg yolk. Beat with an electric mixer, or by hand, for 30 seconds or until combined. Scrape bowl, and beat at medium speed for 3 minutes.
  4. Either by hand or with a dough hook, add in the second cup of flour and mix until a soft dough forms. Knead, by hand or with the dough hook, for 3 to 5 minutes, adding up to an additional 1/4 cup of flour, until dough is smooth and elastic. It will be a very soft dough, and should be very slightly sticky. Cover and let rest for 10 minutes.
  5. Turn dough out onto a lightly floured surface and roll into a 7x12-inch rectangle. Spread cherry curd over dough, then sprinkle with chocolate chips. Beginning from the short (7-inch) side, roll up jelly-roll style. (If doubling, roll a 14x12-inch rectangle and roll from the long side.)
  6. Slice into 6 rolls and place, cut side up, into a greased 8-inch square pan. Cover and let rise until nearly doubled, about 20 minutes.
  7. Bake in a 375-degree F oven for 15 to 20 minutes or until golden brown. Cool slightly before topping with the powdered sugar glaze and serving. Store, covered, at room temperature for 2 to 3 days.
Recipe Notes

Cherry curd recipe here.

Powdered sugar glaze recipe here.

Recipe can be doubled to make 12 rolls in a 9x13-inch pan.

Substitute any curd or jam.

Substitute any flavor chocolate chips.

Add 1/4 cup chopped nuts instead of or in addition to the chocolate chips.

Flavor the powdered sugar glaze with extracts.


Share this Recipe